This guide covers two ways to set up Vaultwarden on your own server: via Coolify (one-click installation) or via Docker Compose with Caddy as a reverse proxy. After completing this guide, you will have your own password manager accessible via HTTPS that supports all official Bitwarden clients. Setup takes 10 to 20 minutes depending on the path you choose.
What is Vaultwarden?
Vaultwarden is an alternative server implementation of the Bitwarden API, written in Rust. It is not a fork of the official Bitwarden server but an independent reimplementation serving the same interface.
In practice this means: the official Bitwarden clients (browser extension, mobile app, desktop app, CLI) work unchanged with Vaultwarden. Install the Bitwarden app and enter your own server URL in the settings.
Key differences from the official Bitwarden server:
- Resources: Vaultwarden needs a single Docker container and 30 to 50 MB of RAM. The official Bitwarden server requires up to 11 containers and over 2 GB of RAM.
- Database: Vaultwarden uses SQLite (a single file). No separate database container needed.
- Premium features: TOTP, file attachments, Send, emergency access and organizations are available without restriction.
- License: Vaultwarden is licensed under the AGPL-3.0 (GNU Affero General Public License). The source code is freely viewable, usable and modifiable. Anyone running a modified version as a network service must publish the changed source code.
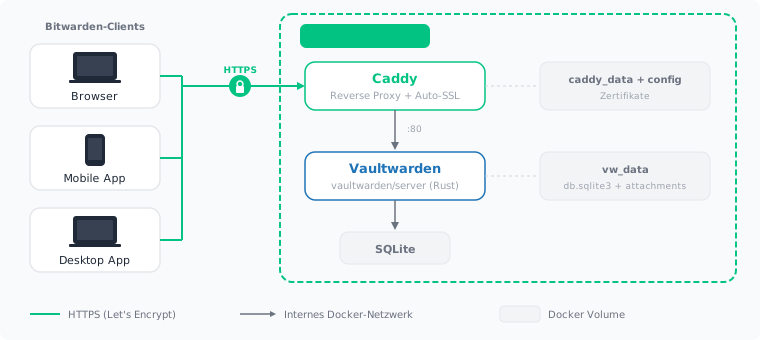
Prerequisites
- A seed on the dataforest cloud (1 CPU, 2 GB RAM is sufficient. Vaultwarden is extremely lightweight). For teams with more than 20 users, 2 CPU and 4 GB RAM is recommended.
- SSH access to the seed
- A domain (e.g. vault.your-company.com) with a DNS A record pointing to your seed's IP address. Set the A record at your domain provider: enter your seed's IP address as the target for the desired subdomain. It can take up to an hour for the record to propagate globally.
- For Path A: Coolify installed on the seed (see Coolify guide)
Path A: Installation via Coolify
Coolify offers Vaultwarden as a one-click service. If Coolify is already running on the seed, this is the fastest path.
1. Create a Vaultwarden service
Open the Coolify dashboard and navigate to your project. Click New Resource and select Service. Search for Vaultwarden in the service list and select it.
2. Configure domain
In the service settings, enter your domain (e.g. vault.your-company.com). Coolify automatically configures a Let's Encrypt certificate for HTTPS.
3. Check environment variables
Coolify sets up the basic configuration automatically. Check the following variables:
DOMAIN: Must contain your full URL (e.g.https://vault.your-company.com)SIGNUPS_ALLOWED: Leave astruefor initial setup (will be disabled after registration)
4. Start the service
Click Deploy. Coolify downloads the Vaultwarden image, starts the container and configures SSL. Your password manager will be accessible at your domain within a few minutes.
Path B: Installation via Docker Compose
This path offers full control over the configuration and is suitable when Coolify is not used.
1. Install Docker
Vaultwarden and the reverse proxy each run in their own Docker container. Docker ensures that each component runs isolated and reproducibly without modifying the seed's operating system.
Connect to your seed via SSH and install Docker:
curl -fsSL https://get.docker.com | sh
2. Create project directory
All configuration files for Vaultwarden are placed in a shared directory:
mkdir -p /opt/vaultwarden && cd /opt/vaultwarden
3. Create Caddyfile
Caddy serves as the reverse proxy. Caddy needs only a few lines of configuration and automatically obtains a Let's Encrypt certificate for HTTPS.
Create the Caddyfile:
vault.your-company.com {
    reverse_proxy vaultwarden:80
}
Replace vault.your-company.com with your domain.
4. Create Docker Compose file
The docker-compose.yml describes both containers and how they work together. Vaultwarden uses SQLite as its database, so no separate database container is needed:
services:
  caddy:
    image: caddy:2-alpine
    restart: always
    ports:
      - "80:80"
      - "443:443"
    volumes:
      - ./Caddyfile:/etc/caddy/Caddyfile:ro
      - caddy_data:/data
      - caddy_config:/config
    depends_on:
      - vaultwarden

  vaultwarden:
    image: vaultwarden/server:latest
    restart: always
    volumes:
      - vw_data:/data
    environment:
      - DOMAIN=https://vault.your-company.com
      - SIGNUPS_ALLOWED=true
      - ADMIN_TOKEN=${ADMIN_TOKEN}
      - SENDS_ALLOWED=true
      - EMERGENCY_ACCESS_ALLOWED=true
      - SMTP_HOST=${SMTP_HOST}
      - SMTP_FROM=${SMTP_FROM}
      - SMTP_PORT=587
      - SMTP_SECURITY=starttls
      - SMTP_USERNAME=${SMTP_USERNAME}
      - SMTP_PASSWORD=${SMTP_PASSWORD}

volumes:
  vw_data:
  caddy_data:
  caddy_config:
Replace vault.your-company.com with your domain.
Key details:
restart: alwaysrestarts each container automatically if it crashes or the server rebootsdepends_onsets the start order: Vaultwarden starts before Caddyvolumesstore data persistently outside containers. Without volumes, all passwords would be lost on restart
Environment variables explained:
DOMAINtells Vaultwarden the public URL. Used for email links, WebSocket connections and web vault configuration.SIGNUPS_ALLOWEDcontrols whether new users can register. Set tofalseafter initial setup.ADMIN_TOKENprotects the admin panel (see next section)- The SMTP variables are set via the
.envfile (see SMTP section)
5. Generate admin token
The admin panel allows managing users, organizations and server settings through the browser. It is protected by a token stored as an Argon2 hash. Argon2 is a modern password hashing algorithm that makes brute-force attacks difficult through high memory and computation requirements.
Generate the hash using Vaultwarden's built-in tool. This command must be run in a direct SSH session as it requires an interactive terminal:
docker run --rm -it vaultwarden/server /vaultwarden hash
The tool asks for a password and returns a complete Argon2 hash. The output looks like this:
Generate an Argon2id PHC string using the 'bitwarden' preset:

Password:
Confirm Password:

ADMIN_TOKEN='$argon2id$v=19$m=65540,t=3,p=4$dG9reW9zYWx0$Y2Z0...(long hash)'
Create a .env file in the project directory. This file contains the admin token and SMTP credentials – all sensitive values that should not be stored directly in the docker-compose.yml:
cat > .env << 'EOF'
ADMIN_TOKEN='PASTE_THE_COMPLETE_OUTPUT_HERE'

SMTP_HOST=smtp.example.com
SMTP_FROM=vault@your-company.com
SMTP_USERNAME=vault@your-company.com
SMTP_PASSWORD=SMTP_PASSWORD_HERE
EOF
Replace PASTE_THE_COMPLETE_OUTPUT_HERE with the full hash including the single quotes from the output. The $ characters in the hash are protected from shell interpretation by the single quotes. Adjust the SMTP values to match your email provider's details.
6. Start everything
docker compose up -d
The -d flag (detached) starts the containers in the background so they keep running after closing the SSH connection.
The first start takes about a minute. Docker downloads the images and Caddy obtains a Let's Encrypt certificate.
7. Verify everything is running
docker compose ps
Both containers (caddy, vaultwarden) should show status running. If a container fails to start:
docker compose logs vaultwarden
Open https://vault.your-company.com in your browser. You should see the Vaultwarden login page (the Bitwarden web vault).
Admin panel
The admin panel is accessible at https://vault.your-company.com/admin. Log in with the password used when generating the Argon2 hash (not the hash itself).
The admin panel allows configuring:
- General settings: Domain, registration, invitations
- SMTP: Email delivery for verification and password reset
- Users: Overview of all registered users, disable or delete accounts
- Organizations: Overview and management
After completing the initial setup, the admin panel can be disabled by removing the ADMIN_TOKEN variable or setting it to an empty string.
Set up users and organizations
Register first user
Open https://vault.your-company.com and click Create Account. Enter an email address, a master password and a master password hint.
The master password is never sent to the server. It is used exclusively to derive the encryption key on the device. A forgotten master password cannot be reset. Choose a long, unique password and store it safely.
Create an organization
Organizations enable sharing passwords within a team. Create an organization in the web vault under New Organization. Create collections (groups of entries) and invite team members via email (SMTP must be configured).
Roles control access:
- Owner: Full control over the organization
- Admin: Can manage collections and users
- User: Can use assigned collections
Set up browser extension and mobile app
Browser extension
- Install the Bitwarden extension from your browser's extension store (Chrome, Firefox, Safari, Edge)
- On the login screen, click the Logging in on dropdown and select Self-hosted
- Enter your server URL:
https://vault.your-company.com - Save and log in with your account
The extension auto-fills login forms and offers to save new passwords.
Mobile app (iOS / Android)
- Install Bitwarden from the App Store or Google Play Store
- On the login screen, tap the Logging in on dropdown and select Self-hosted
- Enter your server URL:
https://vault.your-company.com - Log in
For autofill on Android: Settings > Passwords and Autofill > Enable Bitwarden as autofill service.
For autofill on iOS: Settings > Passwords > AutoFill > Enable Bitwarden.
Desktop app
Bitwarden offers desktop apps for Windows, macOS and Linux. After installation, enter the server URL in settings and log in.
Configure SMTP for email delivery
SMTP is required for:
- Email verification during registration
- Password hint via email
- Organization invitations
- Two-factor authentication via email
SMTP credentials were already added to the .env file (see admin token section). To change the values later, edit the .env file:
SMTP_HOST=smtp.example.com
SMTP_FROM=vault@your-company.com
SMTP_USERNAME=vault@your-company.com
SMTP_PASSWORD=SMTP_PASSWORD_HERE
After modifying the .env file, restart the container:
docker compose up -d
Alternatively, SMTP can be configured via the admin panel under SMTP Email Settings. The admin panel also provides a test email function to verify the configuration.
Import: Migrate from an existing password manager
Vaultwarden supports importing from numerous formats. Import is done via the web interface under Tools > Import Data.
Export from your current service
Most password managers offer an export function under Settings or Tools. Export as JSON or CSV. Note: the export file contains all passwords in plain text. Delete the file after importing.
Import into Vaultwarden
- Log into the web vault (
https://vault.your-company.com) - Navigate to Tools > Import Data
- Select the export format (e.g. Bitwarden JSON, Chrome CSV, Firefox CSV, KeePass XML)
- Upload the file
- Click Import Data
Supported formats include: Bitwarden, Chrome, Firefox, KeePass, Dashlane, Keeper and many more.
Set up backups
Identify critical data
Vaultwarden stores everything in the Docker volume vw_data. The key files:
db.sqlite3: The SQLite database with all vault entries (encrypted)config.json: Server configurationattachments/: File attachmentssends/: Encrypted Send files
Database backup
Find the volume's host path:
docker volume inspect vaultwarden_vw_data --format '{{ .Mountpoint }}'
Create the backup directory:
mkdir -p /opt/backups
A single database backup:
sqlite3 $(docker volume inspect vaultwarden_vw_data --format '{{ .Mountpoint }}')/db.sqlite3 ".backup '/opt/backups/vaultwarden-db-$(date +%Y%m%d).sqlite3'"
This command uses SQLite's built-in backup function, which produces consistent backups even while the server is running. Unlike simply copying the database file, this method is safe from data corruption.
Automatic backup via script and cron job
For automatic backups, a small script is recommended that handles the backup process and verifies success. Create the file /opt/backups/backup-vaultwarden.sh:
#!/bin/bash
BACKUP_DIR="/opt/backups"
DB_PATH="$(docker volume inspect vaultwarden_vw_data --format '{{ .Mountpoint }}')/db.sqlite3"
BACKUP_FILE="${BACKUP_DIR}/vaultwarden-db-$(date +%Y%m%d).sqlite3"

# Create backup
sqlite3 "$DB_PATH" ".backup '${BACKUP_FILE}'"

# Verify the backup is valid
if [ -s "$BACKUP_FILE" ] && sqlite3 "$BACKUP_FILE" "PRAGMA integrity_check;" | grep -q "^ok$"; then
  echo "Backup successful: ${BACKUP_FILE}"
else
  echo "Backup failed or corrupt" >&2
  exit 1
fi
Make the script executable:
chmod +x /opt/backups/backup-vaultwarden.sh
A cron job is a scheduled command that the operating system runs at regular intervals. Set up the cron job:
crontab -e
Add the following line:
0 3 * * * /opt/backups/backup-vaultwarden.sh
The five values 0 3 * * * mean: minute 0, hour 3, every day, every month, every weekday. The backup runs daily at 03:00.
Optional: Automatic cleanup of old backups
Without rotation, backup files grow indefinitely. To automatically delete old backups, extend the script. Be careful: rotation without working backups leads to data loss. The following pattern deletes backups older than 30 days but always keeps at least 3 backups regardless of age:
# Append to backup-vaultwarden.sh (only runs on success):
KEEP_DAYS=30
KEEP_MIN=3

TOTAL=$(find "$BACKUP_DIR" -name "vaultwarden-db-*.sqlite3" | wc -l)
find "$BACKUP_DIR" -name "vaultwarden-db-*.sqlite3" -mtime +${KEEP_DAYS} | while read OLD; do
  if [ "$TOTAL" -gt "$KEEP_MIN" ]; then
    rm "$OLD"
    TOTAL=$((TOTAL - 1))
  fi
done
Rotation only runs within the success block: if today's backup fails, no old backups are deleted. The minimum count (KEEP_MIN=3) additionally protects against all backups disappearing during extended outages (e.g. server offline for weeks).
Important: Regularly verify that backups are actually being created (e.g. via ls -la /opt/backups/). A cron job can fail silently, for example if the volume path changes after a Docker update. Rotation without working backup creation deletes your last good copies.
Server backup via dataforest cloud
The dataforest cloud offers automatic daily offsite backups as an add-on option. This backs up all data on your seed and allows restoring at any time. Backups are not active by default and must be enabled in the cloud console.
Security hardening
Disable registration
After initial setup, public registration should be disabled:
In the docker-compose.yml:
- SIGNUPS_ALLOWED=false
Then:
docker compose up -d
New users can then only be added via organization invitations (SMTP must be configured).
Enforce two-factor authentication
In the admin panel under General Settings, you can require 2FA for all users. At minimum, an authenticator app (TOTP) is recommended. For maximum security: FIDO2 WebAuthn (e.g. YubiKey) as primary method, TOTP as backup.
Rotate admin token
Regularly generate a new admin token:
docker run --rm -it vaultwarden/server /vaultwarden hash
Update the hash in the .env file and restart the container:
docker compose up -d
Disable admin panel
When the admin panel is no longer needed, it can be fully disabled. Remove the ADMIN_TOKEN variable from the docker-compose.yml and .env file:
# Remove or comment out ADMIN_TOKEN
docker compose up -d
The admin panel is then inaccessible. It can be reactivated at any time by setting the token again.
Restrict access to VPN connections
An additional security measure: restrict access to the web interface and API to devices connected to the server via VPN. Without a VPN connection, Vaultwarden is not reachable from the internet.
This requires a WireGuard VPN on the same or a separate server. WireGuard assigns connected devices IP addresses from a private network (e.g. 10.0.0.0/24).
Modify the Caddyfile to only allow connections from the VPN network:
vault.your-company.com {
    @vpn remote_ip 10.0.0.0/24
    handle @vpn {
        reverse_proxy vaultwarden:80
    }
    respond "Access denied" 403
}
@vpn remote_ip 10.0.0.0/24 defines a matcher that only accepts requests from IP addresses in the WireGuard network. All other requests receive a 403 Forbidden response. Replace 10.0.0.0/24 with the actual IP range from your WireGuard configuration.
After the change, reload Caddy:
docker compose exec caddy caddy reload --config /etc/caddy/Caddyfile
This command reloads the configuration without restarting, so there is no downtime.
Note: all devices (browser, mobile, desktop) must have an active VPN connection to sync passwords. Bitwarden clients store passwords in a local cache. Offline access remains available without VPN, and new entries sync once the VPN connection is restored.
If you do not want to restrict access completely, you can alternatively secure only the admin panel via VPN while keeping the API accessible to everyone:
vault.your-company.com {
    @admin {
        path /admin*
        not remote_ip 10.0.0.0/24
    }
    respond @admin "Access denied" 403

    reverse_proxy vaultwarden:80
}
Update Vaultwarden
Regular updates are important as Vaultwarden patches security vulnerabilities and adds support for new Bitwarden API features. Check the release notes on GitHub before updating – especially with major versions, configuration options may change.
Before updating: Create a snapshot
Before each update, create a snapshot of your seed via the dataforest cloud console. A snapshot captures the entire server state at that point in time. If something goes wrong after the update, you can restore the seed to the snapshot and immediately return to the previous state.
Perform the update
cd /opt/vaultwarden
docker compose pull
docker compose up -d
docker compose pull downloads the latest Vaultwarden image. docker compose up -d restarts the container with the new image. Data in the volume is preserved.
Verify after update
docker compose ps
docker compose logs vaultwarden | tail -20
Open your vault URL in the browser and log in. Check the admin panel under Diagnostics to confirm the displayed version matches the expected one.
If problems occur after the update: restore the seed to the previously created snapshot via the cloud console and review the release notes for breaking changes.
Troubleshooting
Vaultwarden is not reachable:
Check if all containers are running (docker compose ps). If the Caddy container fails to start, port 80 or 443 may already be in use by another service (ss -tlnp | grep -E ':80|:443').
No HTTPS certificate:
Caddy requires a domain with a DNS record pointing to the seed's IP address. Check with dig +short vault.your-company.com whether the A record is set correctly. Caddy shows certificate errors in its logs: docker compose logs caddy.
Login does not work:
Make sure the DOMAIN variable in the docker-compose.yml matches exactly the URL in the browser (including https://).
Emails are not sent: Check the SMTP configuration in the admin panel. Common errors: wrong port (587 for STARTTLS, 465 for SSL/TLS), missing authentication or blocked ports. Test with the admin panel's test email function.
Sync does not work between devices: Vaultwarden uses WebSocket connections for real-time sync (enabled by default). Make sure your reverse proxy (Caddy) forwards WebSocket connections – with the configuration described in this guide, this works automatically. If you use a different reverse proxy, it must pass through WebSocket upgrade requests to Vaultwarden.
Summary
After completing this guide, your own password manager is running on a dedicated server, accessible via HTTPS and secured with automatic backups. All official Bitwarden clients (browser, mobile, desktop) are connected and sync passwords encrypted through your own server.
If you are using Vaultwarden as your entry point to the dataforest cloud: the seed is a full Linux server that can also run other services in parallel. Find an overview of further possibilities in our solutions and guides.