This guide shows how to persistently configure an additional IPv4 address you have added to your seed through the dataforest cloud UI. You take three values from the network tab (the IP address, the CIDR prefix length and the gateway), store them in the network configuration of your distribution and activate the change. The configuration then survives reboots and is done in a few minutes on Debian, Ubuntu, AlmaLinux and RockyLinux.
Why manual configuration is required
Only an IPv4 address you book directly when creating the seed is configured automatically inside the operating system. Any IPv4 address you add later is routed to your seed immediately, but the OS does not know about it. This also applies to the very first IPv4 if you originally created the seed without IPv4 (IPv6 only). So the kernel will not accept incoming packets for a later-added address until you add it to the network configuration. After configuration, your seed accepts connections on the new address and programs can use it as an explicit source address. The default source address for outgoing connections stays your primary IP. A one-time configuration also makes the address persistent across reboots.
Prerequisites
- A seed on the dataforest cloud with at least one additional IPv4 address in the network tab
- SSH root access to the seed
A second IPv4 address can be added at any time, as long as your limit is not reached: open the Network tab in the seed detail and click Add IPv4 under Public Network.
Note the values from the network tab
The table under Public Network shows four network values for each address: IP address, CIDR, gateway and subnet mask.
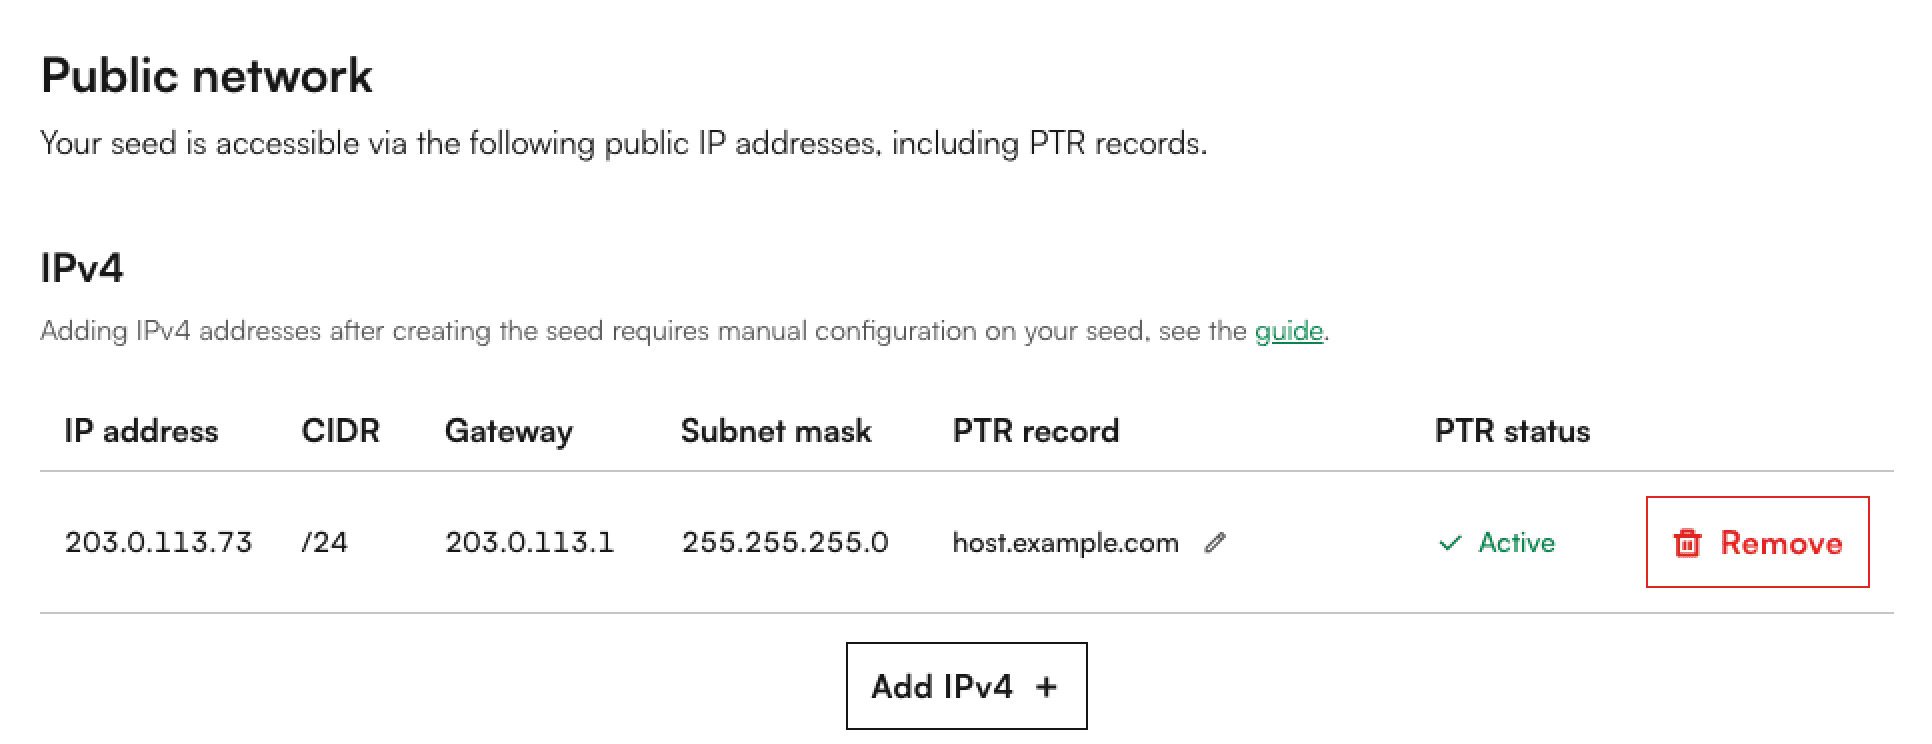
For the steps below you need three of them:
| Value | Meaning |
|---|---|
| IP address | The new address that should become active on your seed |
| CIDR | The prefix length of the subnet, exactly as shown in the tab |
| Gateway | The gateway through which your addresses are reached |
Enter the CIDR exactly as shown in the tab. The subnet mask follows from it and does not need to be entered separately. Always include the gateway: this makes your address work on its own and keeps it reachable even if you later remove your original IPv4.
Note: DNS records (A and PTR) are created automatically for each IPv4 address using your seed's hostname. The steps in this guide only cover the configuration on the seed itself.
Persist the IP address in the operating system
First, connect to your seed via SSH:
ssh root@<SEED-IP-OR-HOSTNAME>
The examples below use eth0, the default name of the network interface on dataforest seeds. Quickly check what your interface is actually called:
ip -br link | awk '$1!="lo"{print $1; exit}'
The command prints the name of your network interface, almost always eth0. It also works when the seed does not have any IPv4 yet. If a different name appears, replace eth0 in the following commands and files with that name.
Then pick the section that matches your distribution.
Debian with ifupdown
Debian manages the network with ifupdown. So that your additional address survives every reboot, even when cloud-init rewrites the network (for example after you change an IPv4 through the panel), place a small script under /etc/network/if-up.d/. ifupdown runs it every time the interface comes up, including when cloud-init reapplies eth0.
nano /etc/network/if-up.d/additional-ipv4
Insert the following content and replace the placeholders with the values from the network tab:
#!/bin/sh
[ "$IFACE" = "eth0" ] || exit 0
ip addr replace <IP-ADDRESS>/<CIDR> dev eth0
ip route replace default via <GATEWAY> dev eth0 metric 1000
For each further address, add another ip addr replace line. Make the script executable and run it once directly so the address becomes active immediately:
chmod +x /etc/network/if-up.d/additional-ipv4
IFACE=eth0 /etc/network/if-up.d/additional-ipv4
From now on the script re-applies the address and route every time eth0 comes up. This keeps the configuration in place even when cloud-init re-renders the network after a panel change. The high-metric default route only serves as a backup while your primary IP exists, and takes over as soon as you remove it.
Ubuntu with netplan
On Ubuntu the network is configured through netplan. The configuration for the primary address is located in /etc/netplan/50-cloud-init.yaml. Instead of editing that file, create a separate file with a higher priority:
nano /etc/netplan/60-additional-ipv4.yaml
Insert the following content and replace the placeholders with your values:
network:
  version: 2
  ethernets:
    eth0:
      addresses:
        - <IP-ADDRESS>/<CIDR>
      routes:
        - to: default
          via: <GATEWAY>
netplan expects the file to be readable by root only, otherwise it prints a warning. Set the permission and apply the configuration:
chmod 600 /etc/netplan/60-additional-ipv4.yaml
netplan apply
netplan merges your file with the main configuration on every render, including after a cloud-init rewrite, so your address is preserved. The additional default route serves as a safeguard: while your primary IP exists the seed uses its route; if you later remove the primary IP, this route keeps the seed reachable.
AlmaLinux and RockyLinux with NetworkManager
On AlmaLinux and RockyLinux the network is managed by NetworkManager. Here cloud-init manages the same connection that holds your primary IP and rewrites it after a panel change, so an address entered directly into the connection would be lost. It stays stable through a NetworkManager dispatcher script that runs every time the interface comes up, including after a cloud-init rewrite.
nano /etc/NetworkManager/dispatcher.d/50-additional-ipv4
Insert the following content and replace the placeholders:
#!/bin/sh
[ "$1" = "eth0" ] || exit 0
[ "$2" = "up" ] || exit 0
ip addr replace <IP-ADDRESS>/<CIDR> dev eth0
ip route replace default via <GATEWAY> dev eth0 metric 1000
For each further address, add another ip addr replace line. Set the permissions (NetworkManager ignores scripts that are writable by others or not owned by root) and run it once directly so the address becomes active immediately:
chmod 755 /etc/NetworkManager/dispatcher.d/50-additional-ipv4
chown root:root /etc/NetworkManager/dispatcher.d/50-additional-ipv4
/etc/NetworkManager/dispatcher.d/50-additional-ipv4 eth0 up
From now on the script re-applies the address and route every time eth0 comes up, so it survives cloud-init rewrites after panel changes as well.
Verify that the address is active
First check on the seed that the new address is on the interface:
ip -4 addr show eth0
The new IP address should be listed in addition to your primary IP.
Then test from your own computer whether the seed is reachable on the new address:
ping <IP-ADDRESS>
ssh root@<IP-ADDRESS>
If the server answers both ways, it is listening on the new address. If the first attempt fails right after applying, wait a few seconds and try again: the upstream network needs a moment to learn the new address. Because the additional address sits on the same network interface, your existing firewall rules automatically apply to it as well.
You're done
The additional IPv4 address is now permanently bound to your seed and survives reboots. Further addresses follow the same pattern: add them in the cloud UI, add a line to the same file, apply. PTR and A records are kept in sync automatically in the background.