What exactly is Odysseus?
Odysseus is an open-source, fully self-hosted AI workspace developed by YouTuber PewDiePie. It is designed as a private, 100% controllable alternative to commercial platforms like ChatGPT or Claude.
The idea behind it: instead of using a separate external tool for every task and leaving personal data scattered everywhere, Odysseus bundles chat, agents, deep research, and email plus calendar into a single interface on your own server. Your data stays in one place that you control, and you stop hopping between a dozen different services.
Why Odysseus in particular? The project launched on 2026-05-31 and gathered over 67,000 GitHub stars in less than two weeks. Unlike pure chat interfaces, it combines an agent, deep research, email integration, and its own model management in one tool. One heads-up first: in the wake of the hype, fake repositories are already circulating (for example pewdiepie-odysseus/odysseus). Only the repo linked above (pewdiepie-archdaemon/odysseus) is the real project.
Before you start: a word of warning
As promising as the workspace is - before you put it to serious use, you should soberly put a few things into perspective. This matters enough to us that we're placing it ahead of the actual guide:
- Odysseus is only half the picture. The interface plus the agent framework brings no "intelligence" of its own - that always comes from an LLM that you provide yourself. There are two ways to do this: either you run a model locally on your server (conveniently via the built-in Cookbook, more on that later) or you store the API key of an external provider such as OpenAI or Anthropic. Without at least one of these two options, the workspace is missing its most important piece - so to use it the way PewDiePie shows in his video, you also need an LLM.
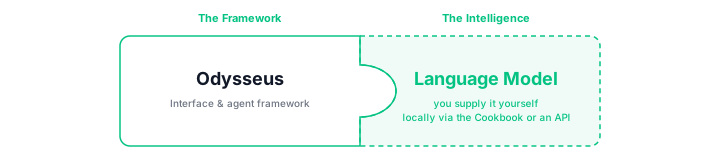
Diagram: Odysseus and an LLM as two puzzle pieces - Odysseus provides the interface and agent framework, the missing piece is an LLM that you supply yourself (locally via the Cookbook or through an external API). Only both pieces together make a ready-to-use workspace.
Important note on data sovereignty: These two paths differ fundamentally when it comes to privacy. If you store the API key of an external provider, your chat content - and everything an agent processes, such as emails and documents - leaves your server and is sent to the provider of the AI model (e.g. OpenAI or Anthropic). The "privacy-friendly" claim from the introduction only holds without reservation for the local model: in that case all content stays on your own server, with no text going to third parties. - Very young project - not a production system. Officially, Odysseus carries version 1.0 (the README says "vers. 1.0",
src/constants.pyreportsAPP_VERSION = "1.0.0"), but there are no actual releases or tags yet. Behind it is a project that only launched on 2026-05-31, with a high rate of change - over 1,100 open issues as of today - and plenty of community criticism of its code quality (the keyword being "vibe-coded", see the HN thread about the launch). For private experiments and internal tools it's certainly interesting - but for business-critical production systems we advise against using it. - Autonomous agents are powerful - and risky. The AI can execute real commands on your server, browse the web, and modify files. A strong admin password is therefore a must. For especially sensitive setups you should additionally restrict access to a private VPN (see the WireGuard VPN Guide).
- Beware of prompt injection. Untrusted content that the agent processes - incoming emails, web pages, calendar entries - can contain hidden instructions that the agent treats as genuine commands. This is exactly the combination this guide promotes (email integration + web browsing + agent), and the official THREAT_MODEL.md names it as a core risk. Making it worse: the shell and filesystem tools run without a sandbox - so a successful injection in an admin session can trigger real shell commands. So far Odysseus only hardens against this at the prompt level. Use automatic actions only with an approval step, and don't connect a mailbox containing sensitive data to the agent.
What does Odysseus offer in detail?
So you know what you're getting into, here's a look at the most important out-of-the-box features:
- Autonomous AI agents: A powerful framework that can execute code directly on the server, browse the web, and manipulate files.
- Improves with use: The agent has a persistent memory and builds up reusable skills that get better over time - so it understands you and your tasks bit by bit. (It does not automatically rewrite its own instructions when a task fails.)
- Local email management: A local email client securely scans mailboxes in the background, categorizes messages, and flags urgent ones.
- Auto-reply: For standard questions, the AI researches on its own and presents you with a ready-made draft reply in the dashboard for approval.
- Deep research: Multi-stage, in-depth web searches for complex topics - including a clear visualization and a chat for targeted follow-up questions.
- Interactive document editor: Renders documents and code in real time. You can step in manually or have the formatting adjusted via AI prompt. (PDF rendering is not a standard feature but an optional extra: it requires the additional dependency PyMuPDF under the AGPL license and must be enabled explicitly at Docker build time with
--build-arg INSTALL_OPTIONAL=true.) - The "Cookbook": Greatly simplifies setting up local LLMs. It checks CPU, RAM, and VRAM and derives a compatibility score directly from that.
- One-click models: Based on your hardware score, you download the matching models. The API orchestration starts fully automatically.
Requirements for the installation
Tested with: Odysseus 1.0.0 (main branch, no releases/tags available) on Debian 13, June 2026. You should bring at least the following setup:
| Component | Minimum requirement (API-only use without local LLMs) |
|---|---|
| Operating system | Debian 12/13 or Ubuntu 22.04 / 24.04 LTS (strongly recommended) |
| Processor (CPU) | 2 to 4 vCPUs |
| Memory | 4 GB RAM |
| Disk | 40 GB SSD storage |
| Software | Docker environment including Compose v2, Git |
| Network | Configured SSH access (preferably via key authentication) |
| Domain (optional) | Only needed if you want to run the workspace under your own domain with HTTPS (steps 3 + 5). Not required for direct access via IP. |
Installation: step by step
1. Prepare the server
First, log in to your server:
ssh root@<your-server-ip>
Bring the system up to date and install the required packages if you haven't already:
apt update && apt upgrade -y
apt install git docker.io docker-compose -y
2. Clone the repository
Download the current code from the official GitHub repository. It's recommended to place everything in the /opt directory. We deliberately clone the main branch: the repo's default branch is dev, which the README flags as potentially unstable - main is the curated, more stable branch.
cd /opt
git clone -b main https://github.com/pewdiepie-archdaemon/odysseus.git
cd odysseus
Tip - reproducible state: Since there are no releases or tags,
mainkeeps evolving. For a reproducible state you can pin a specific commit after cloning (git checkout <commit-hash>); the current hash is shown bygit log -1 --format=%H. This guide was tested against themainstate from early June 2026.
3. (Optional) Point your domain at the server
Steps 3 and 5 are optional. They enable access via your own domain with HTTPS encryption. If you just want to use the workspace internally or for testing via IP, skip both steps - you'll then reach it later at
http://<your-server-ip>:7000.
For your workspace to be reachable via your own domain instead of an IP address (and to get an SSL certificate), your domain has to point at the server. If you don't have a suitable domain yet, you can get one at Avoro - our own domain offering. Then create an A record at your domain provider:
| Type | Name | Value |
|---|---|---|
A | ai (or @ for the root domain) | Your server IP |
Then check that the mapping works - the command should return your server IP:
dig +short ai.example.com
Note: It can take a few minutes (rarely up to an hour) until a new DNS record is available worldwide. Wait until
digshows the correct IP before moving on.
4. Adjust the configuration
Odysseus also runs without a .env file, using default values - every variable in the Compose file has a default. We still create the file (it's explicitly recommended in the README) to configure access and HTTPS cleanly. We copy the template first:
cp .env.example .env
Most keys in the template are commented out (only LLM_HOST=localhost and SEARXNG_INSTANCE=... are active, and the Compose file overrides the latter anyway). By default the web UI binds to 127.0.0.1 on port 7000 - so out of the box it is only reachable from the server itself, not from outside. We set the relevant values directly via command, so you don't have to hunt for and replace anything by hand in an editor.
About the admin login: You don't need to set a password up front. Odysseus creates the admin account on first boot and prints a temporary password to the logs - how to read it out and change it right away is covered in step 8.
Now configure access depending on the path you chose:
# Make the web UI reachable from outside:
sed -i "s|^# APP_BIND=.*|APP_BIND=0.0.0.0|" .env
Quickly verify that the values were applied:
grep -E "^(APP_BIND|SECURE_COOKIES)" .env
5. (Optional) Set up a reverse proxy with HTTPS
Skip this step if you want to access the workspace without your own domain via
http://<your-server-ip>:7000. It belongs together with step 3.
Instead of leaving the workspace exposed to the internet on a bare high port, we put Caddy in front of it. Caddy is a lightweight web server that automatically obtains a valid SSL certificate from Let's Encrypt and renews it on its own - so you never have to deal with certificates again.
We add Caddy as an additional service without touching the bundled Compose file. Docker Compose automatically reads an optional file named docker-compose.override.yml. Create it:
cat > /opt/odysseus/docker-compose.override.yml <<'EOF'
services:
  caddy:
    image: caddy:2-alpine
    restart: always
    ports:
      - "80:80"
      - "443:443"
    volumes:
      - ./Caddyfile:/etc/caddy/Caddyfile:ro
      - caddy_data:/data
      - caddy_config:/config

volumes:
  caddy_data:
  caddy_config:
EOF
Now for the actual Caddy configuration. It's pleasantly short - one line for your domain, one for forwarding to the Odysseus container. We set the DOMAIN variable once more to be safe (in case you logged in again between steps) - replace ai.example.com with your domain again:
DOMAIN=ai.example.com
cat > /opt/odysseus/Caddyfile <<EOF
$DOMAIN {
    reverse_proxy odysseus:7000
}
EOF
That way your real domain ends up in the file automatically. Caddy forwards all traffic to the odysseus service on its container-internal port 7000; both containers share the same Docker network as soon as they run via the same Compose file. (If the main service is named differently in your version, docker compose config --services shows the correct names.)
6. Spin up the containers
Now we start everything at once. If you did step 5, Docker Compose automatically pulls in the Caddy override file. Odysseus is built from source in the process - the --build flag makes that happen, and it can take a few minutes on the first run depending on your server:
docker compose up -d --build
If you set up Caddy (step 5), it now requests your SSL certificate in the background. You can follow the progress with:
docker compose logs -f caddy
As soon as Caddy reports certificate obtained successfully, your domain is reachable via HTTPS. Press Ctrl+C to leave the log view.
7. Check that everything is running
Before you switch to the browser, a quick health check. List the status of all containers:
docker compose ps
You'll see several containers here: alongside odysseus itself, Compose also starts chromadb (vector store for the agent's memory), searxng (metasearch for web research), and ntfy (notifications). All three bind only to 127.0.0.1, so you don't need to open any additional port in the firewall - the firewall details from the previous steps remain correct.
All services should be listed as running (or healthy). If you see restarting or exited instead, something is wrong - take a look at the logs of the affected service:
docker compose logs odysseus
8. Open the web interface
Now open your workspace in the browser - depending on which path you chose:
- Direct access (without steps 3 + 5):
http://<your-server-ip>:7000 - With your own domain (steps 3 + 5):
https://ai.example.com(your domain)
First login: On first boot Odysseus automatically creates the
adminaccount and writes a temporary password to the logs. Read it out with:docker compose logs odysseus | grep -i passwordSign in with it and change the password immediately in Settings. While you're there, also enable the two-factor authentication (TOTP) that Odysseus ships with - especially with a domain setup, this is the single most effective step to harden your admin account.
Note on direct access: Over
http://…:7000the connection is unencrypted - credentials travel in plain text. Use this path for internal or testing purposes only; for permanent operation, set up a domain and HTTPS (steps 3 + 5).
Adding models via the Cookbook
The workspace is now installed, but - as mentioned at the start - it still needs some "intelligence" to be able to function. If you want to run a local model, we use the built-in Cookbook for that. (Alternatively, simply store the API key of an external provider in the settings.)
- Sign in to Odysseus and open the Cookbook in the menu.
- Start the hardware scan. The system now checks your resources.
- Pick a suitable open-source model from the suggested list - when in doubt, the one with the best compatibility score (the catalog is currently heavily Qwen3-focused, e.g. a small
qwen3-4b). - Click Download & Integrate. Nothing more is needed - Odysseus sets up the inference endpoint for you in the background.
Once the download is complete, you can connect emails, work with agents, or use the deep research feature.
Secure the server: the dataforest cloud Firewall
As soon as your workspace is reachable from the outside, only the bare minimum should be open - and that matters especially here, because the AI can execute real commands on the server. Keep the project's design assumption in mind: according to its threat model, Odysseus is meant for trusted users on a private network, not for public internet exposure. So you open port 7000 (direct access) exclusively for your own IP - the workspace should only be publicly reachable via the encrypted HTTPS path (Caddy on ports 80/443), ideally additionally shielded behind a VPN.
If your server runs as a Seed in the dataforest cloud, the easiest way to lock it down is our Cloud Firewall. It operates at the network level, in front of the Seed: you configure it entirely in the dashboard - no SSH login and no setting up a package like ufw by hand. By default it blocks all traffic that is not explicitly allowed by a rule.
- In the dataforest dashboard, open Firewalls and click Create Firewall.
- Every new firewall comes with sensible default rules - inbound, SSH (port 22) and Ping are already allowed. Under Inbound, add the rule that matches your access path:
Access path Protocol Port Source Direct access via IP TCP 7000Your IP only With Caddy/HTTPS (step 5) TCP 80and443All IPv4/All IPv6 - Switch to the Applied Resources tab and apply the firewall to your Seed.
- Save. Once the status switches to Applied, the rules take effect.
Tip: Allow SSH (
22) only for your own IP as well, instead ofAll IPv4. That keeps the server reachable for you, but not for half the internet. The workspace port7000should never be opened toAll IPv4anyway (see above).
Setting up backups
Precisely because the project is so young and you should back up before every update, an automated backup pays off from the start.
Identify the critical data
Odysseus spreads its data across two places:
- Bind mount
/opt/odysseus/data: This holds the bulk of it - configuration, the agent's memory, sessions, and installed skills. Directly visible in the filesystem. - Three named volumes:
searxng-data(search settings),chromadb-data(the memory's vector database), andntfy-cache(notifications). These live in Docker's management layer and are not captured by a simpletarover the project directory - they have to be backed up separately.
Daily backup
The following script backs up both - the data directory and the three named volumes - into a single archive per day. Create /opt/odysseus/backup.sh:
#!/bin/bash
set -euo pipefail

BACKUP_DIR="/opt/backups/odysseus"
STAMP="$(date +%Y%m%d)"
BACKUP_FILE="${BACKUP_DIR}/odysseus-${STAMP}.tar.gz"
STAGING="$(mktemp -d)"

mkdir -p "$BACKUP_DIR"

# 1) Bind-mount data (configuration, memory, sessions, skills)
cp -a /opt/odysseus/data "${STAGING}/data"

# 2) Copy the named volumes into the staging directory via a helper container.
#    docker volume ls finds them regardless of the project prefix (e.g. odysseus_chromadb-data).
for VOL in $(docker volume ls -q | grep -E '(^|_)(searxng-data|chromadb-data|ntfy-cache)$'); do
  mkdir -p "${STAGING}/volumes/${VOL}"
  docker run --rm -v "${VOL}:/src:ro" -v "${STAGING}/volumes/${VOL}:/dst" \
    alpine sh -c 'cp -a /src/. /dst/'
done

# 3) Pack everything into one archive
tar -czf "$BACKUP_FILE" -C "$STAGING" .
rm -rf "$STAGING"

if [ -s "$BACKUP_FILE" ]; then
  echo "Backup successful: ${BACKUP_FILE}"
else
  echo "Backup failed" >&2
  exit 1
fi

# Delete backups older than 30 days, keep at least 3
TOTAL=$(find "$BACKUP_DIR" -name "odysseus-*.tar.gz" | wc -l)
find "$BACKUP_DIR" -name "odysseus-*.tar.gz" -mtime +30 | while read OLD; do
  if [ "$TOTAL" -gt 3 ]; then
    rm "$OLD"
    TOTAL=$((TOTAL - 1))
  fi
done
chmod +x /opt/odysseus/backup.sh
Tip for a consistent backup: The vector database (
chromadb) is written to while the stack is running. For a guaranteed-consistent state you can briefly stop the stack before the backup (docker compose stop) and start it again afterwards (docker compose start) - for a private setup, the hot backup above is usually sufficient.
Set up a cron job:
crontab -e
Add the following line:
0 3 * * * /opt/odysseus/backup.sh
The backup runs daily at 03:00. 0 3 * * * means: minute 0, hour 3, every day, every month, every weekday.
Server backup via dataforest cloud
The dataforest cloud offers automatic daily offsite backups as an add-on option. With it you can back up the entire Seed and restore it at any time - including the data directory and the Docker volumes. Backups are not active by default and have to be enabled in the cloud console.
Applying updates
Since the project is very young, new versions appear frequently. Create a backup before every update (see the backup script above) and then pull the current state:
cd /opt/odysseus
git pull
docker compose up -d --build
git pull fetches the new source code along with the Compose file and scripts; up -d --build rebuilds the Odysseus image and restarts the containers in the new version. (A docker compose pull isn't enough here, because Odysseus is built locally rather than pulled as a prebuilt image.) Your data in the volumes is preserved.
Troubleshooting
Caddy doesn't get an SSL certificate (HTTPS setup only):
Almost always a DNS or port problem. Check with dig +short ai.example.com whether the A record points to your server IP, and make sure ports 80 and 443 are reachable from the outside (allowed in your firewall or at your cloud provider). docker compose logs caddy gives you the details.
"502 Bad Gateway" (HTTPS setup only):
Caddy is running but can't find the Odysseus container. Check with docker compose ps whether the service is running, and with docker compose config --services whether it is really named odysseus - otherwise adjust the name in the Caddyfile and run docker compose restart caddy.
Workspace unreachable via IP (direct access):
Check with docker compose ps whether the container is running, whether APP_BIND=0.0.0.0 is set in your .env (with the default 127.0.0.1 the UI is only reachable from the server itself - see step 4), and whether port 7000 is allowed in your firewall (e.g. at your cloud provider). Type the address as http://... (not https://) as long as you haven't set up a domain.
The AI doesn't respond:
Usually the LLM is missing. Make sure you've either downloaded a model in the Cookbook or stored a valid API key in the settings. With local models, check the load with docker stats - if RAM fills up, choose a smaller model.
A container won't start (restarting/exited):
The cause is in the logs: docker compose logs <service-name>. Often an occupied port 80/443 is to blame - ss -tlnp | grep -E ':80|:443' finds the blocking process.
More tips for operation
- Connect mail accounts: Enter your IMAP/SMTP details in the settings - be sure to use app passwords instead of your regular login credentials. Note: Odysseus currently only supports IMAP/SMTP with password authentication, no OAuth. Outlook and Microsoft 365 therefore don't work at the moment. An app password also requires two-factor authentication to be enabled at the provider (Gmail, for example).
- Be realistic about local vs. API: The 4 GB of RAM in the prerequisites table are for API-only use. Local inference needs considerably more - even a quantized 8B model takes around 5 to 6 GB plus context - and runs noticeably slowly on CPU-only Seeds. For small Seeds, the API route is therefore usually the more realistic choice; the README itself recommends: "small hosts can connect to API or remote model servers instead". If you do want to test locally, start in the 4B class (e.g.
qwen3-4b) and go by the Cookbook's compatibility score. Only once RAM and VRAM aren't maxing out should you work your way up to larger models. - Keep an eye on costs: External APIs bill per token, local models cost electricity and hardware. Watch the consumption of autonomous agents.
- Report bugs: If something doesn't work, check the official GitHub issues - often there's already a workaround there.