Our images set up access, network and hostname automatically on first boot. From an ISO you install it yourself instead. You are free to pick the distribution and the partitioning, but you do not get that preparation. The catalog under Manage in the seed detail view shows which ISOs are available.
This guide walks Fedora Server all the way through. A Windows ISO follows a different path, described in the guide Install Windows Server yourself from an ISO.
The seed may well hold a running system. The installation overwrites it. Back up anything you want to keep first.
An ISO is a foreign system. What comes from an ISO is not prepared for our platform: it can behave differently than our images, and individual steps may look different on your screen than they do here. For questions about the system itself, the vendor's own documentation is the place to look.
What changes on the seed permanently
The moment you mount an ISO for the first time, the seed switches to restricted mode. From then on the cloud no longer knows what is on the disk, so it turns off the features that require a known system:
| Feature | ISO mounted | After ejecting |
|---|---|---|
| Reset root password | unavailable | permanently unavailable |
| Reinstall, upgrade | unavailable | available again |
| Rescue mode | available | available |
| Console, restart, backups, snapshots, firewalls | available | available |
So rescue mode stays available, but it takes precedence at boot: while it is active, the Seed starts the rescue system rather than the mounted ISO.
Restricted mode stays in place even once you eject the ISO. The only way out is Empty seed and reinstall with one of our images. Above the tabs in the seed detail view, two markers show the state: ISO active while a medium is mounted, and Restricted mode afterwards.
On top of that, everything cloud-init does for you with our images is now yours to do:
- No access. Your SSH key from the panel does not reach the system. Create a user with a password in the installer, otherwise the console is your only way in. A lost password is not something the cloud can reset.
- No network. There is no DHCP on our network. Without a static configuration the seed stays offline, starting in the installer.
Note down your network details
Collect the values before you start, because with Fedora you need them in the installer already. Open the Network tab in the seed detail view and click the address row under Public network. The values expand below it:
| Value | Meaning |
|---|---|
| IP address | The public address of your seed |
| CIDR | The prefix length of the subnet, exactly as shown in the tab |
| Subnet mask | The same value in dotted notation, for dialogs without a prefix length |
| Gateway | The gateway your seed is reached through |
| DNS server 1 and 2 | The two servers for name resolution |
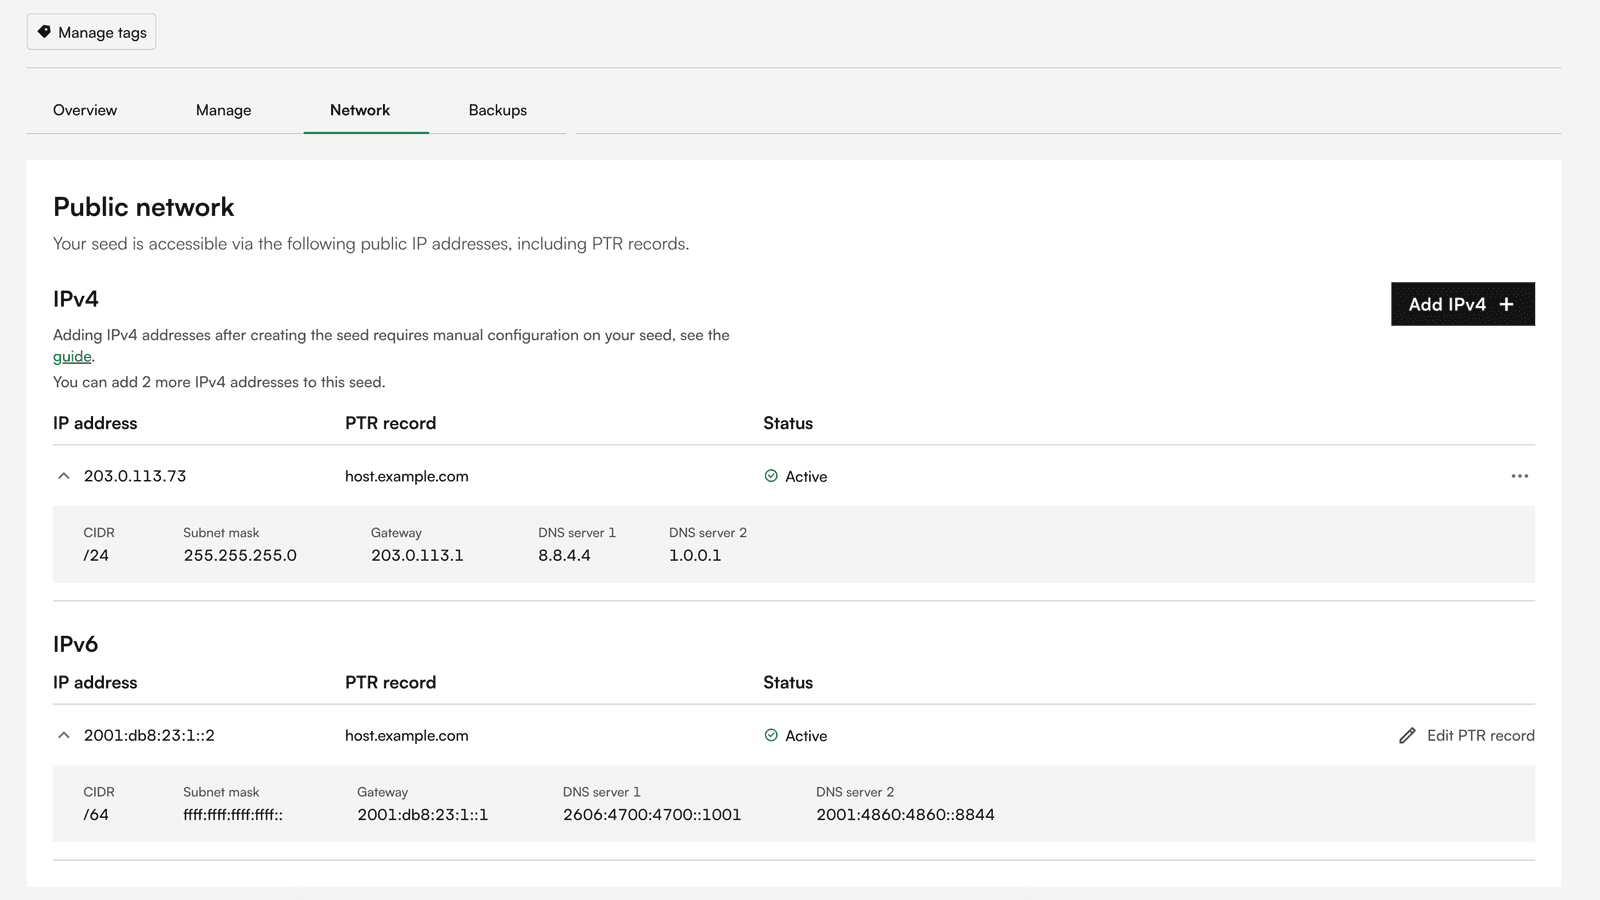
Note the values for both address families. IPv4 and IPv6 have their own gateways and their own DNS servers, each listed in its own row. With IPv6 the entire /64 is yours, so you may assign further addresses within it freely. With IPv4 only the listed addresses work: a filter on the virtual network port drops packets with foreign source addresses, so an IPv4 address of your own choosing will not work.
Mount the ISO
Open the Manage tab in the seed detail view. The Mount ISO section holds the ISO catalog. Choose Mount from the menu at the end of the row.
The first time, a notice tells you the seed will switch to restricted mode. Confirm with Mount ISO. The mounted ISO then sits highlighted above the list, marked Mounted.
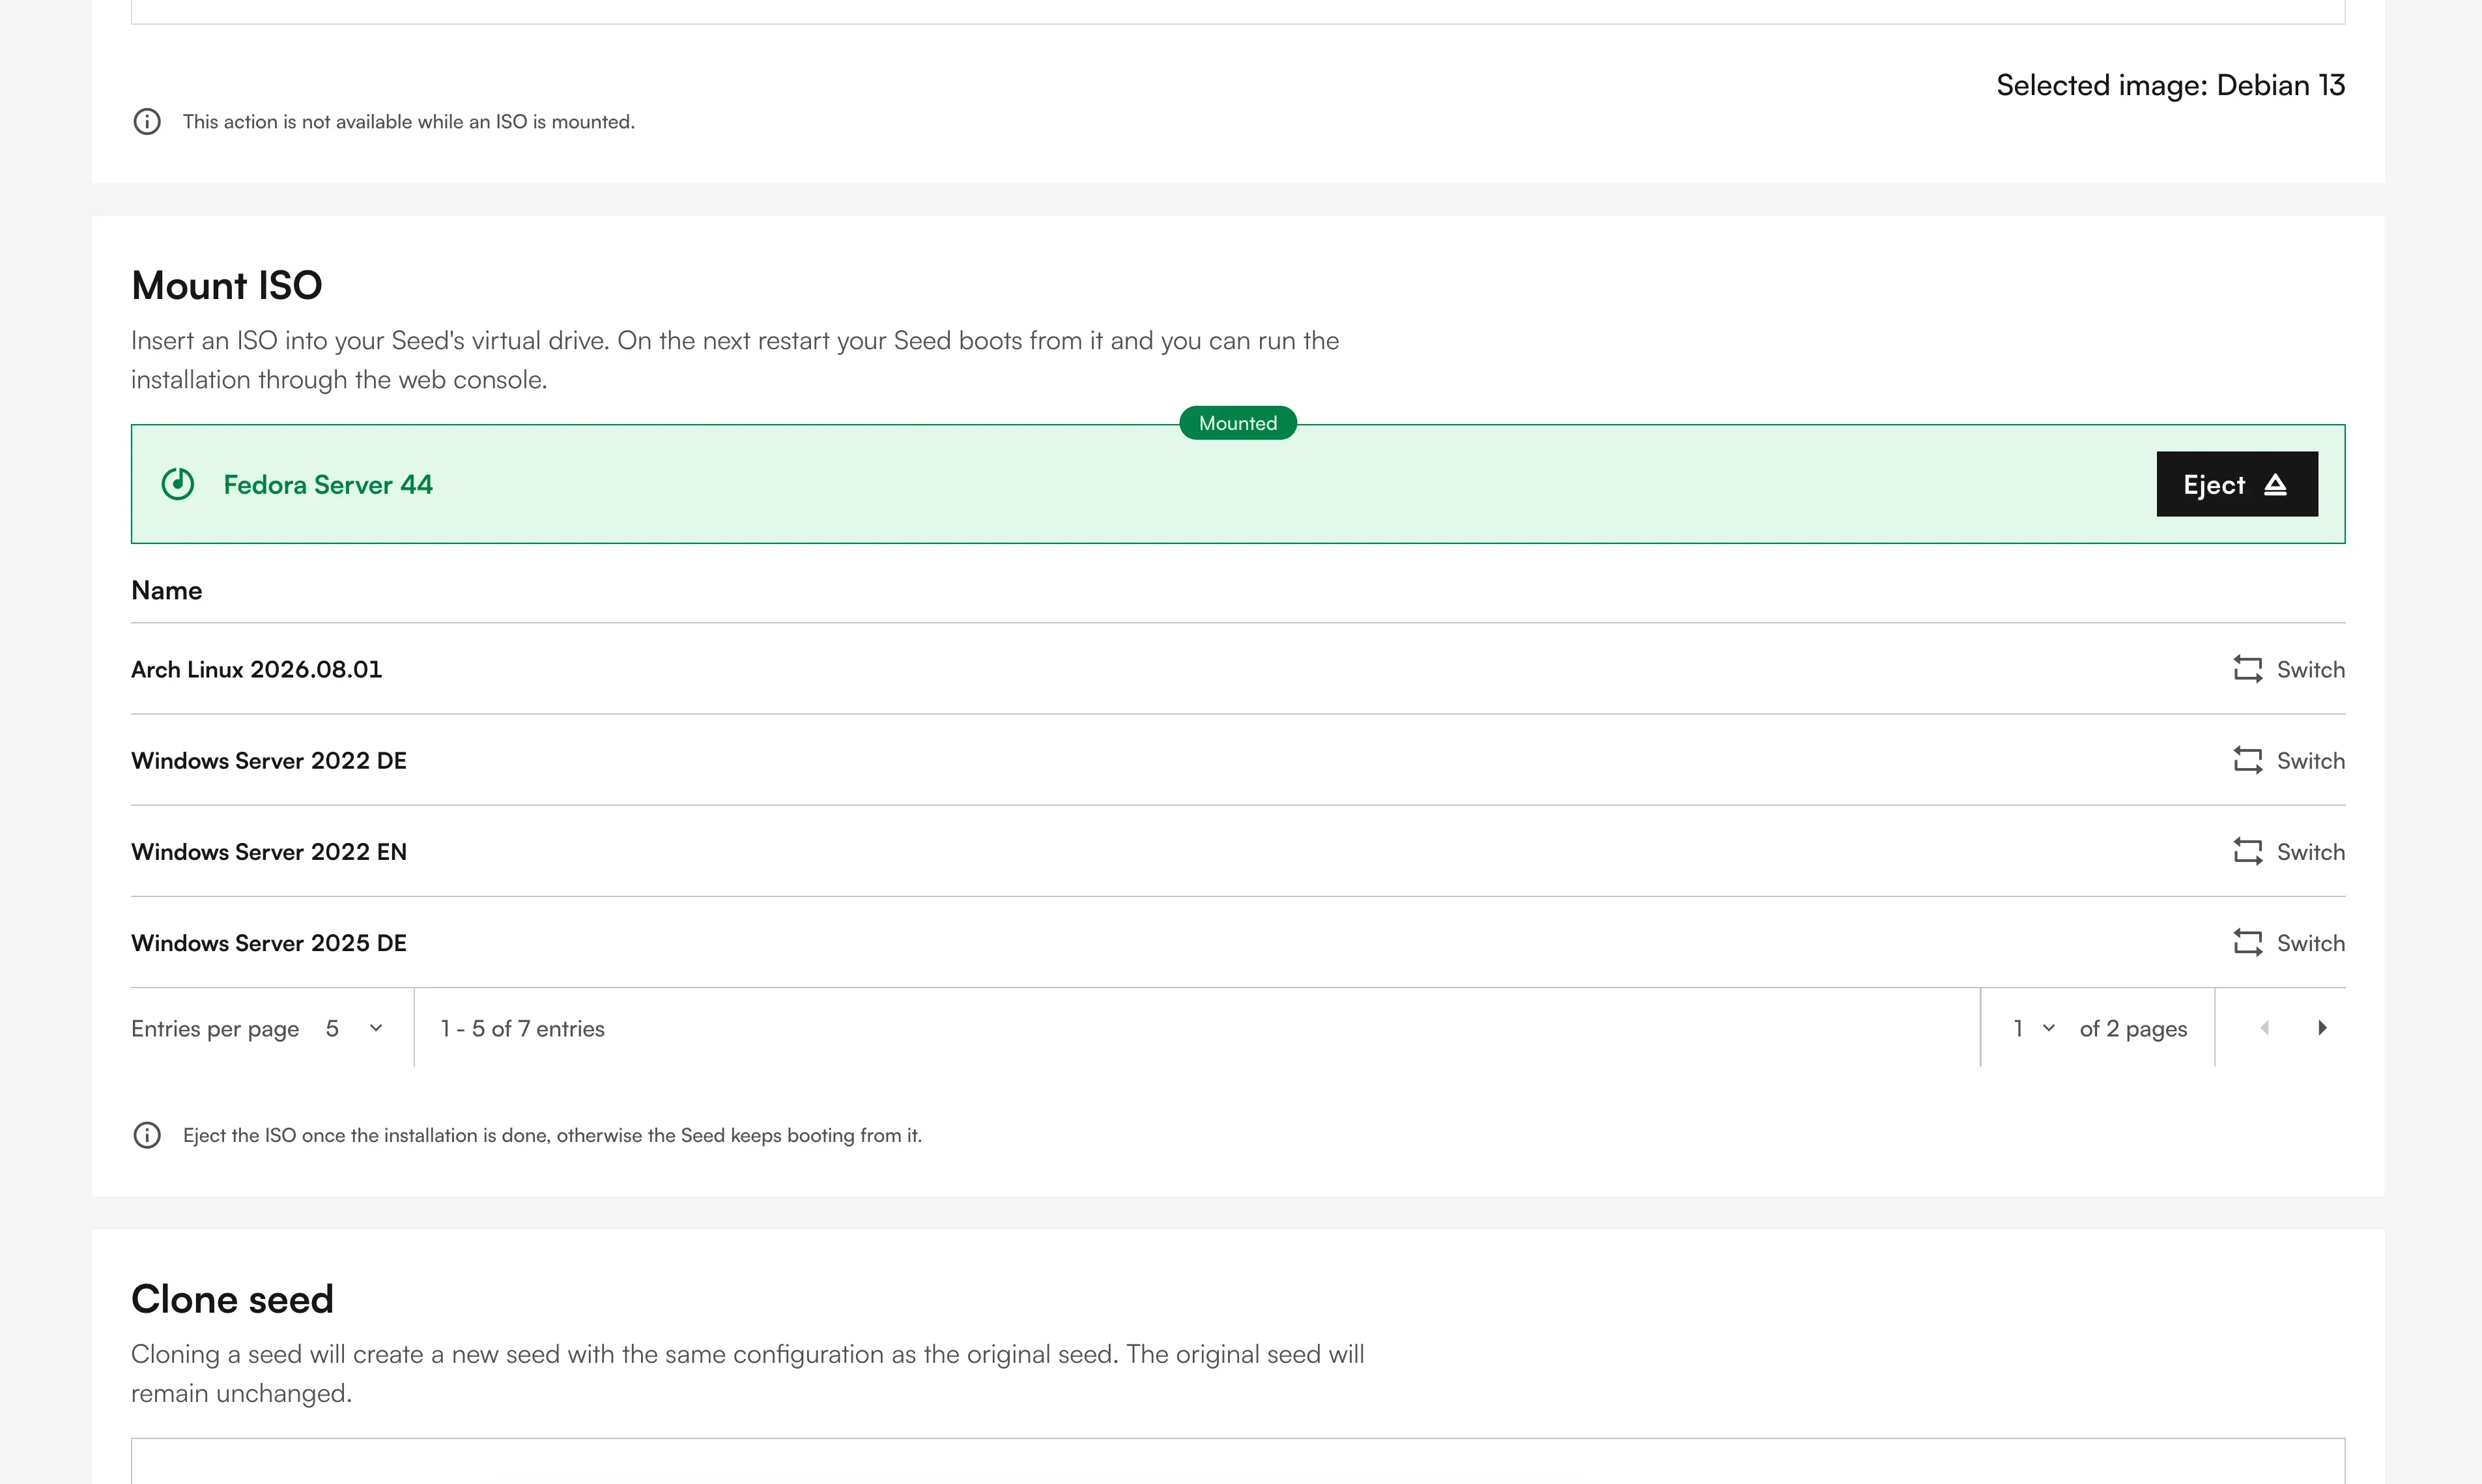
Two things regularly come as a surprise here:
- The seed does not restart on its own. That is deliberate, because an automatic restart would destroy a running installation. You trigger the restart yourself.
- From now on the seed boots from the ISO first. While a medium is mounted, it sits ahead of the disk in the boot order. Unlike a Windows ISO, a Linux ISO boots straight through without a keystroke. You therefore land in the installer on every restart until you eject the medium.
Restart and boot into the installer
Open the console first, via Start console. The seed is still running your old system, and the console only exists while it runs. It opens in its own window.
Then trigger the restart from inside the running system, so you watch the boot from the first second. On Linux, Send CtrlAltDel in the top right of the console does it. If the system stays silent, or the seed is powered off, use Actions › Restart or Start in the panel.
If the console connection drops, just open it again. The installation keeps running in the background.
The disk sits on a VirtIO SCSI controller. Every current Linux kernel ships the driver, so the disk shows up as /dev/sda with no help from you. The driver detour a Windows installation needs does not exist here.
Install Fedora Server
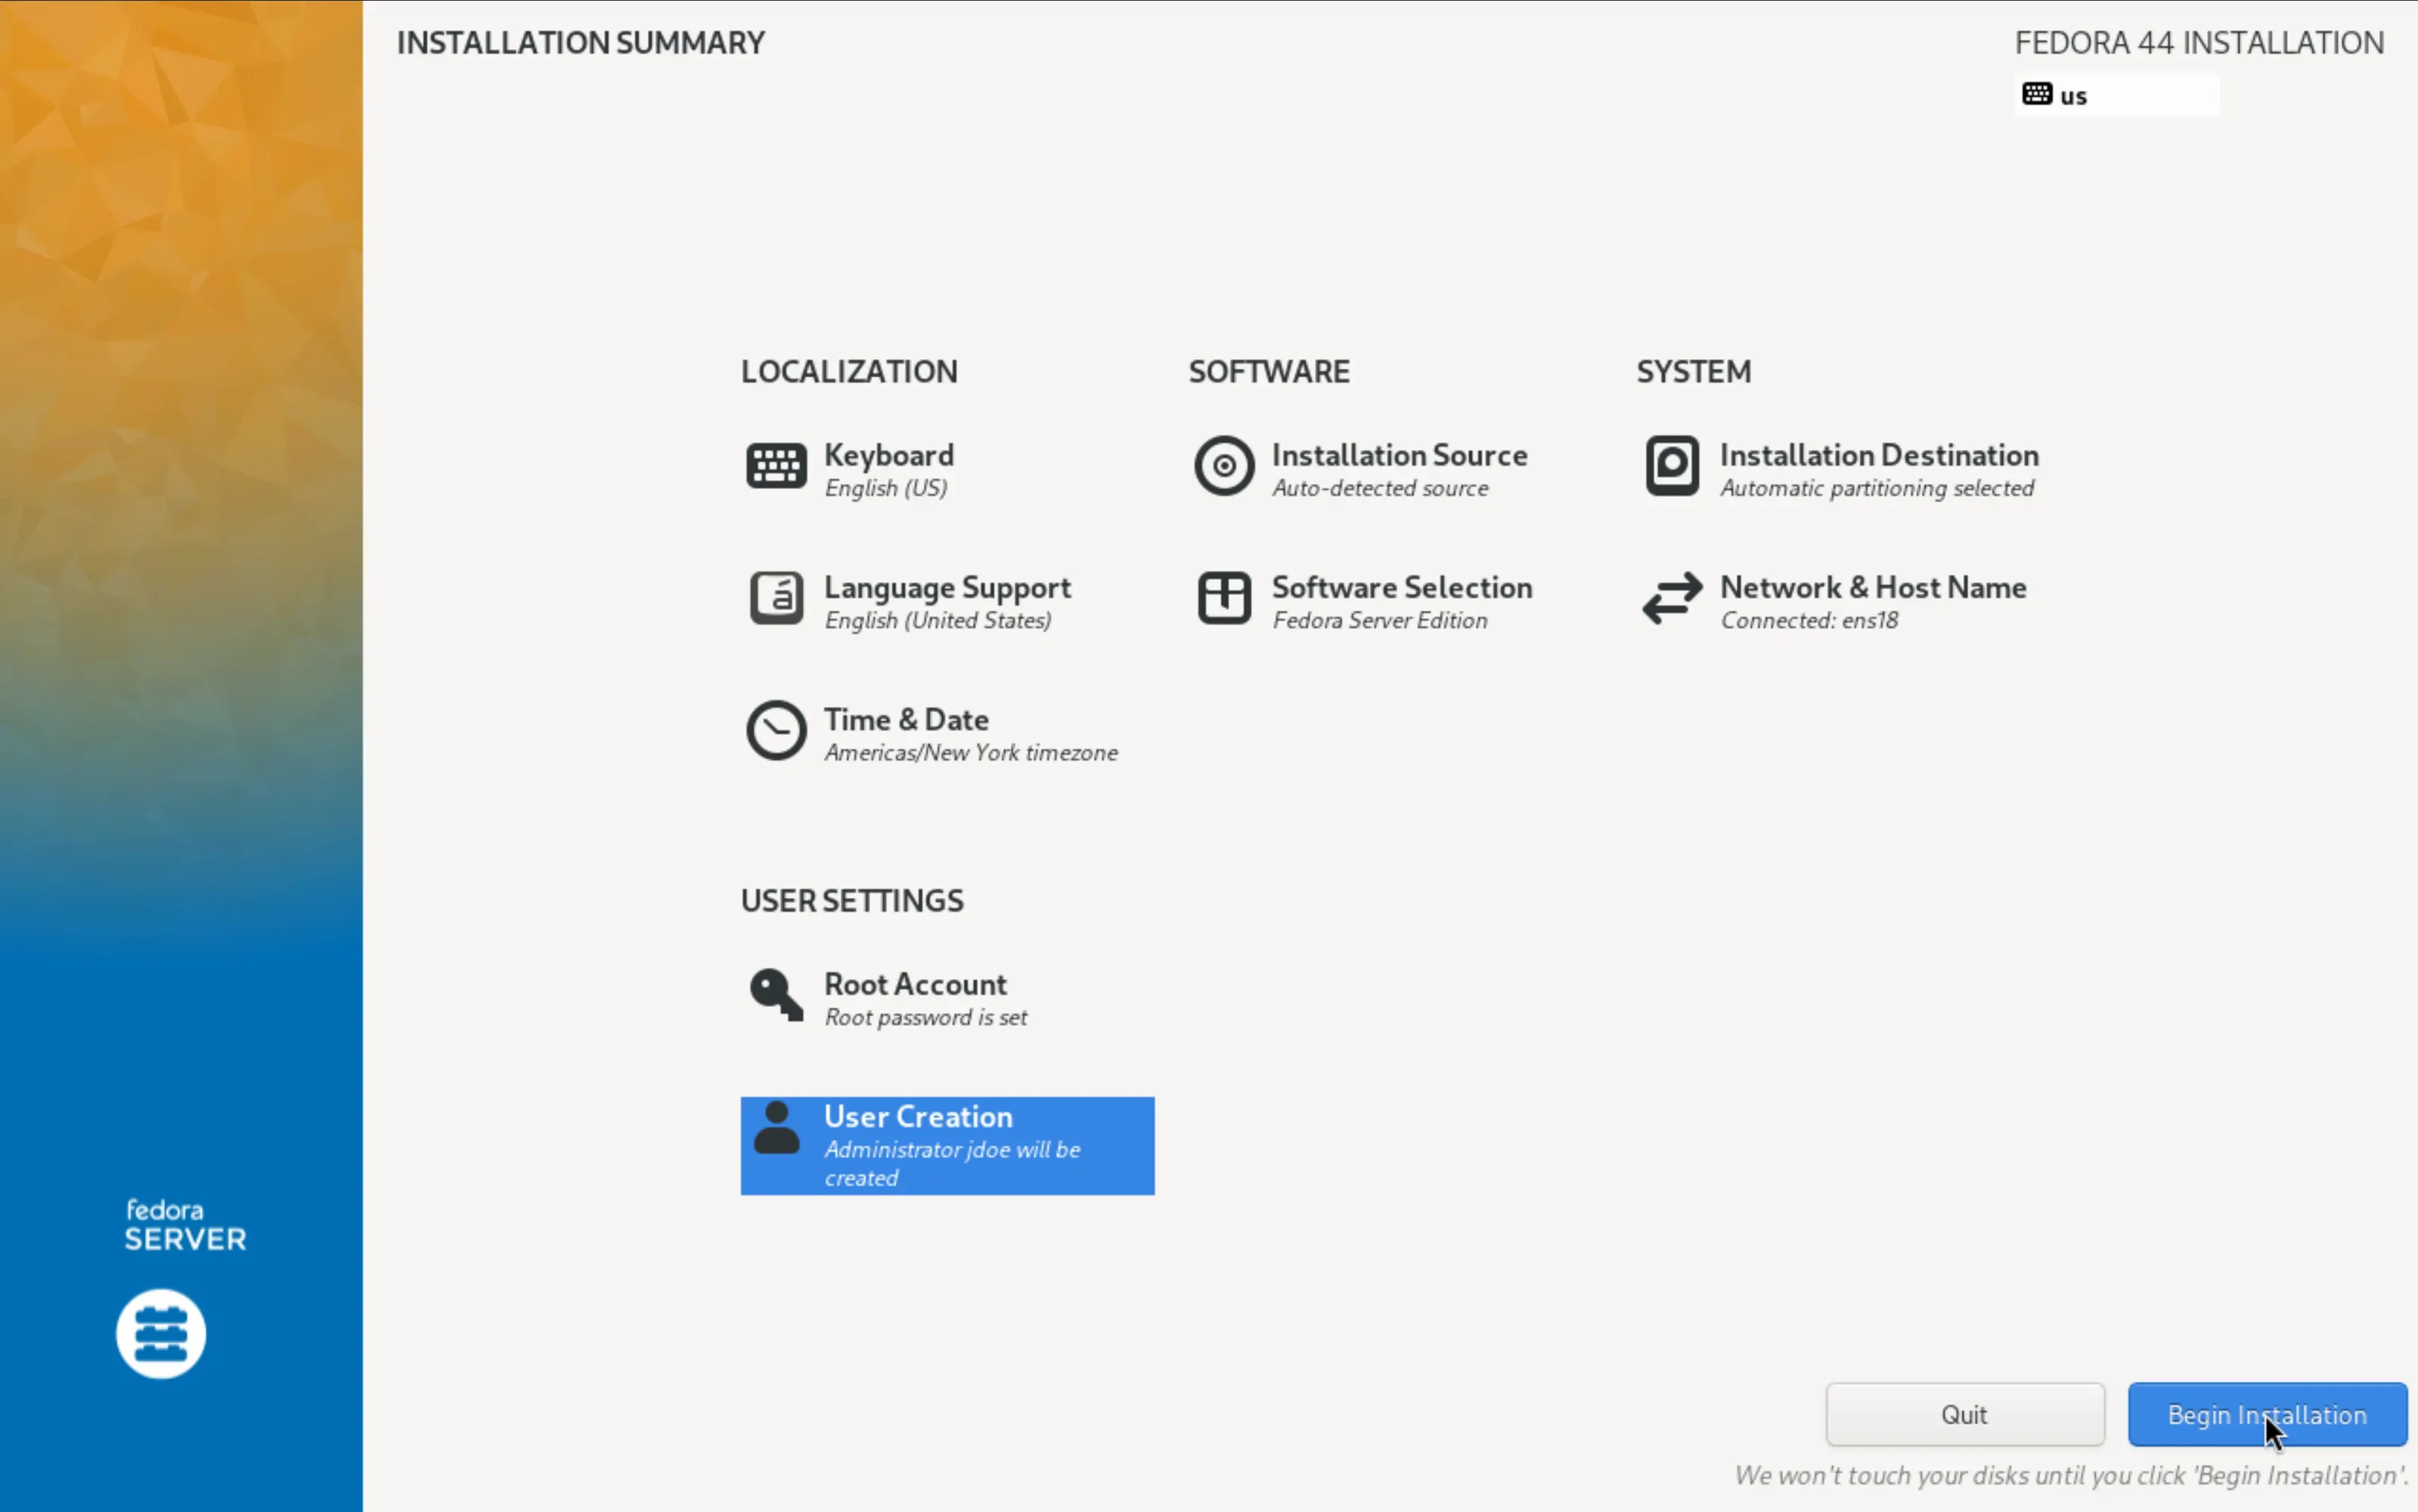
Anaconda starts by itself after the boot and first asks for the installation language. Continue takes you to the Installation Summary, where every remaining step sits as a tile. You leave each tile with Done in the top left.
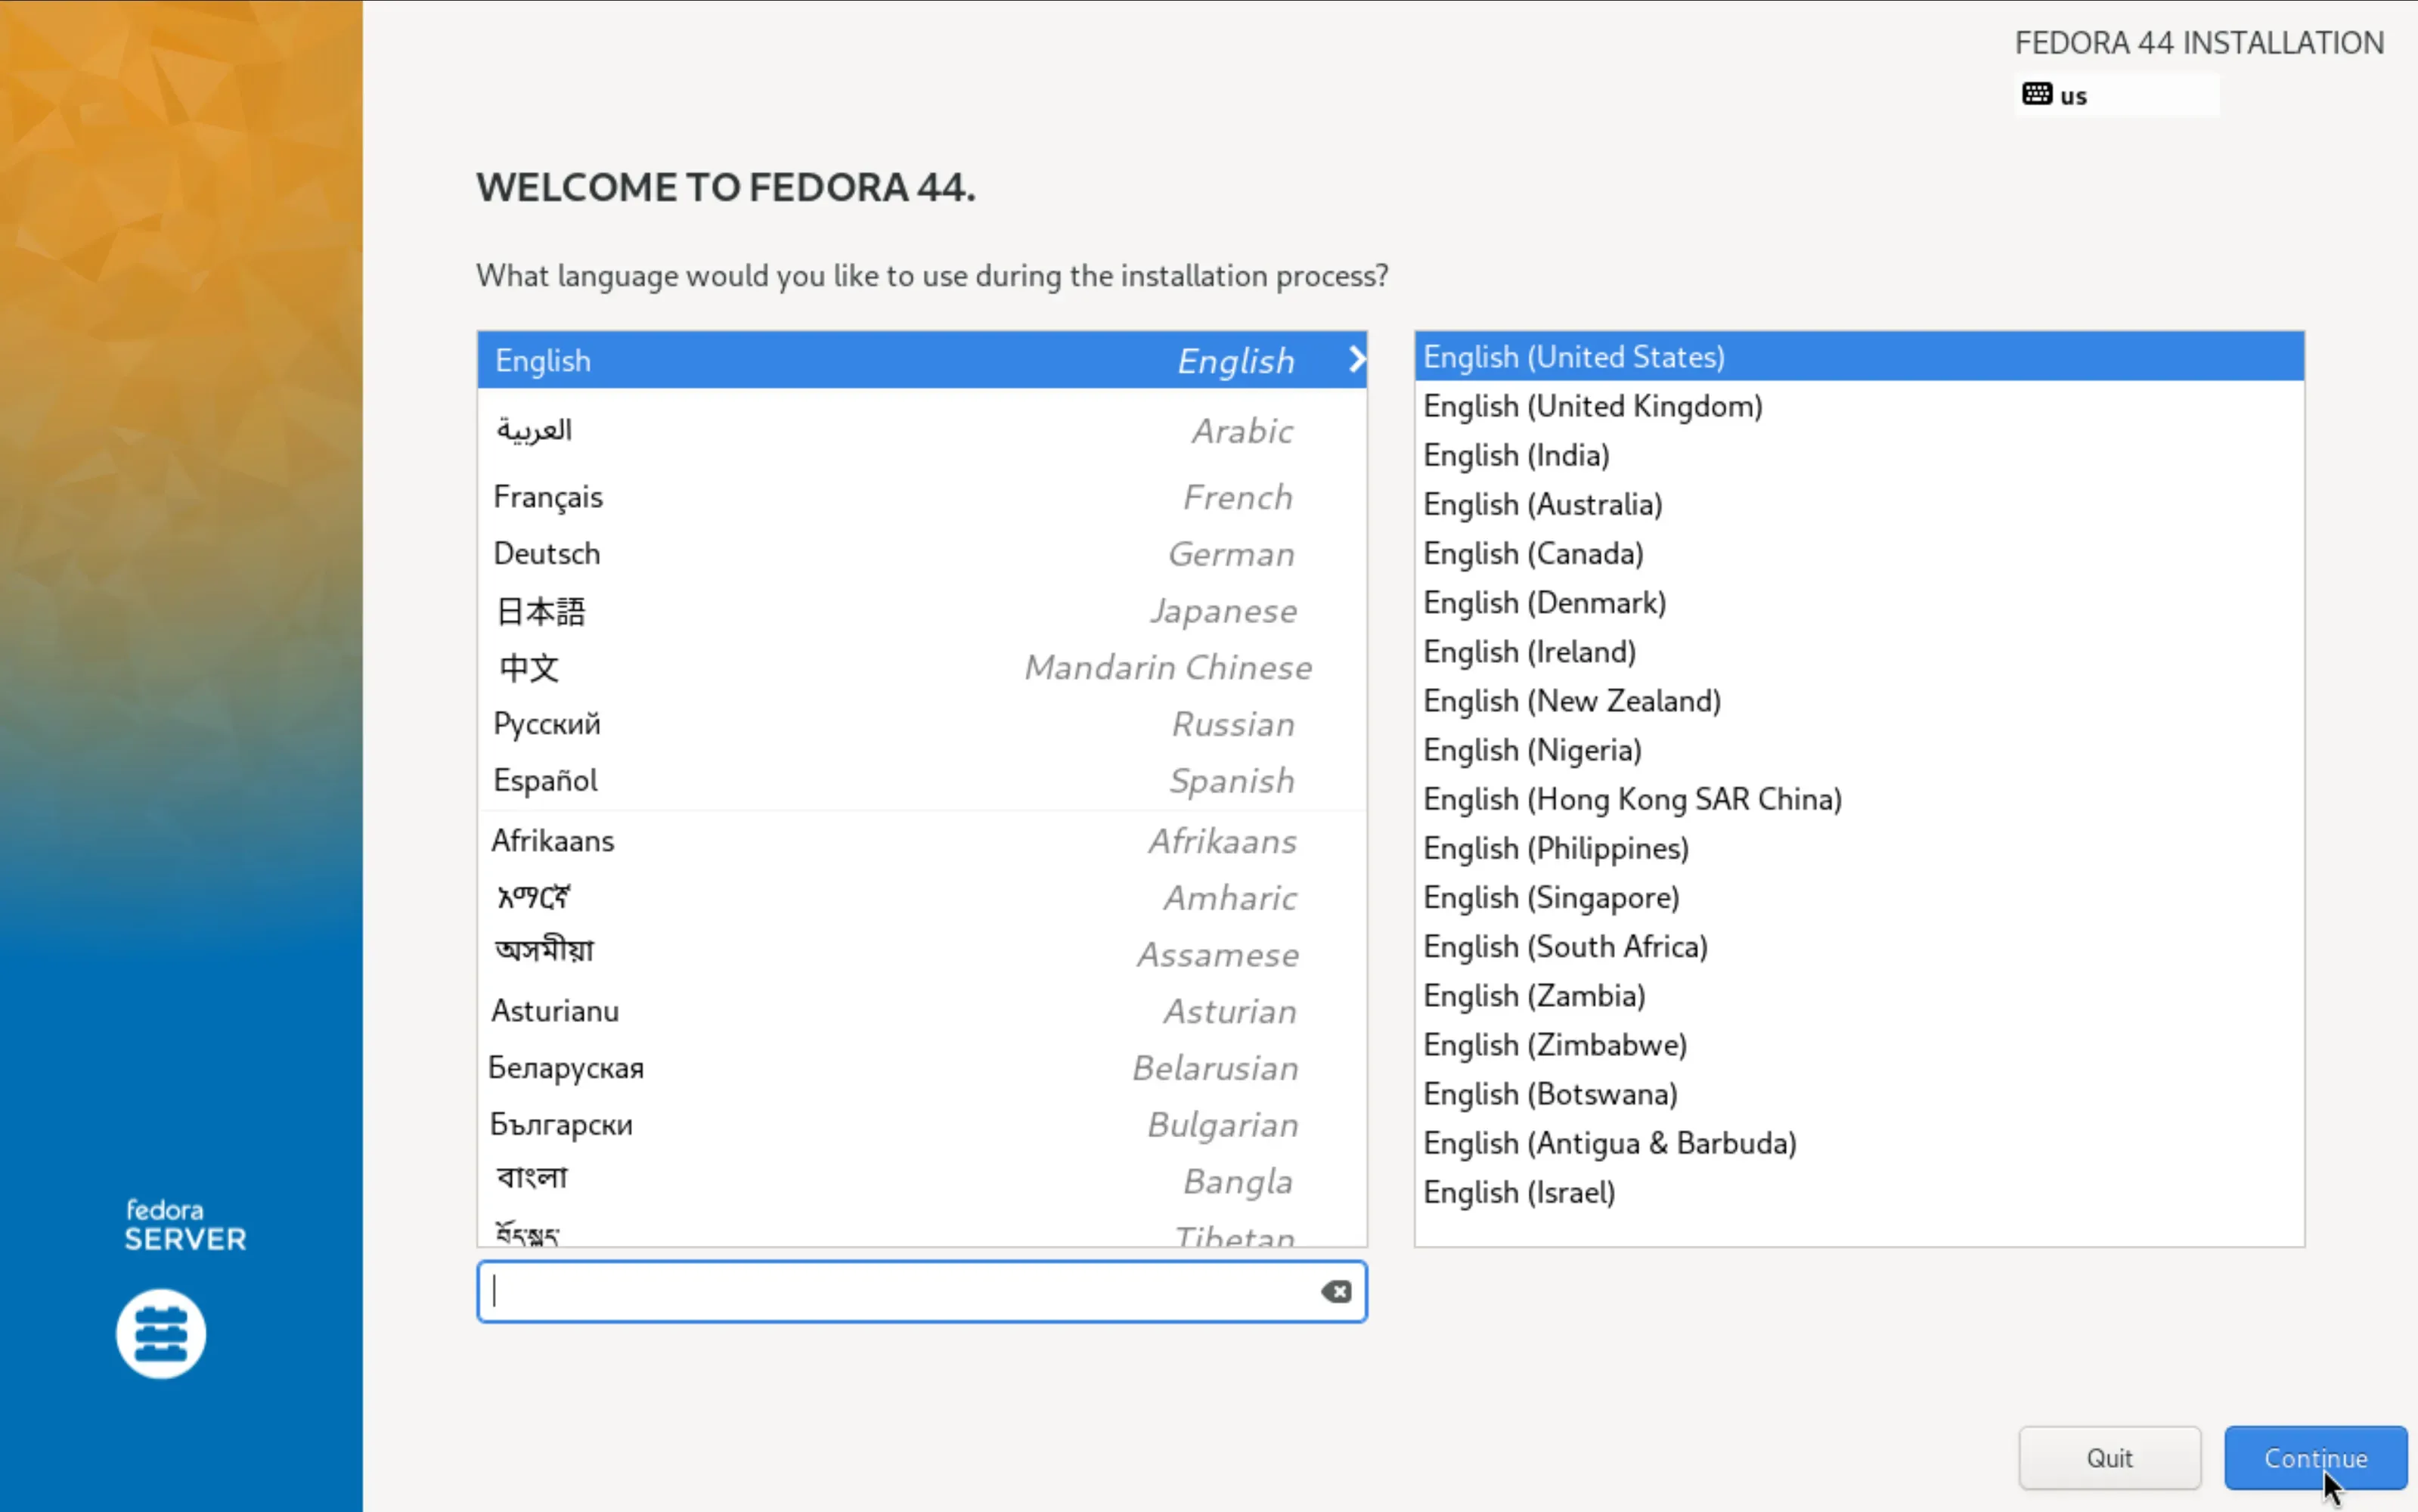
Start with Keyboard and set the layout of your actual keyboard. It applies to what you type in the installer and to the finished system.
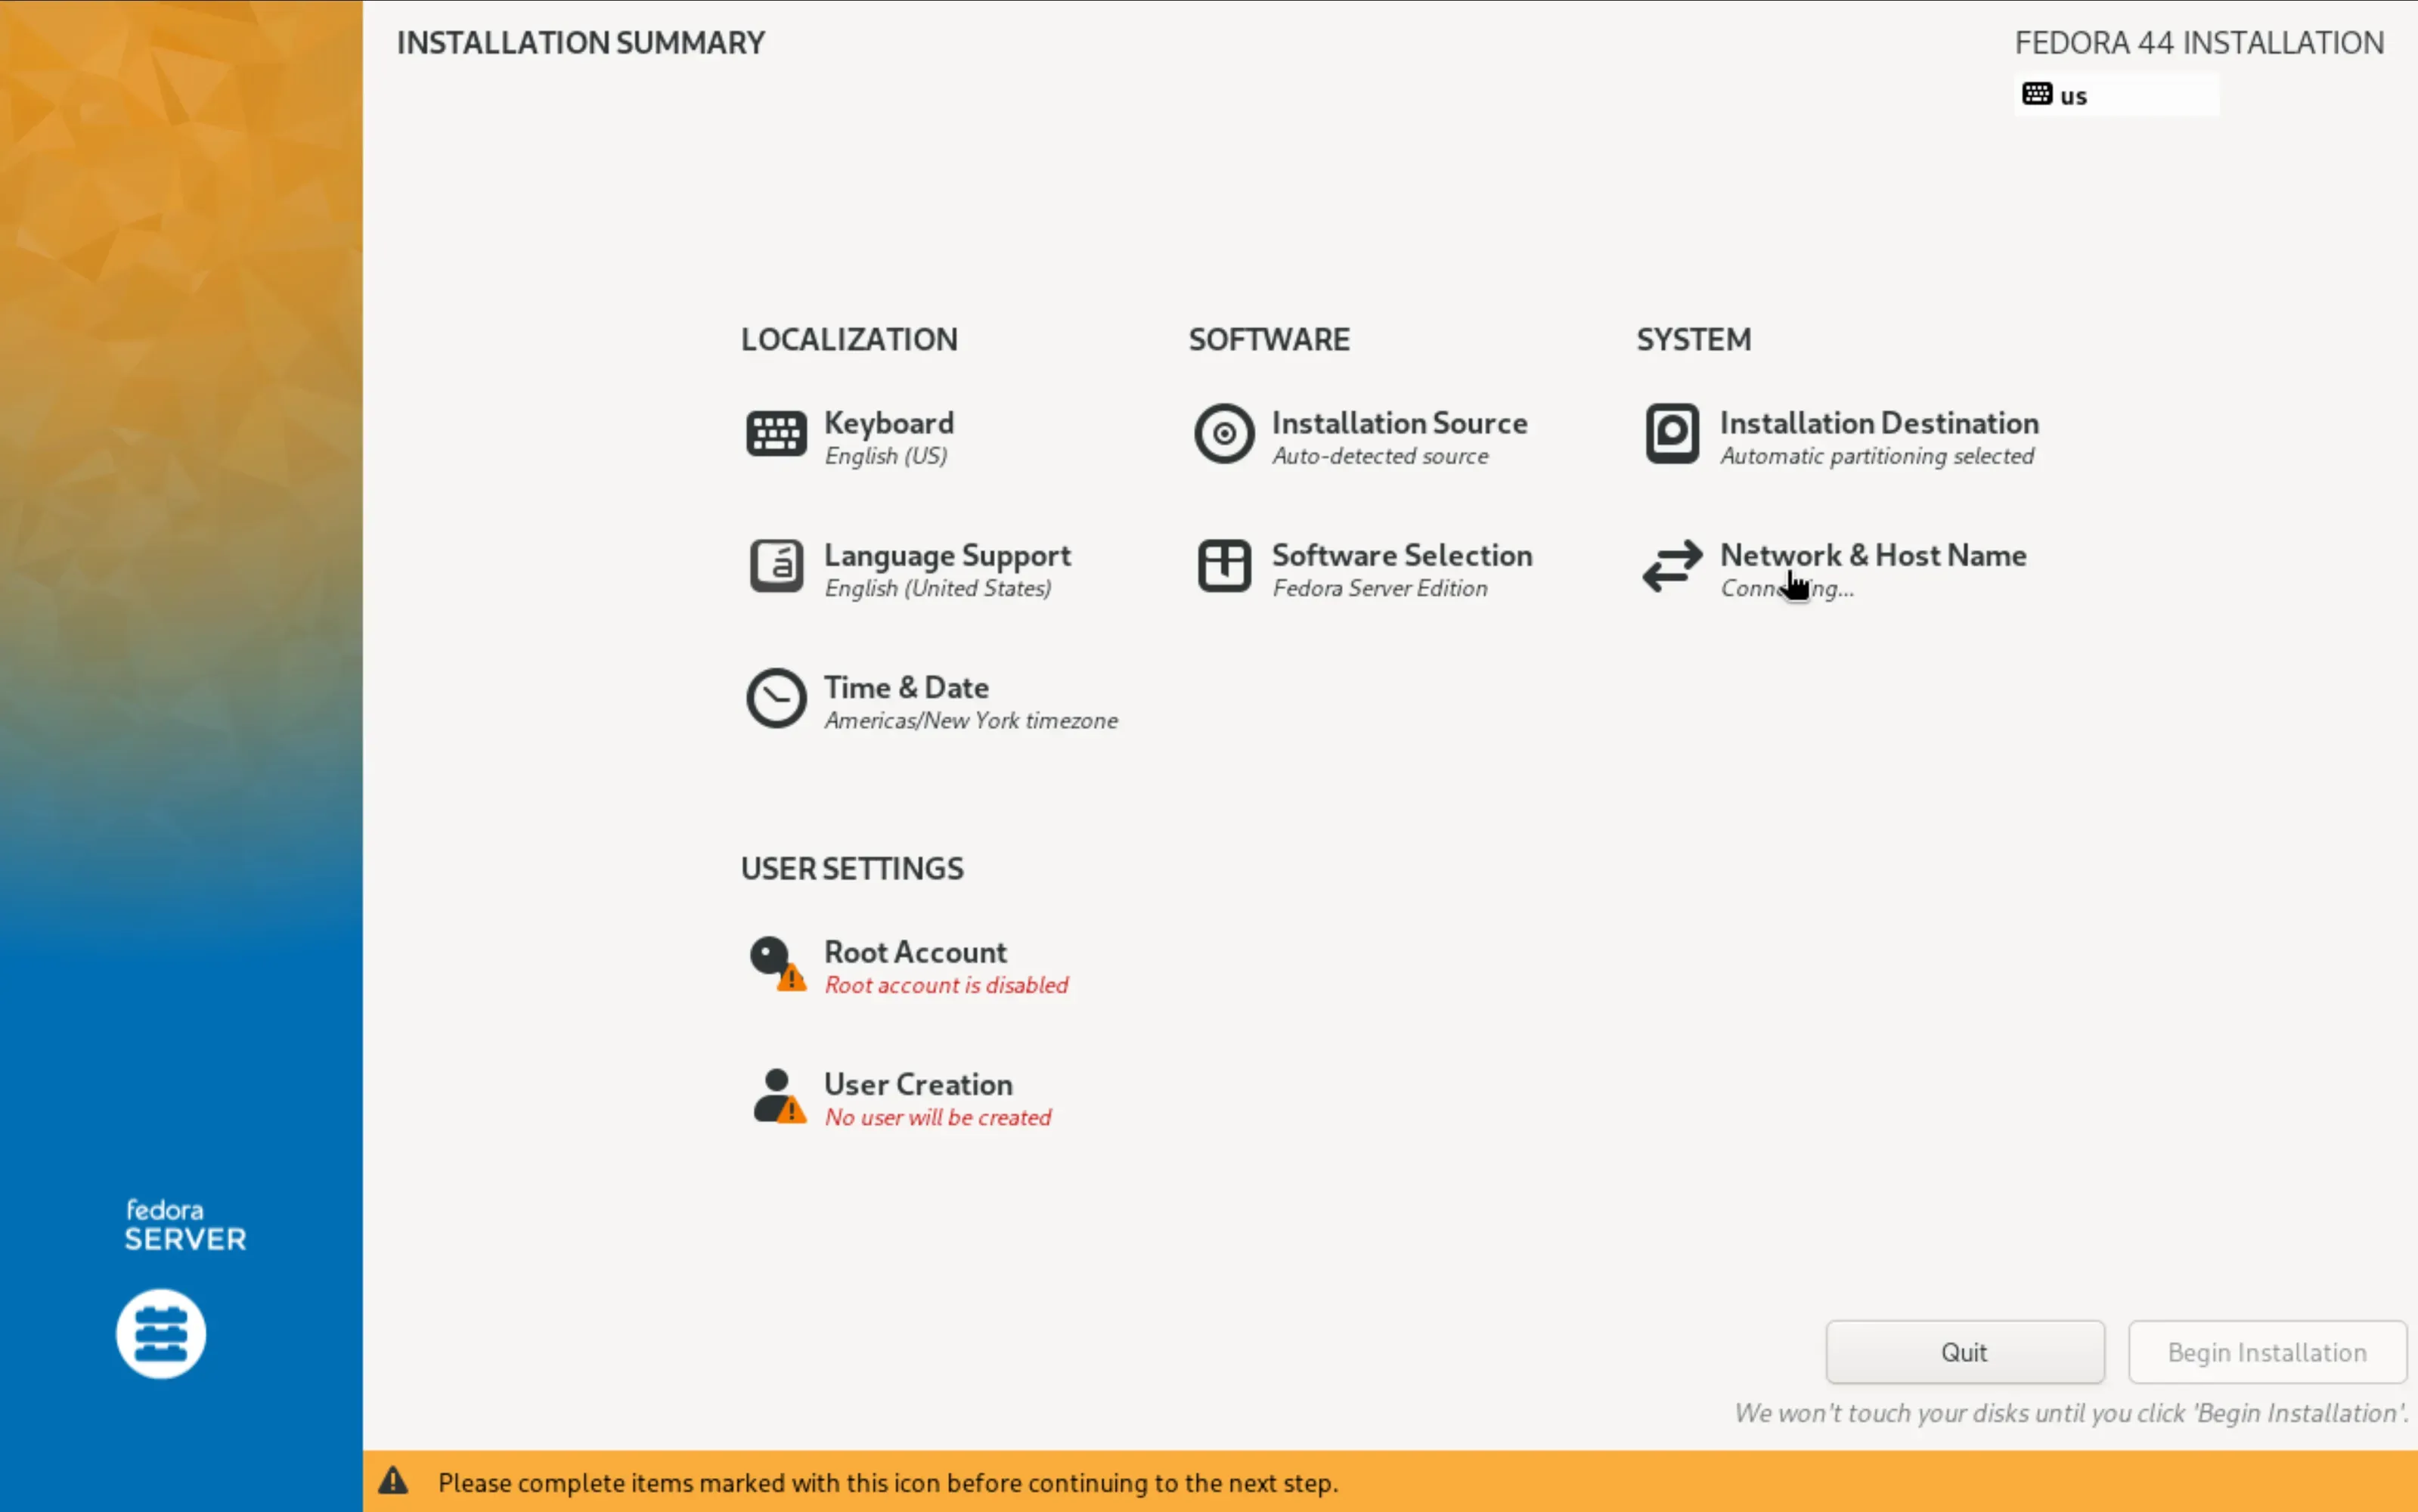
The Network & Host Name tile is unconfigured, and Anaconda does not flag that as an error:
The installer tries DHCP, gets no answer and carries on regardless. Enter the network here, or you end up with a system that has no connection.
Entering the network details
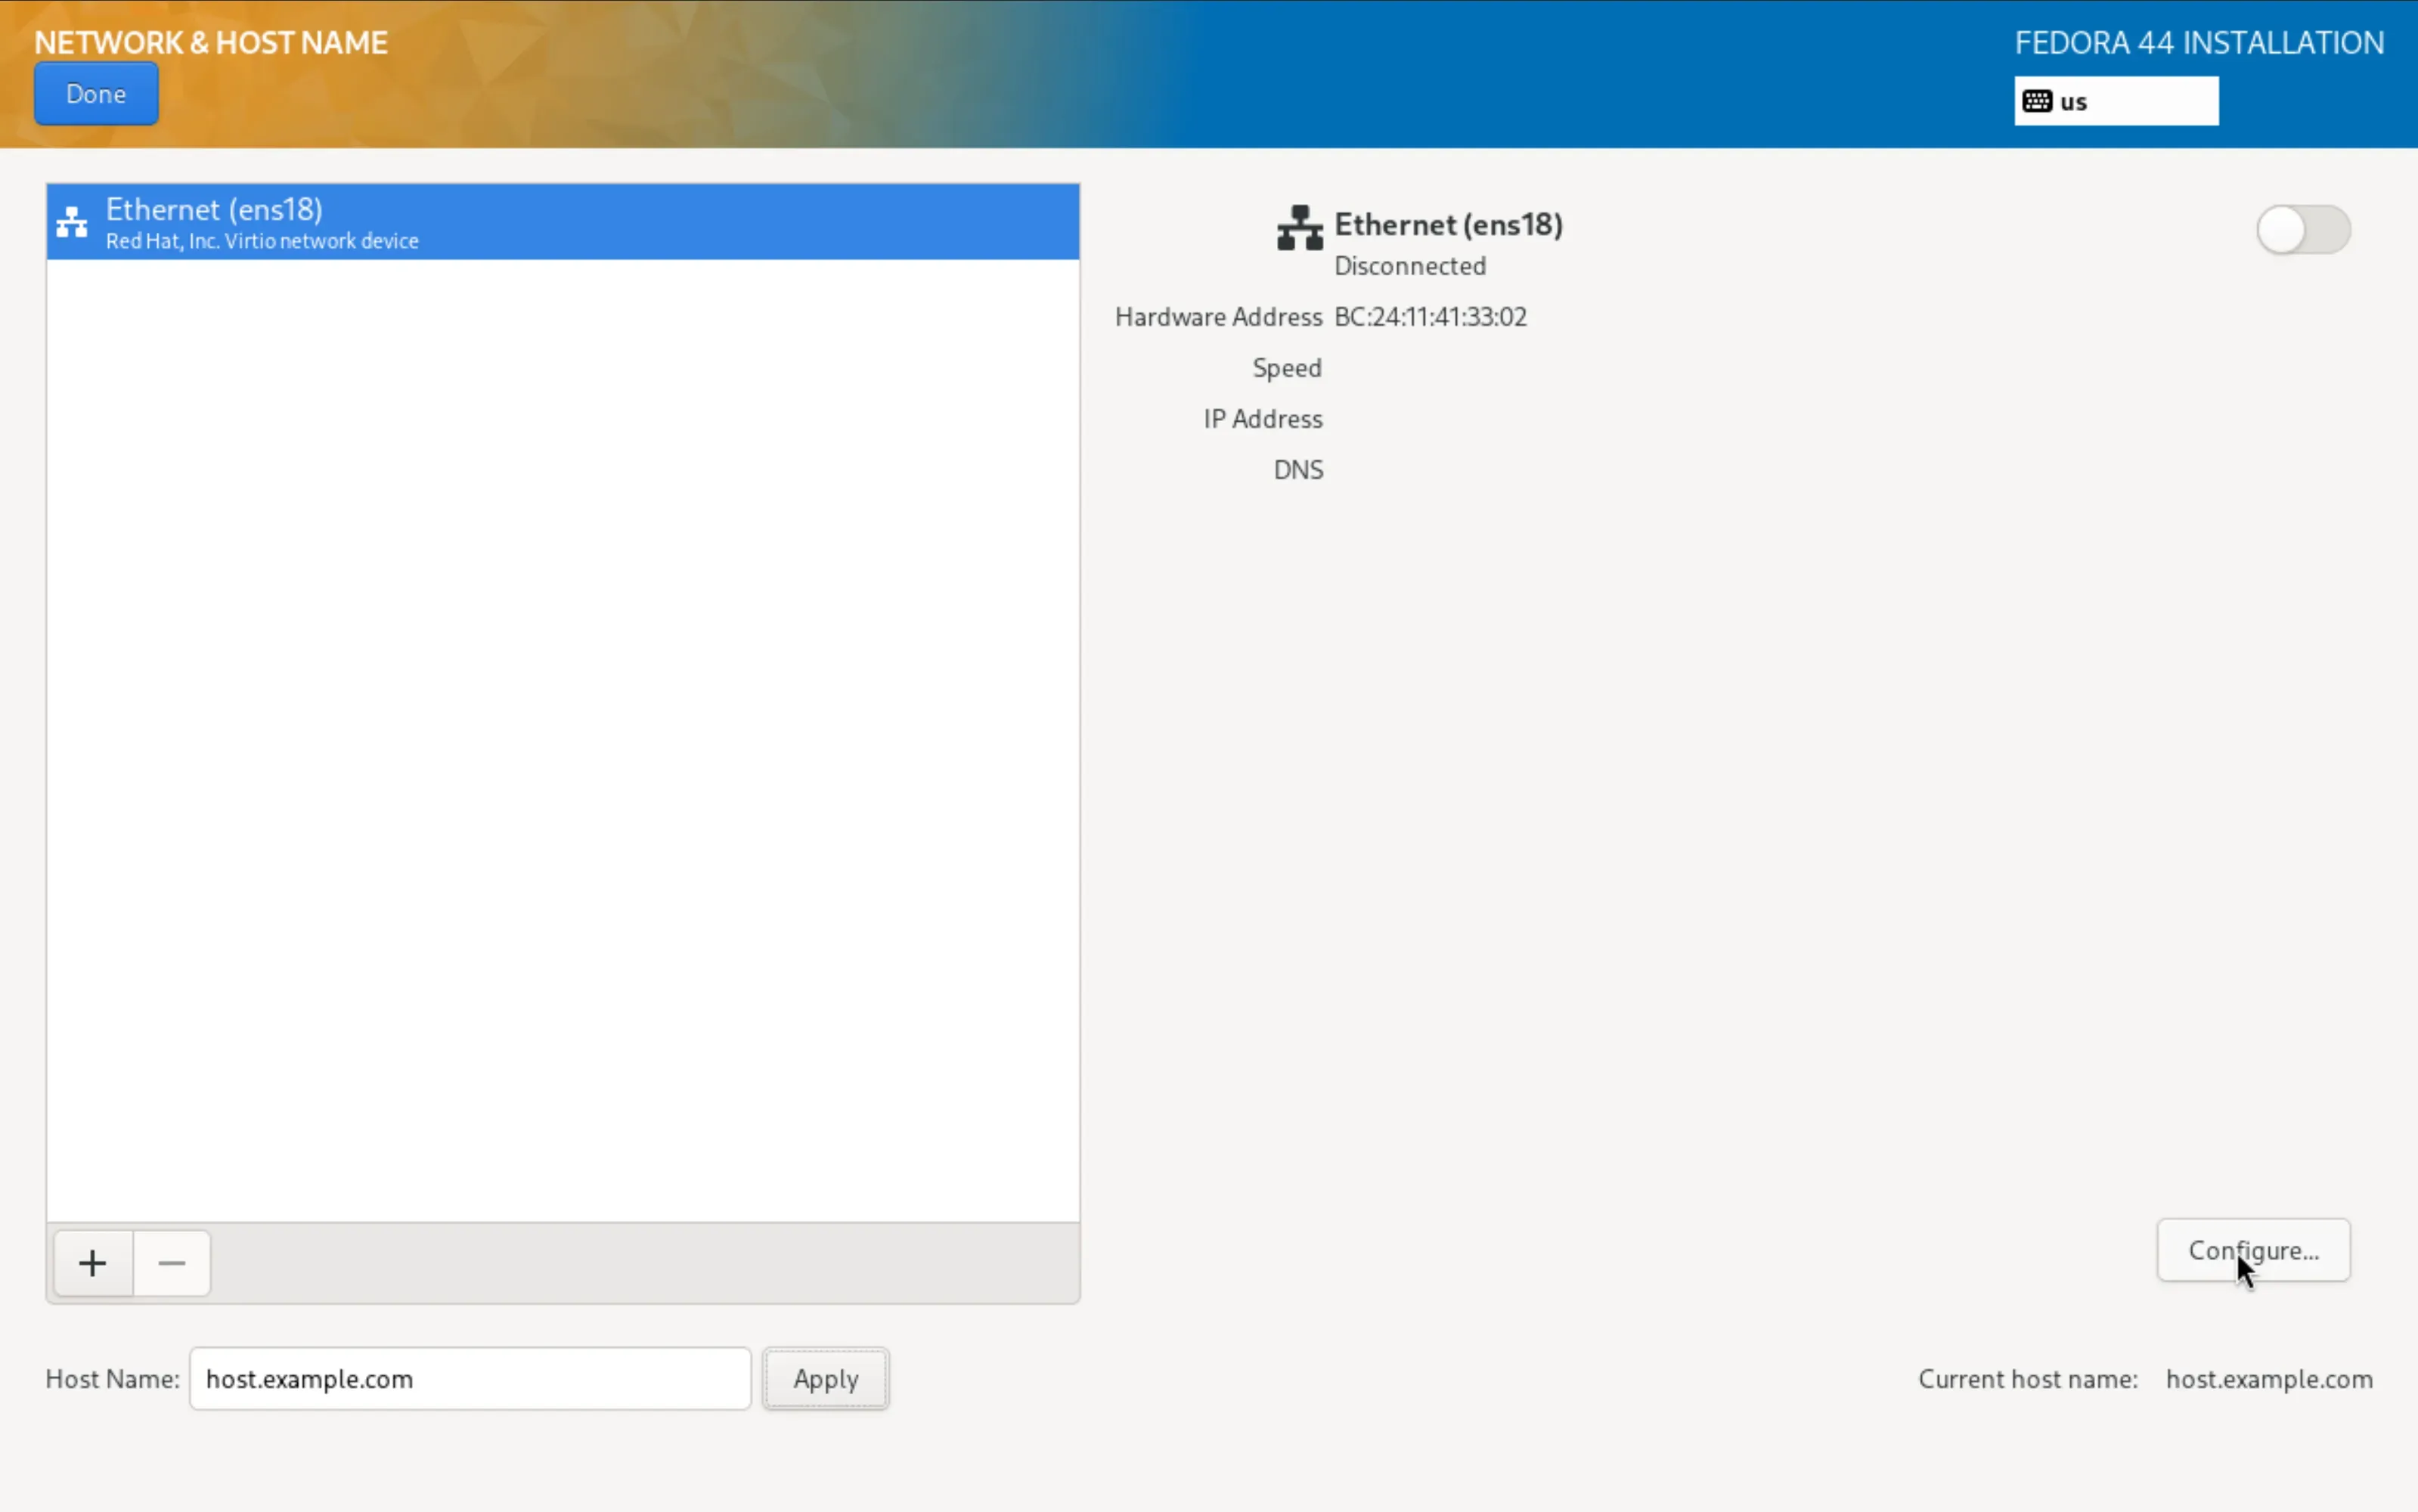
Open Network & Host Name and put the Host Name in the field at the bottom left, confirmed with Apply. Use your seed's hostname, so the cloud's DNS records match.
Select the adapter, usually called ens18, and click Configure.
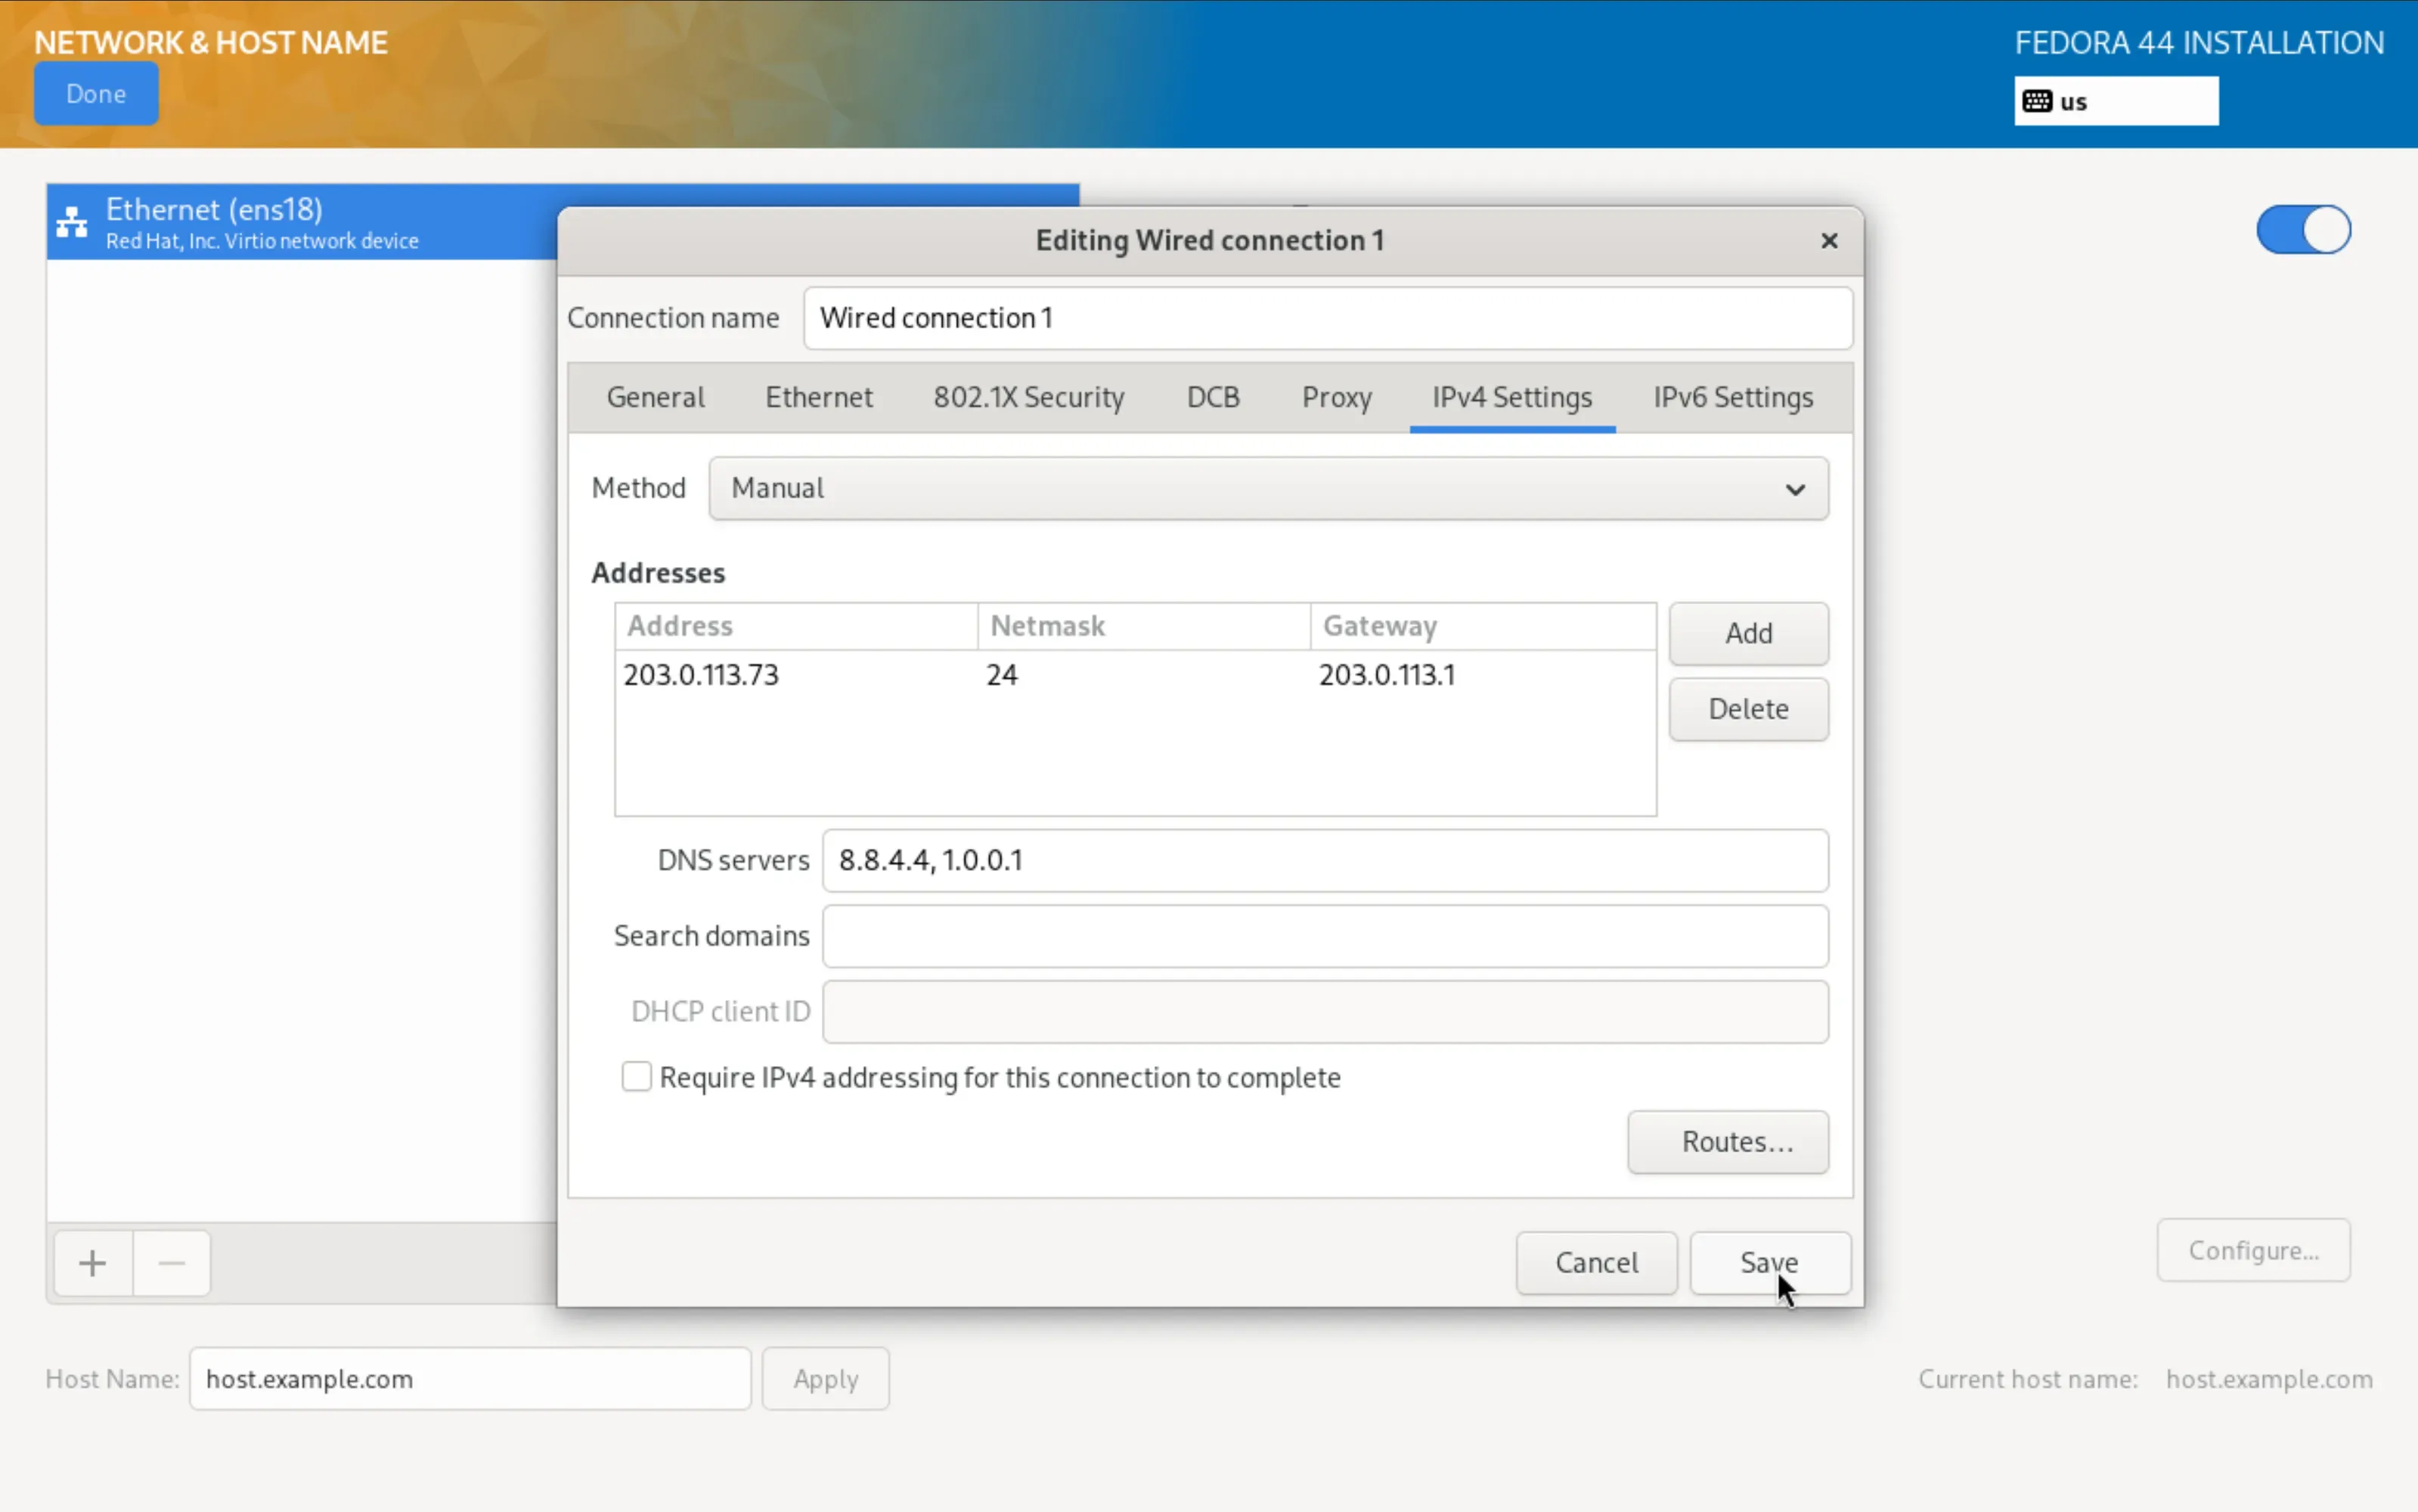
On the IPv4 Settings tab, first switch Method to Manual. While it still reads Automatic (DHCP), the fields below say Additional static addresses and your values have no effect. Then click Add and enter:
| Field in the dialog | Value from the Network tab |
|---|---|
| Address | IP address |
| Netmask | Subnet mask or CIDR |
| Gateway | Gateway |
| DNS servers | DNS server 1 and 2, comma separated |
The IPv6 Settings tab works the same way: Method to Manual, the IPv6 address with prefix length 64, the IPv6 gateway and the IPv6 resolvers from the second row of the Network tab.
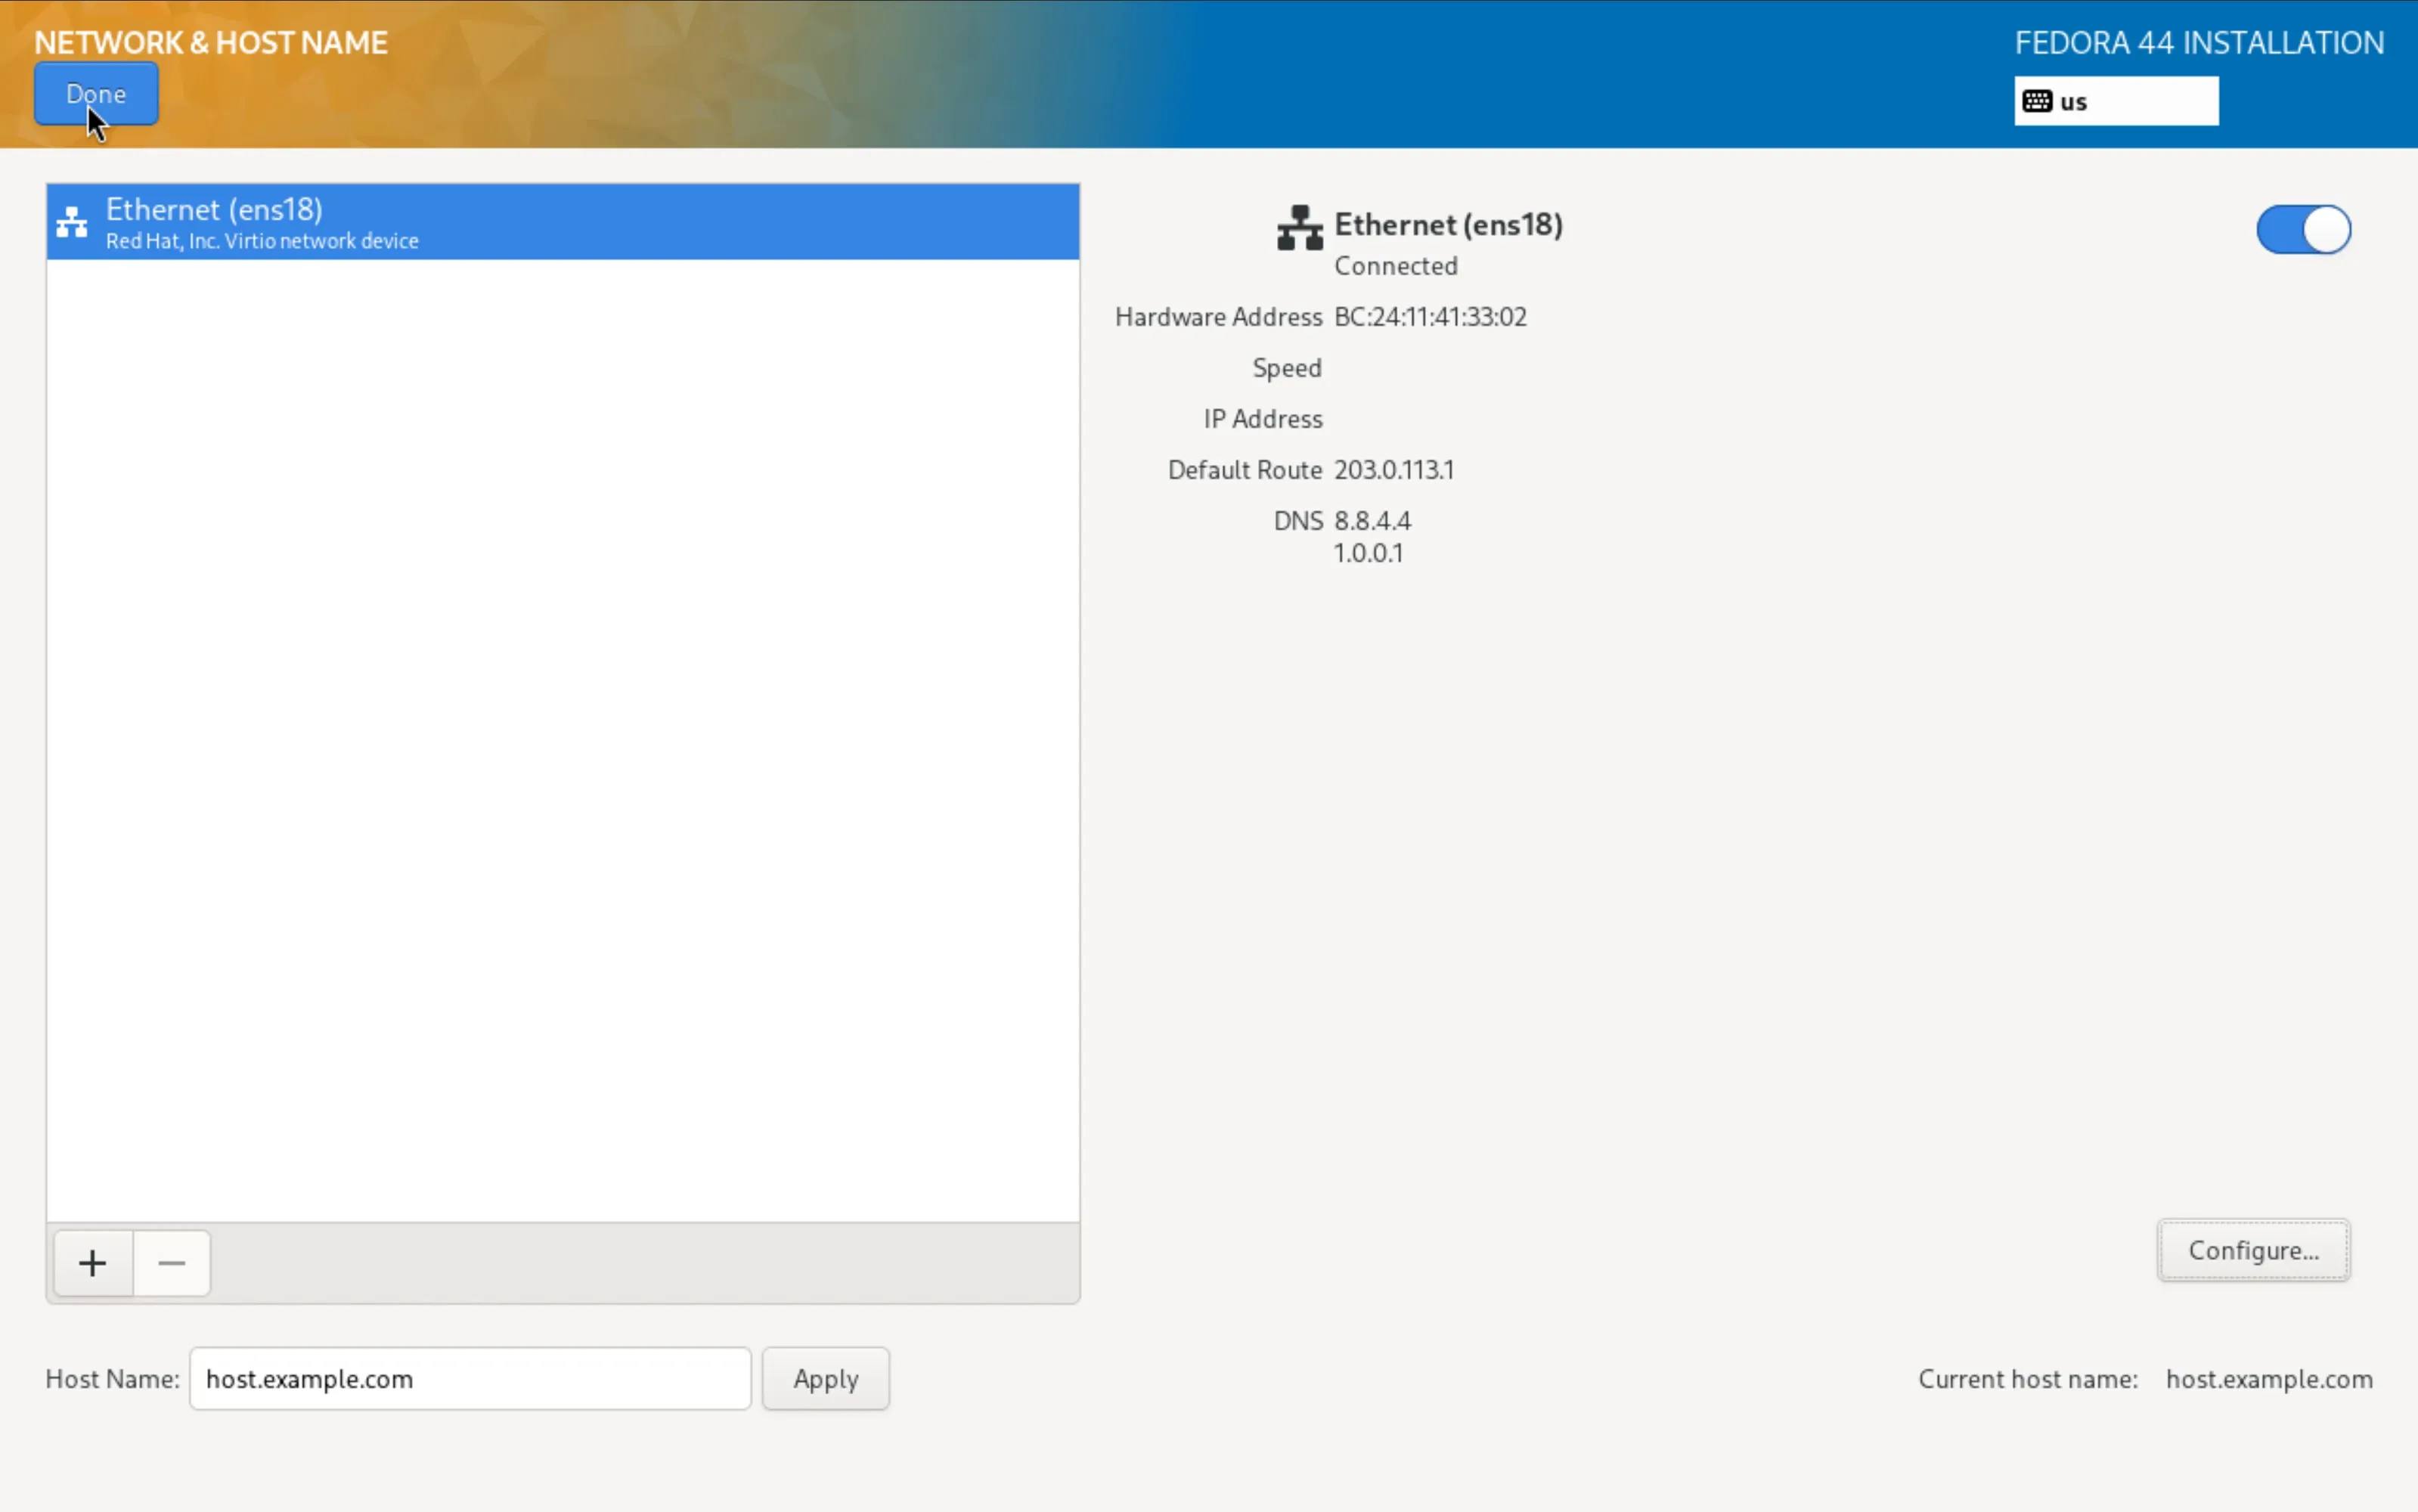
Finish with Save, or the dialog discards your input. The status turns to Connected and the default route and DNS appear on the right. Only then Done.
You type these values by hand: the web console carries no clipboard into the guest. Best keep the Network tab open in a second window beside it.
The remaining tiles
Begin Installation stays greyed out until these three are done:
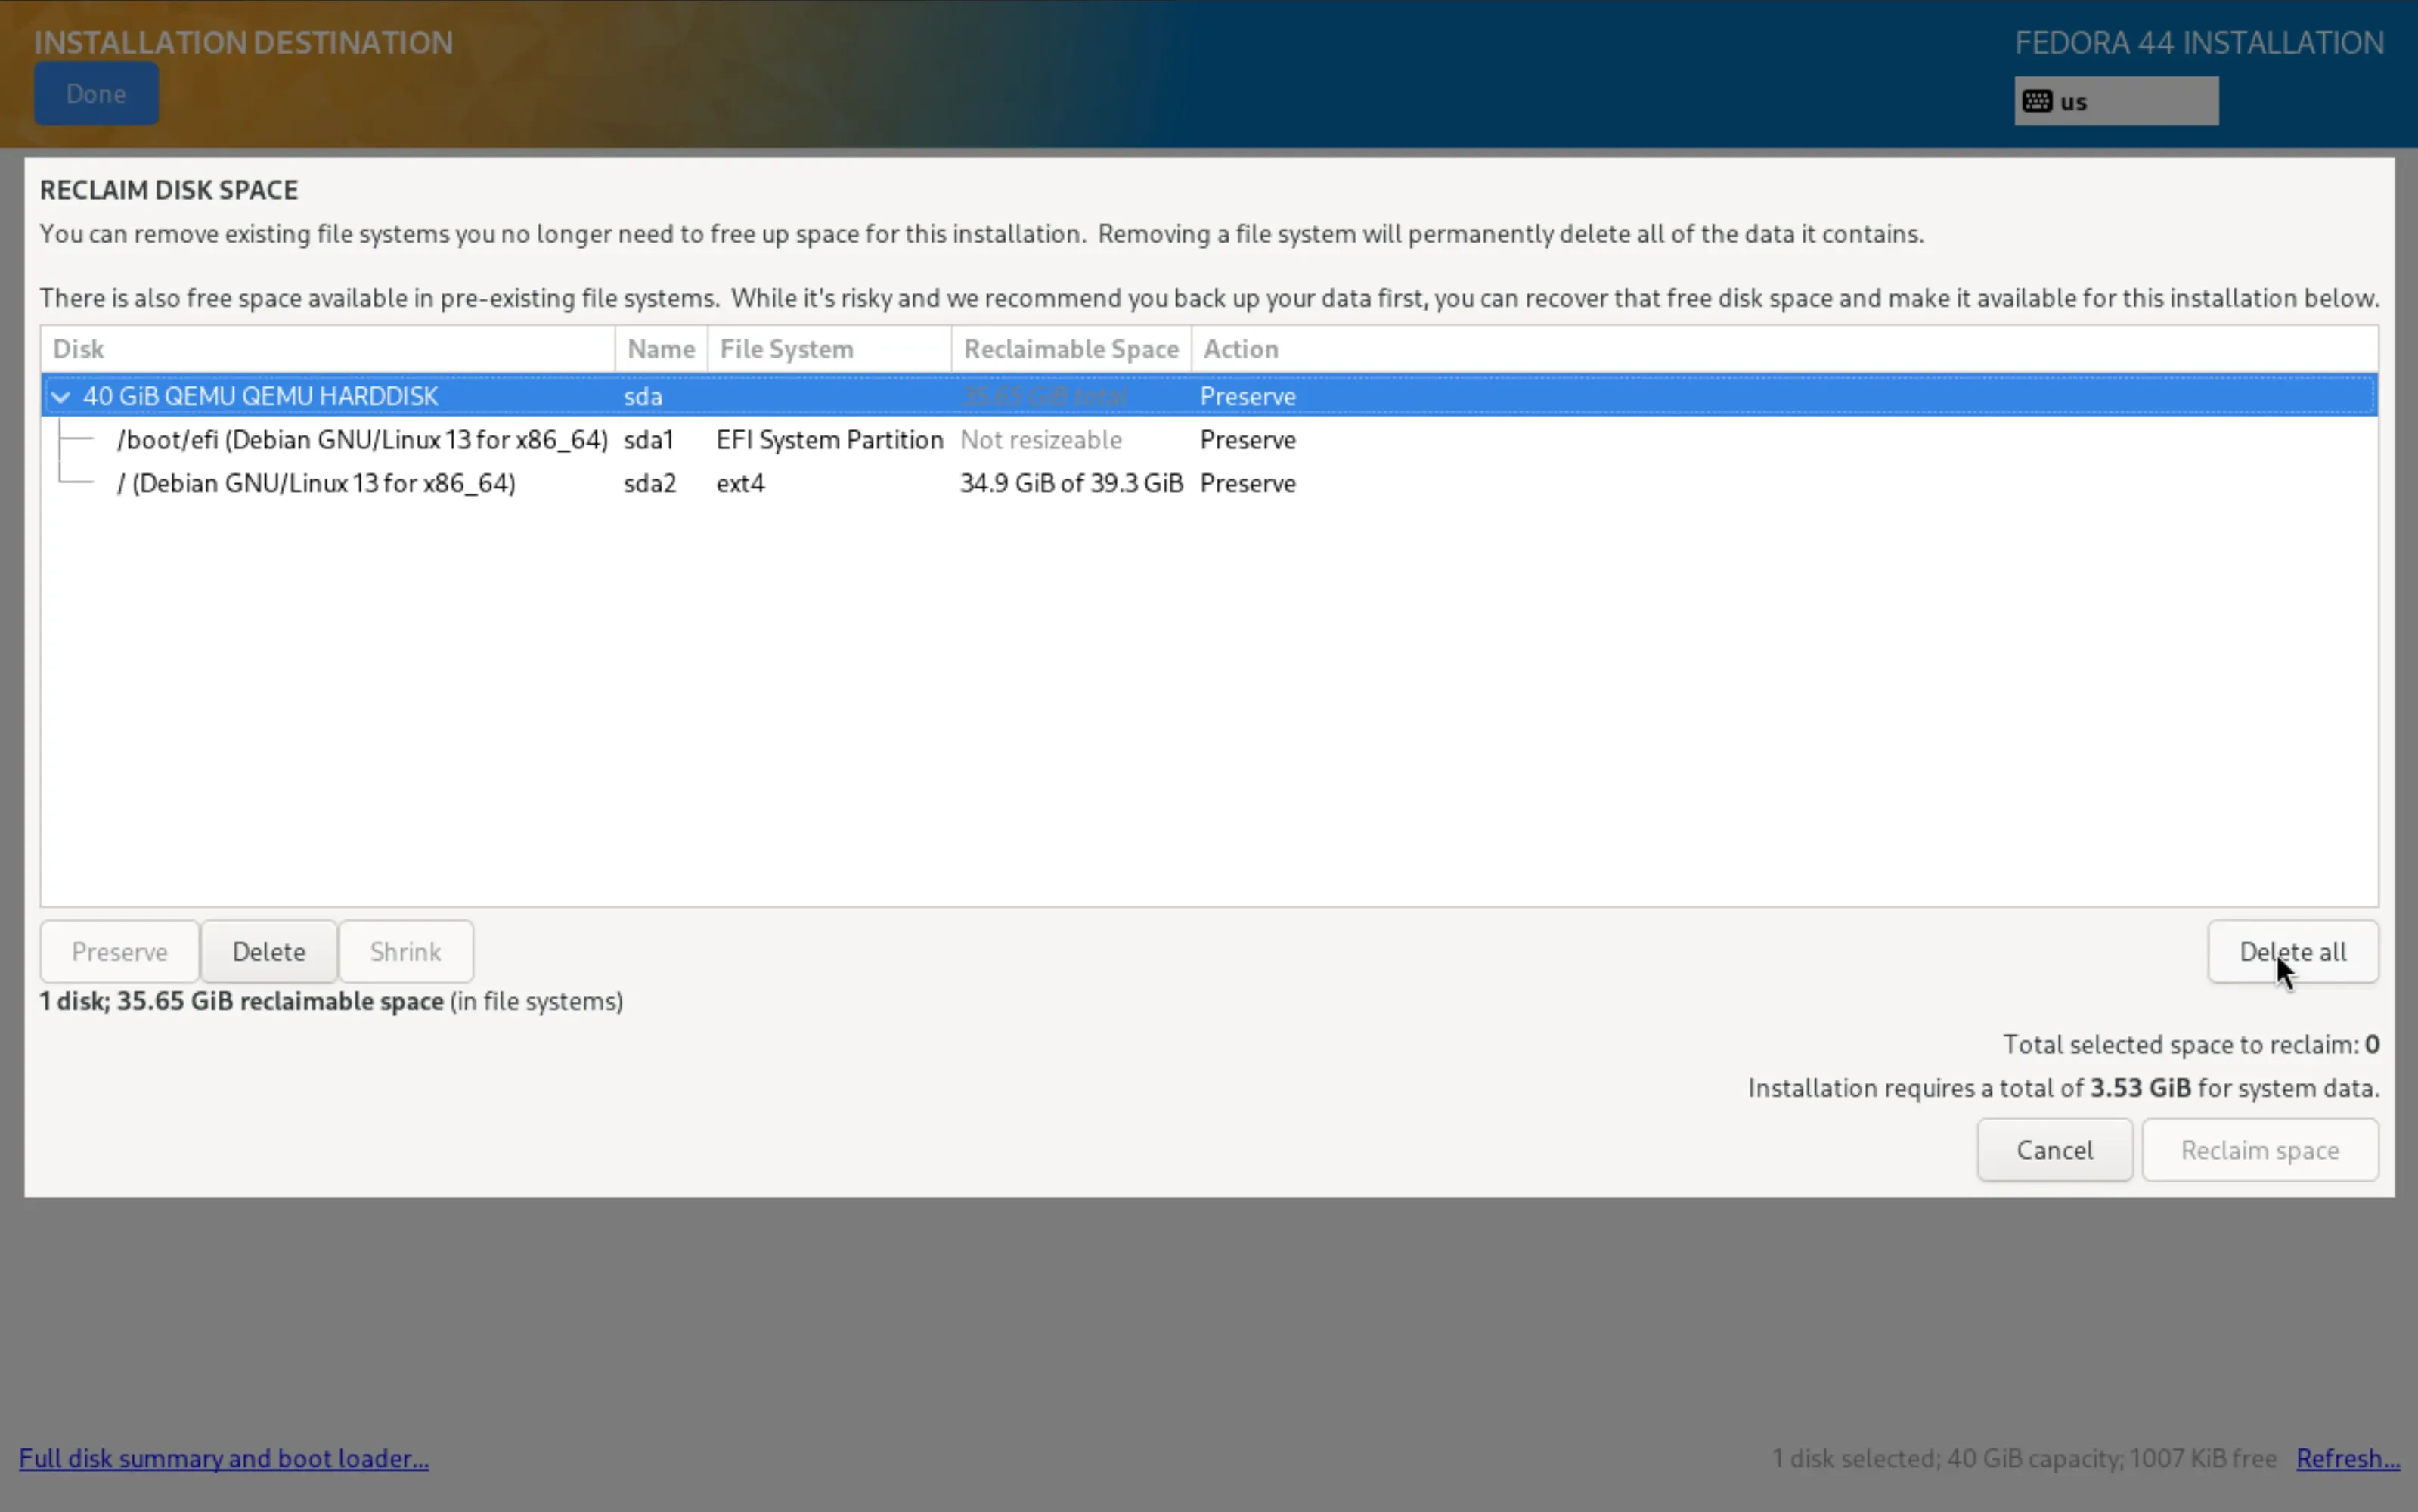
- Installation Destination. The only disk is
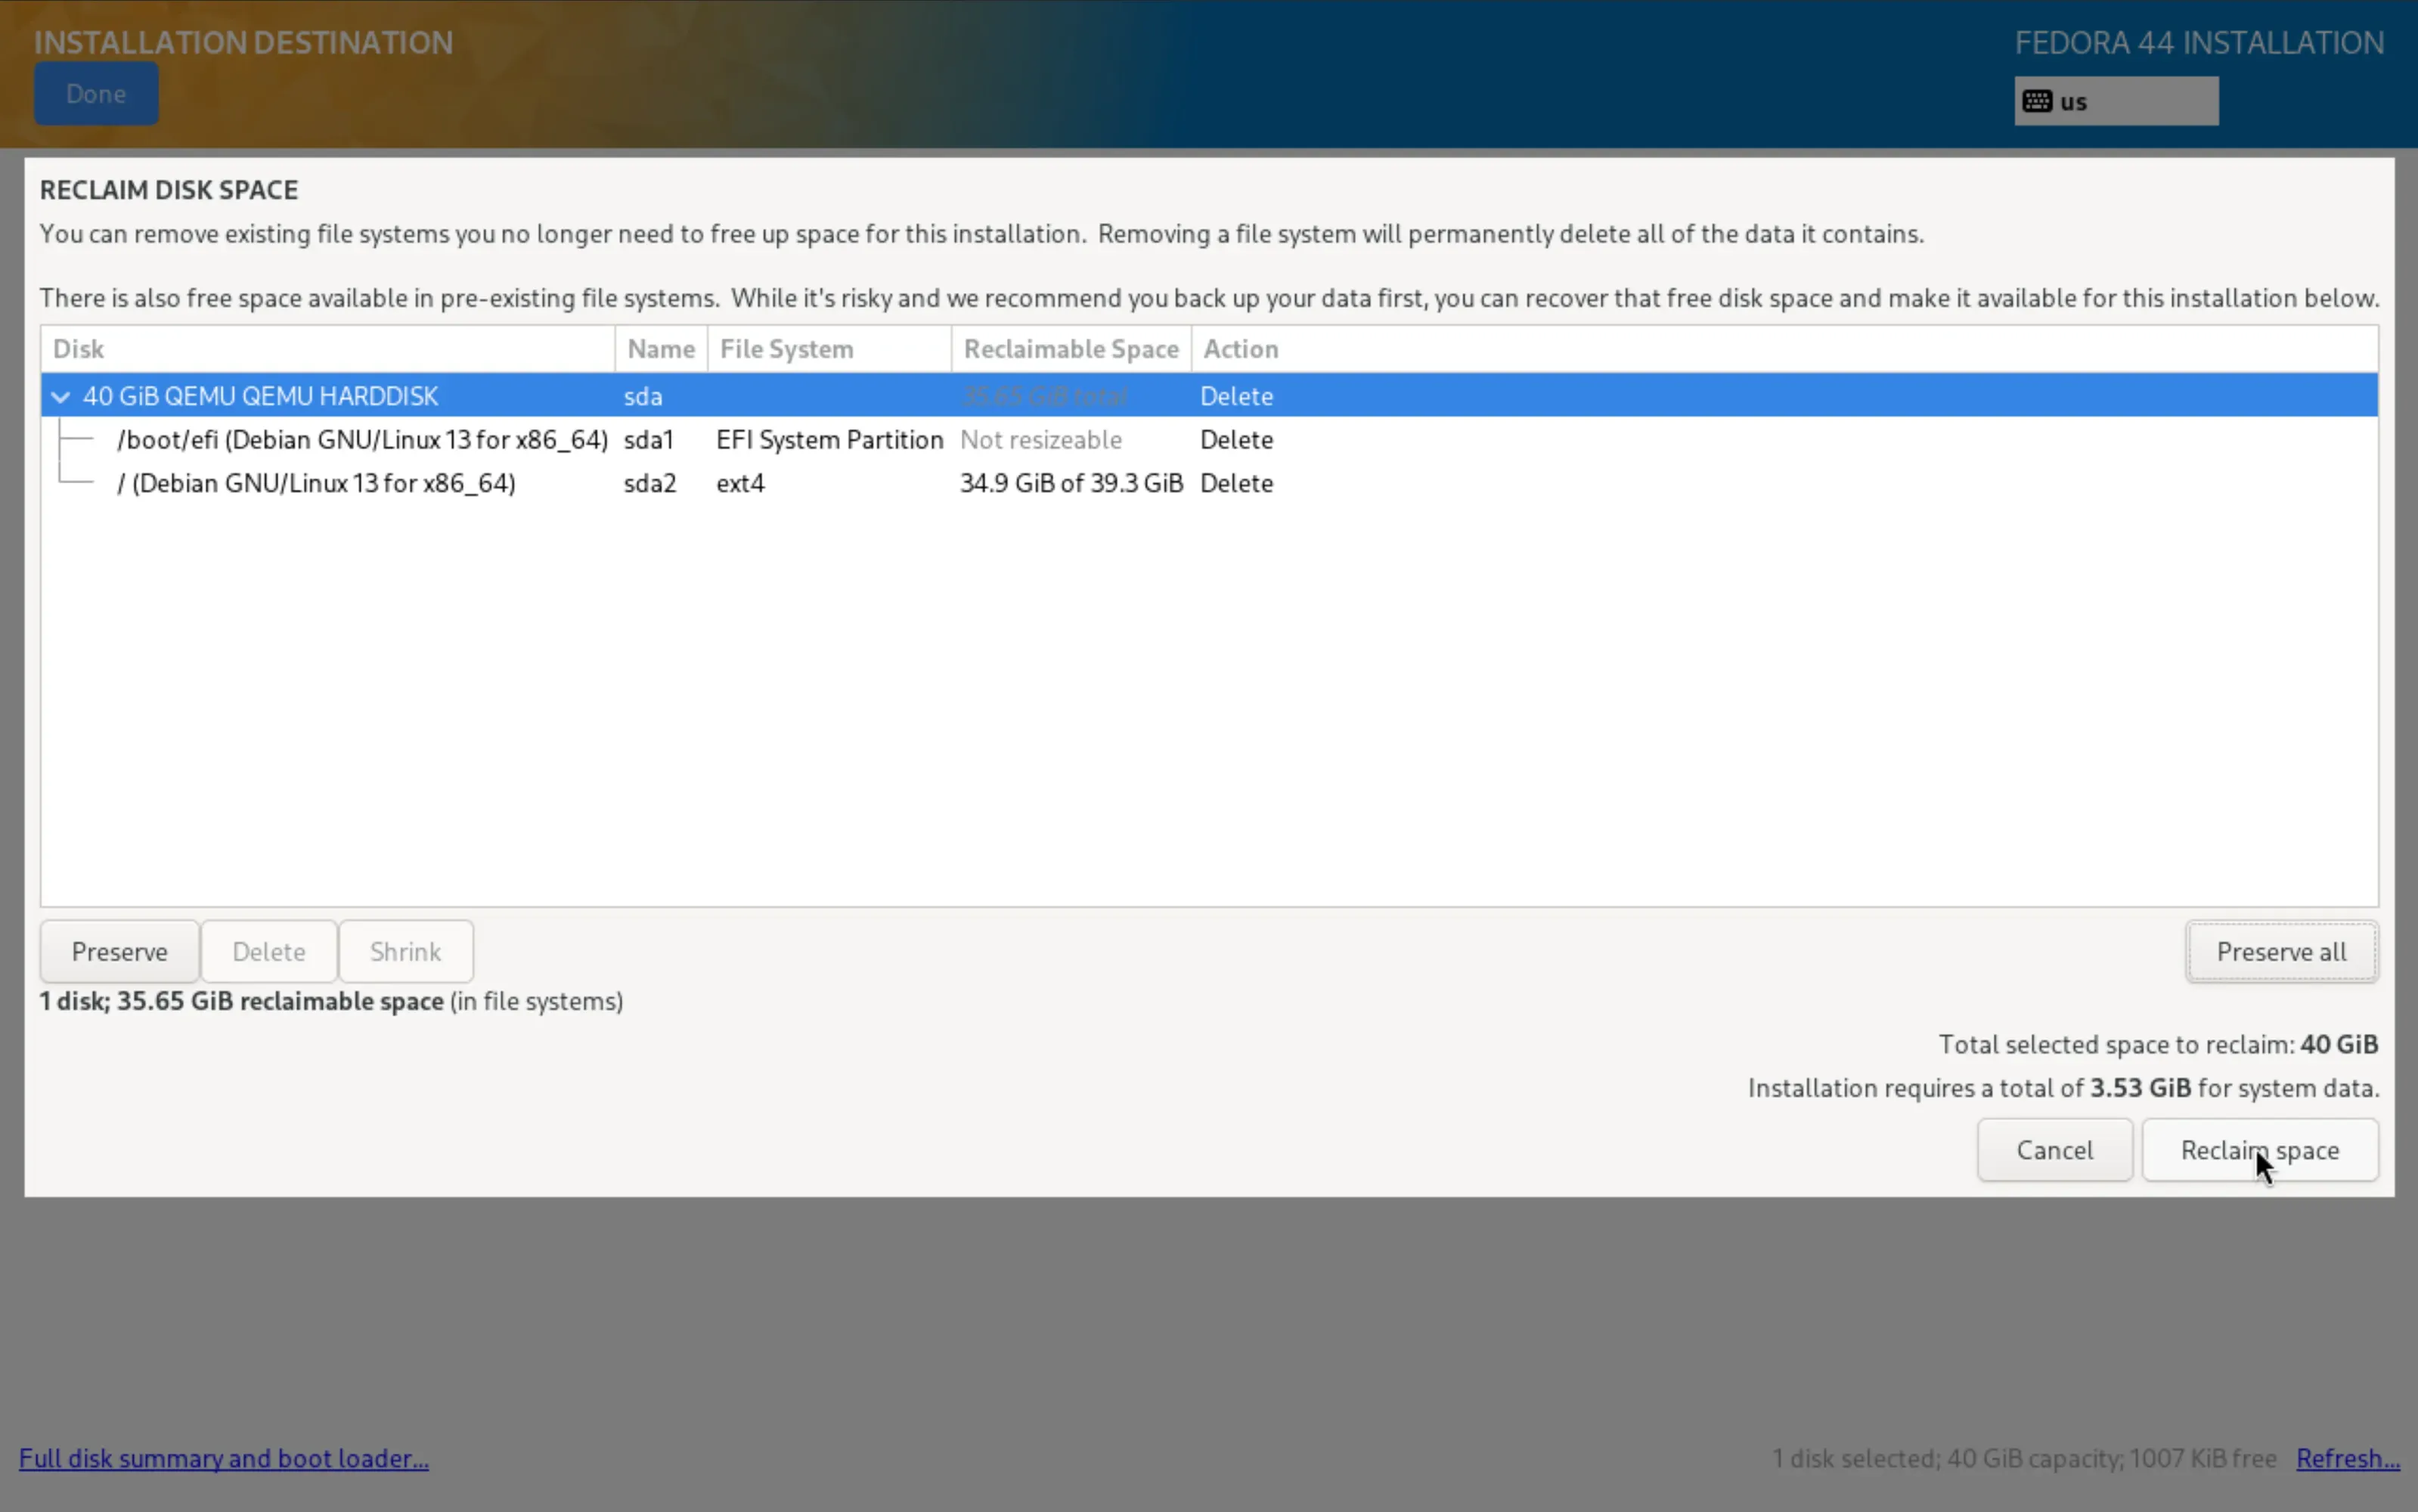
sda, and it is already selected. The line below it still reports almost no free space, because your previous system's partitions take it up. Tick Free up space by removing or shrinking existing partitions, then Done, and in the Reclaim Disk Space dialog click Delete all followed by Reclaim space. The old data is gone from here on.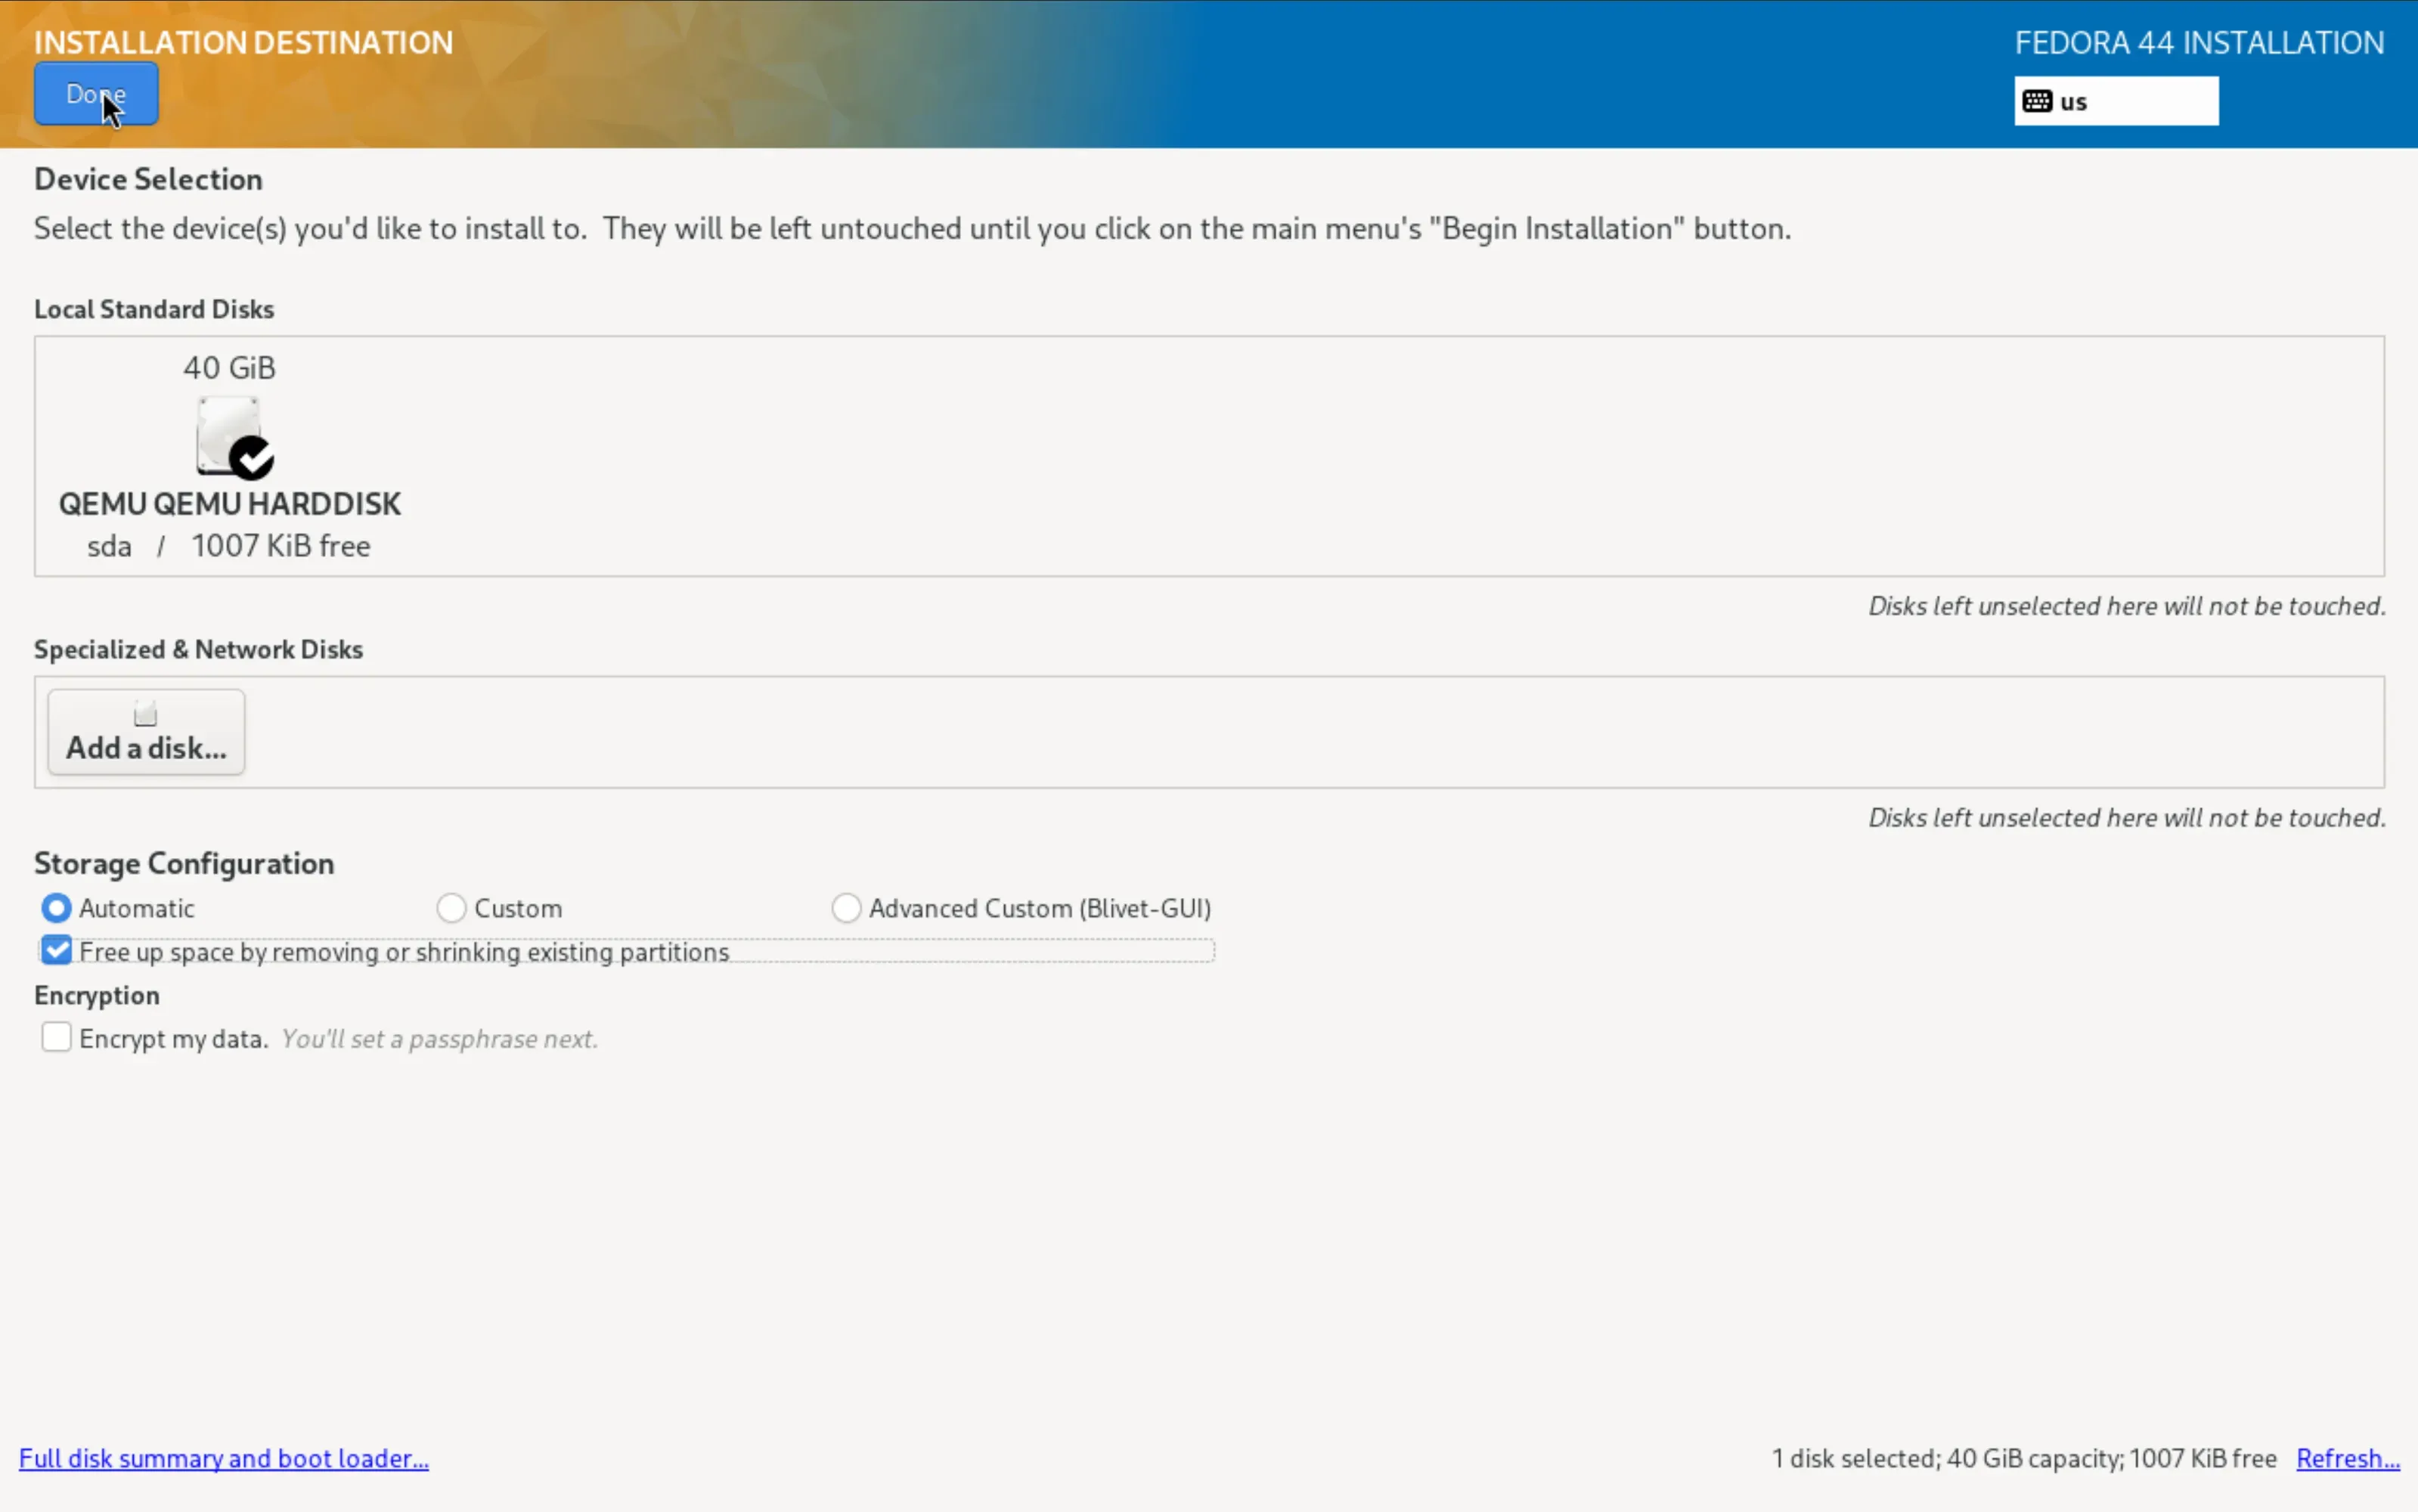 Installation Destination with Free up space ticked
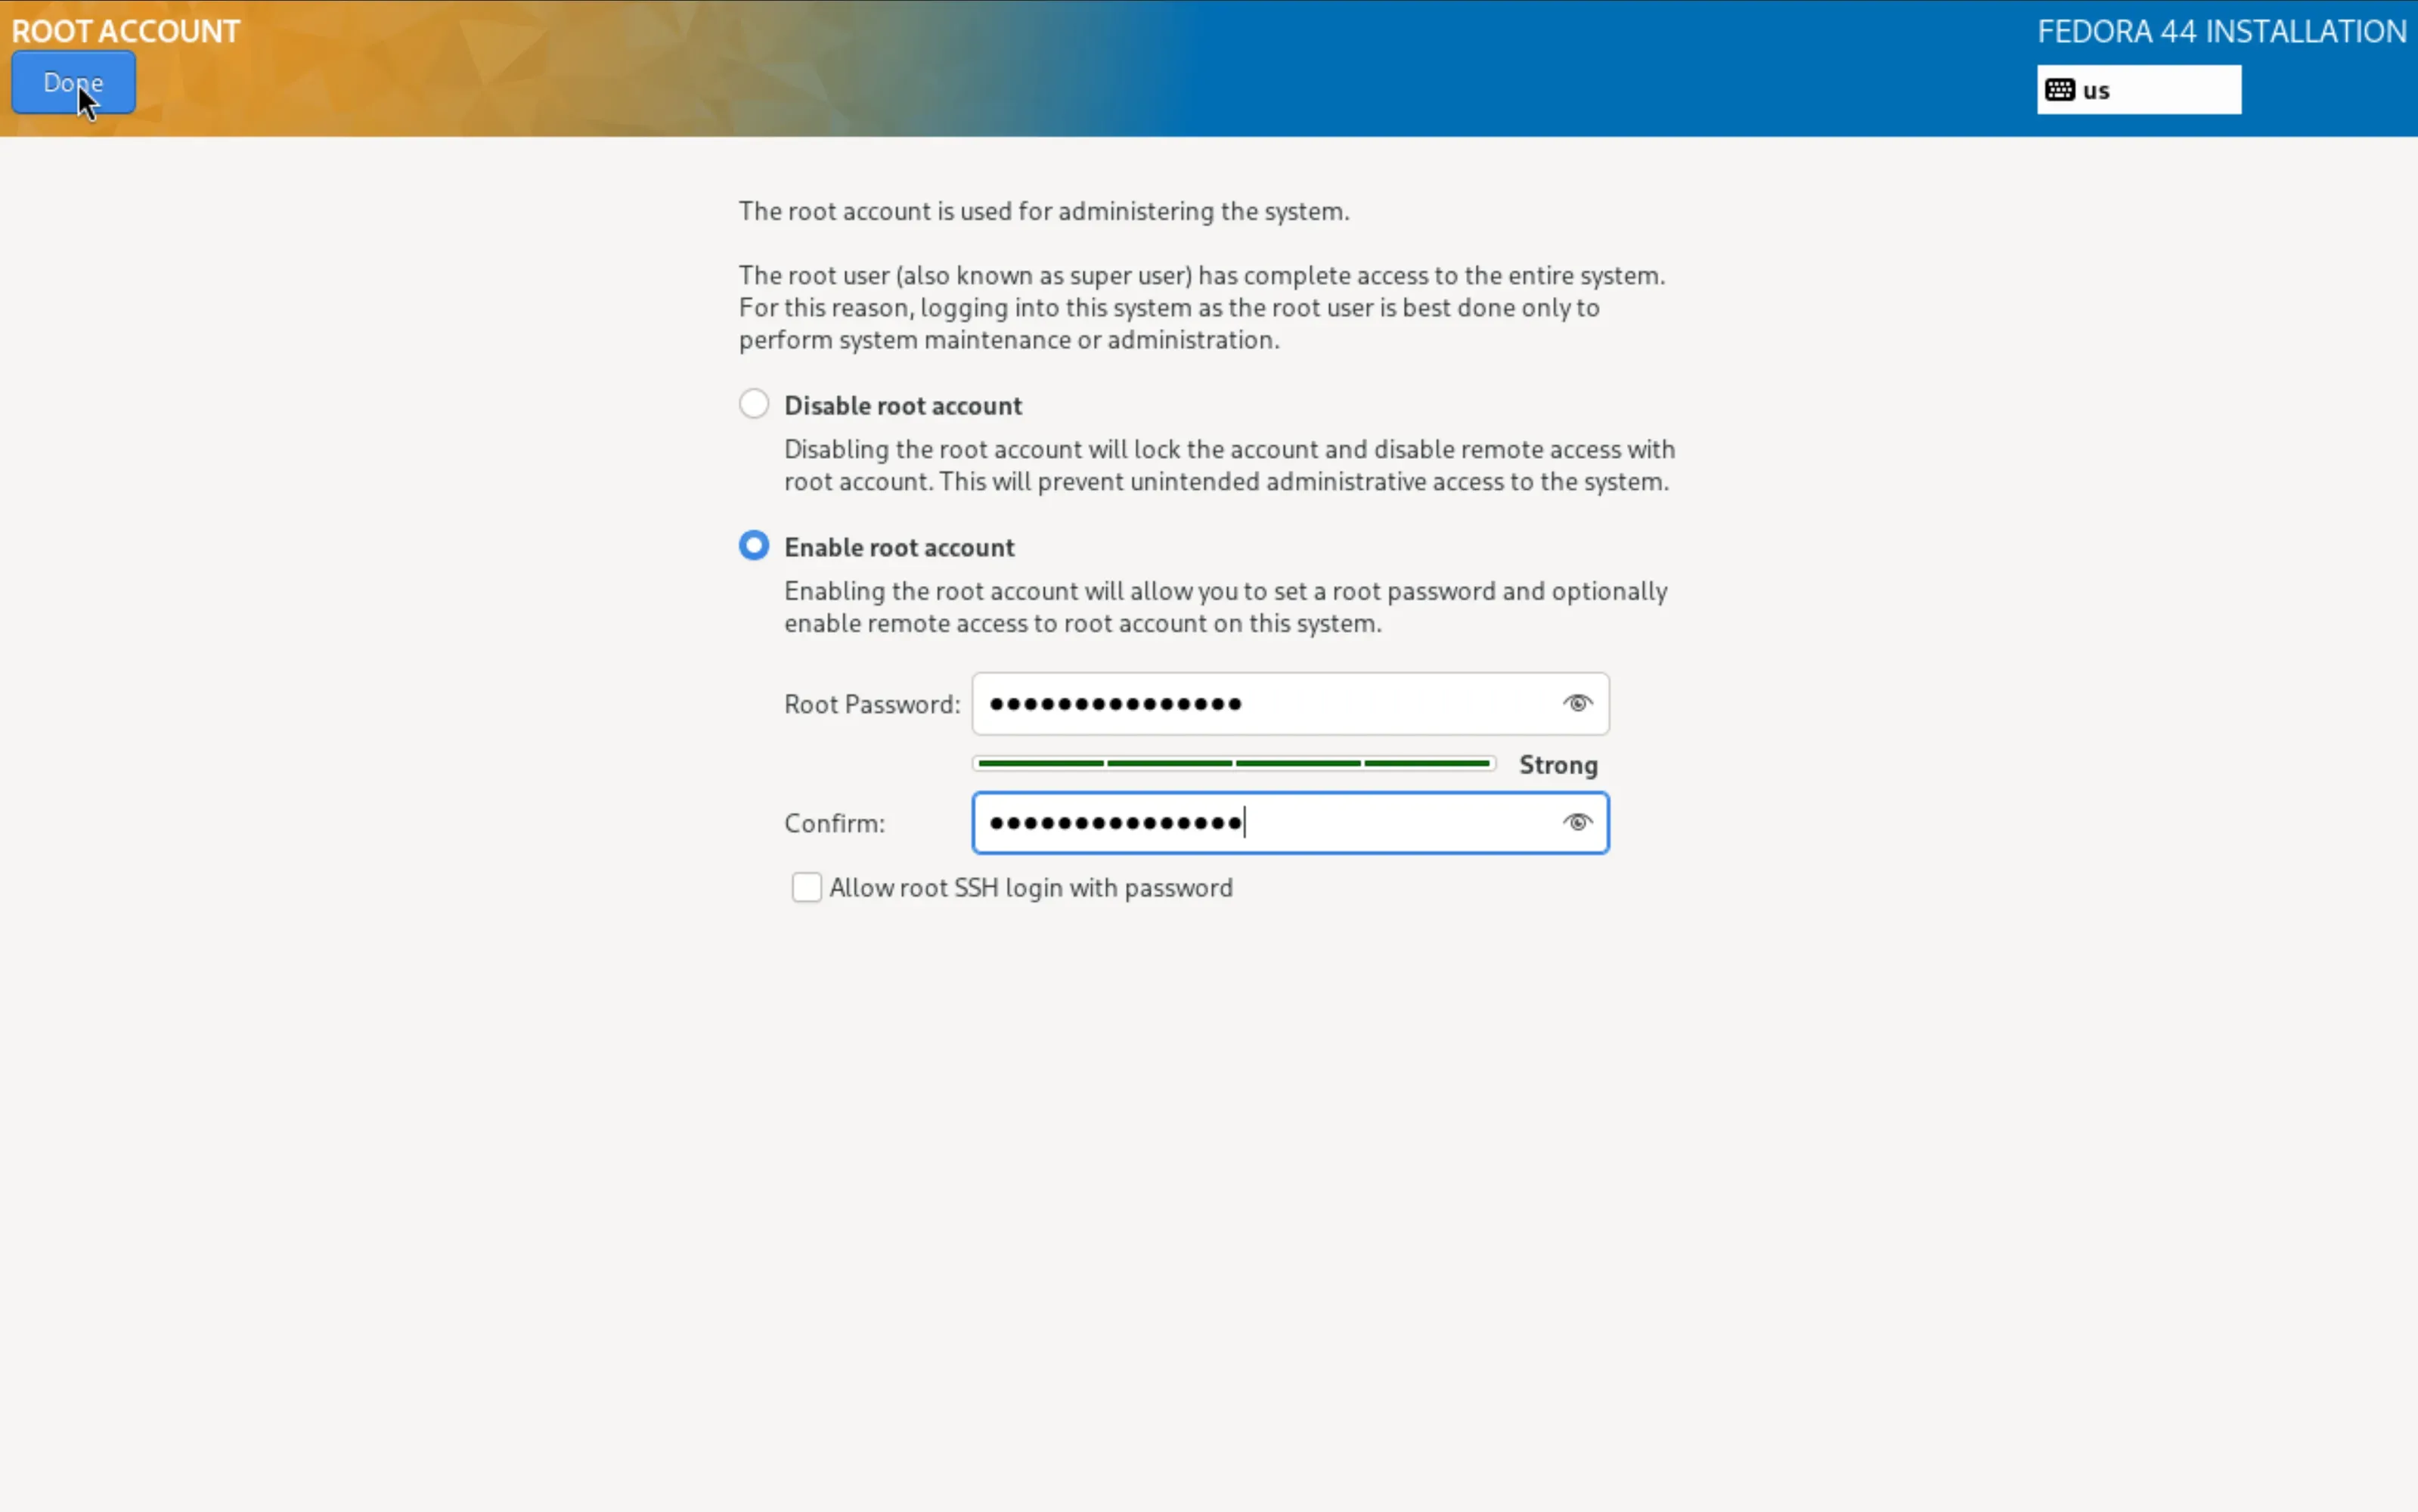
 - Root Account. Reads disabled. Set a password and leave Allow root SSH login with password off. If SSH access gives you trouble later, the console is your only way in.
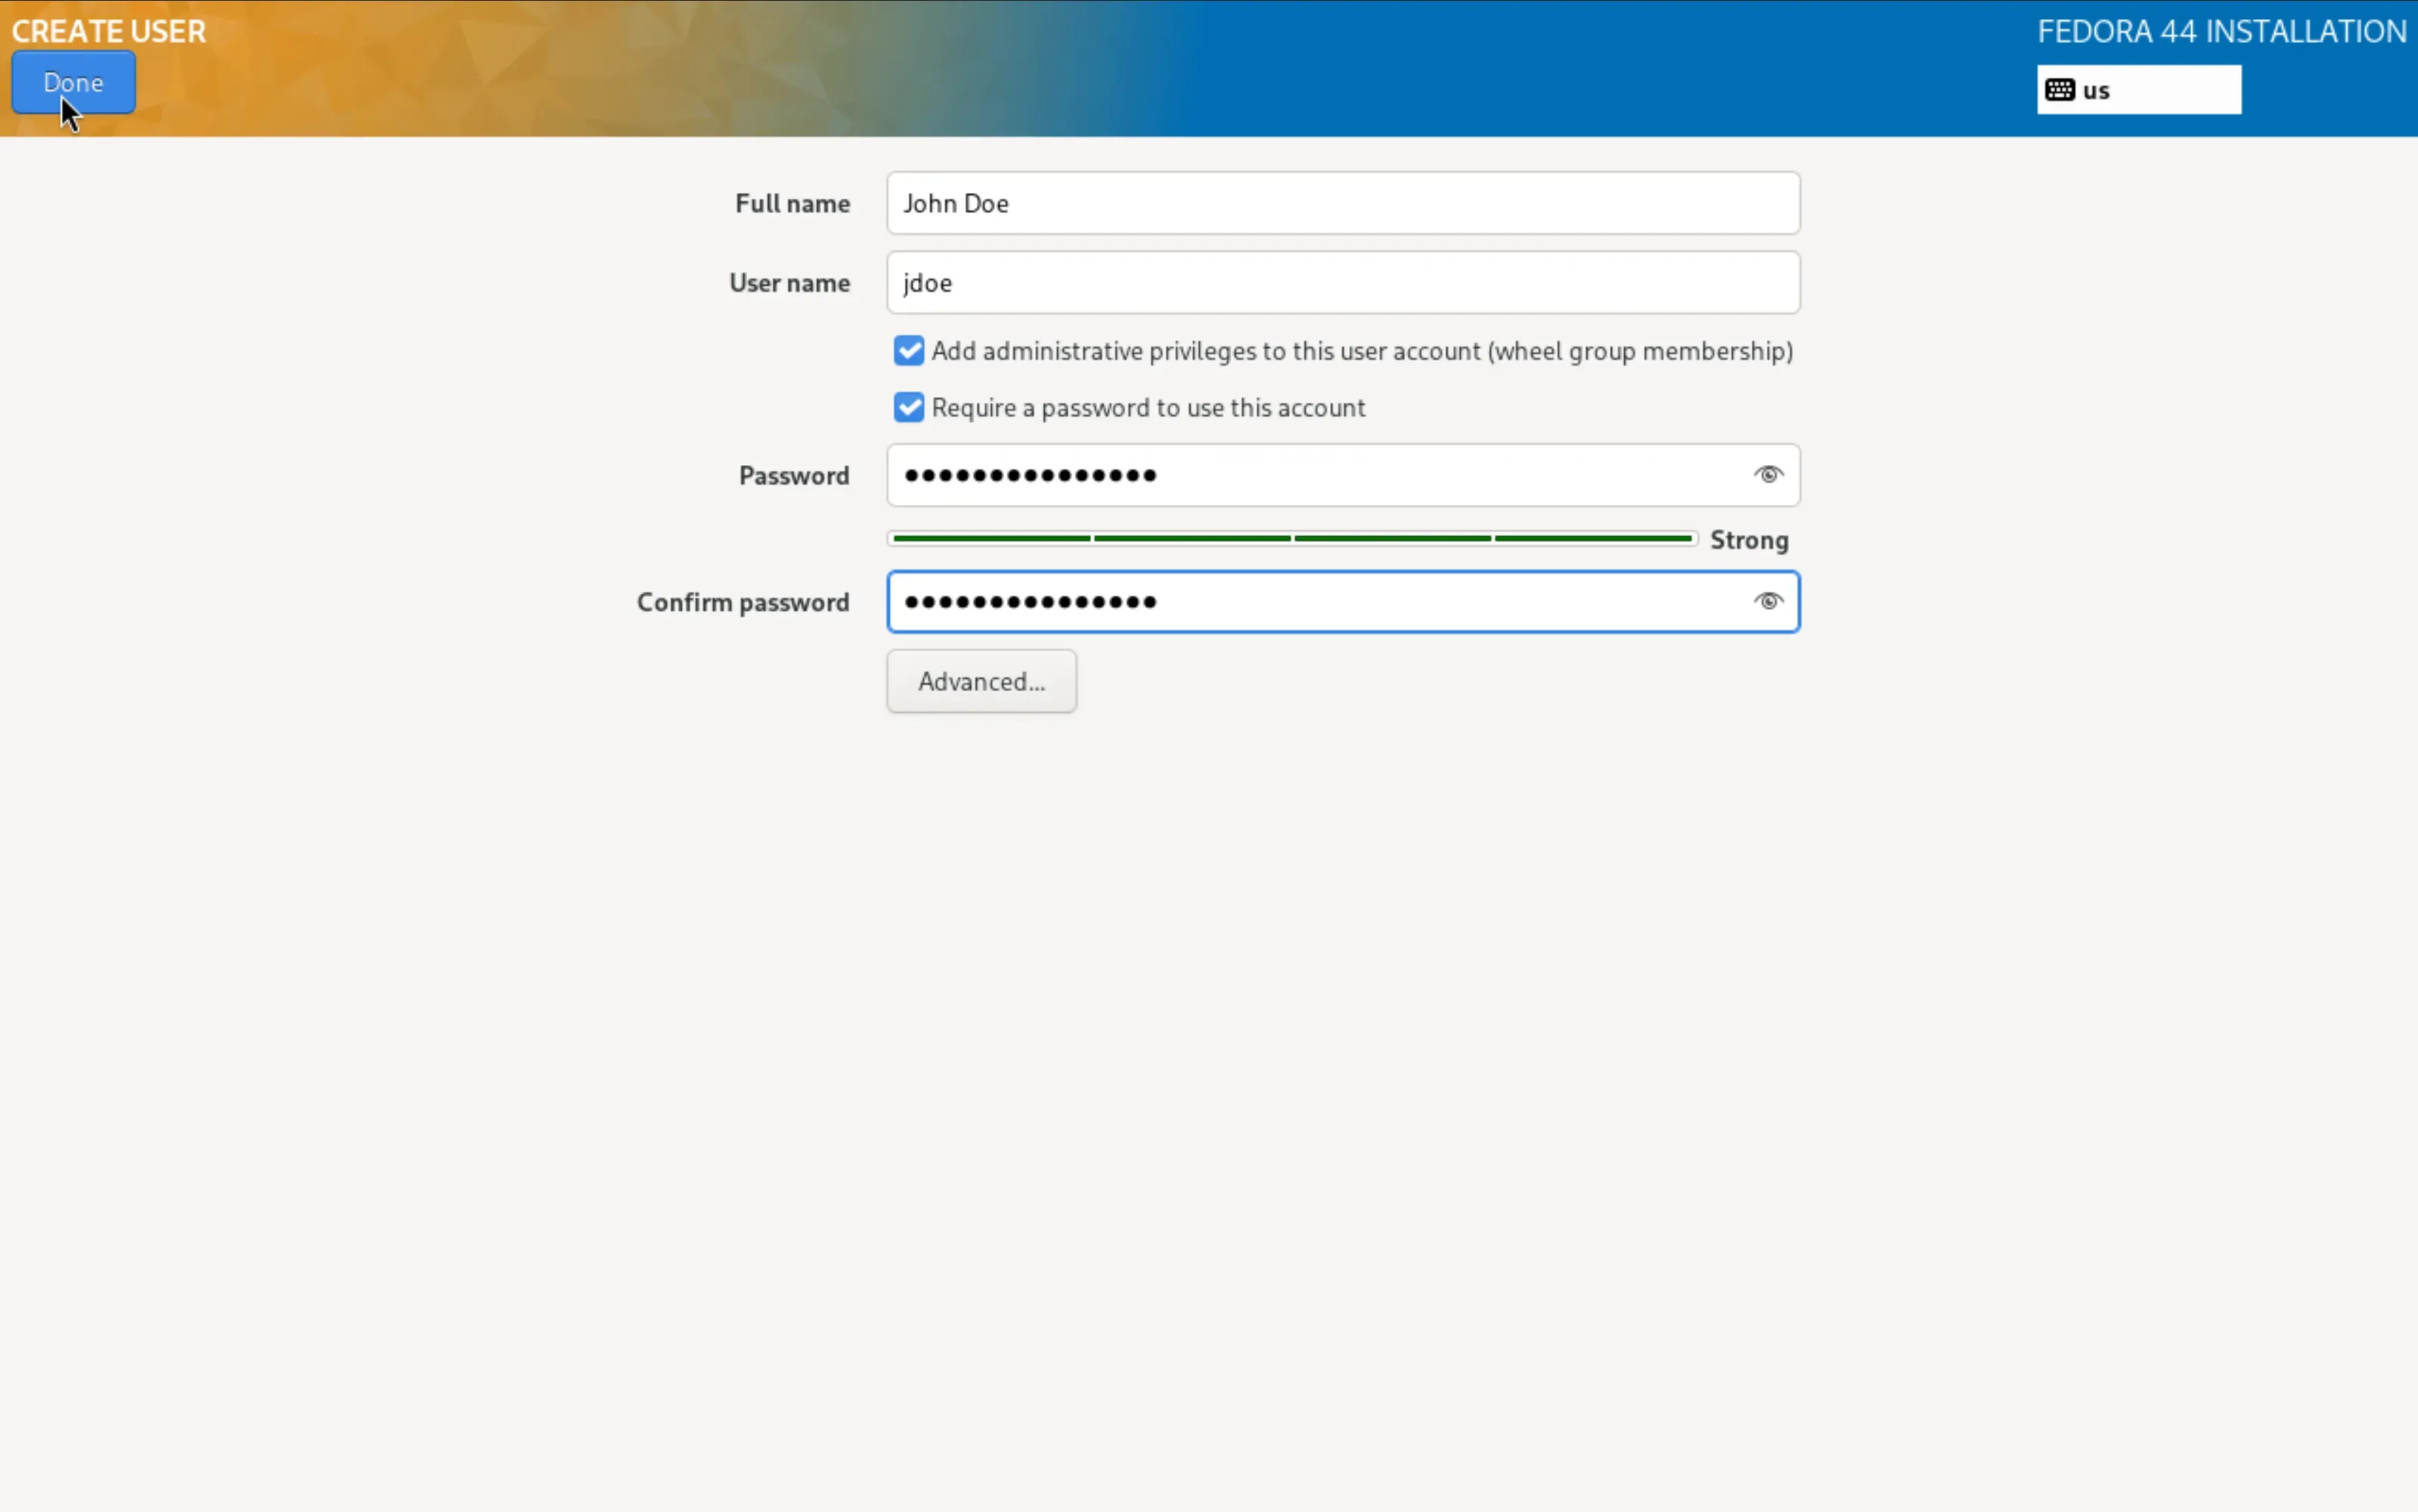
- User Creation. The user you will log in with. Tick Add administrative privileges to this user account, or you cannot administer anything on the system.
Finally, set the timezone under Time & Date; it ships set to Americas/New York.
Begin Installation starts the installation.
Eject the ISO and boot into the new system
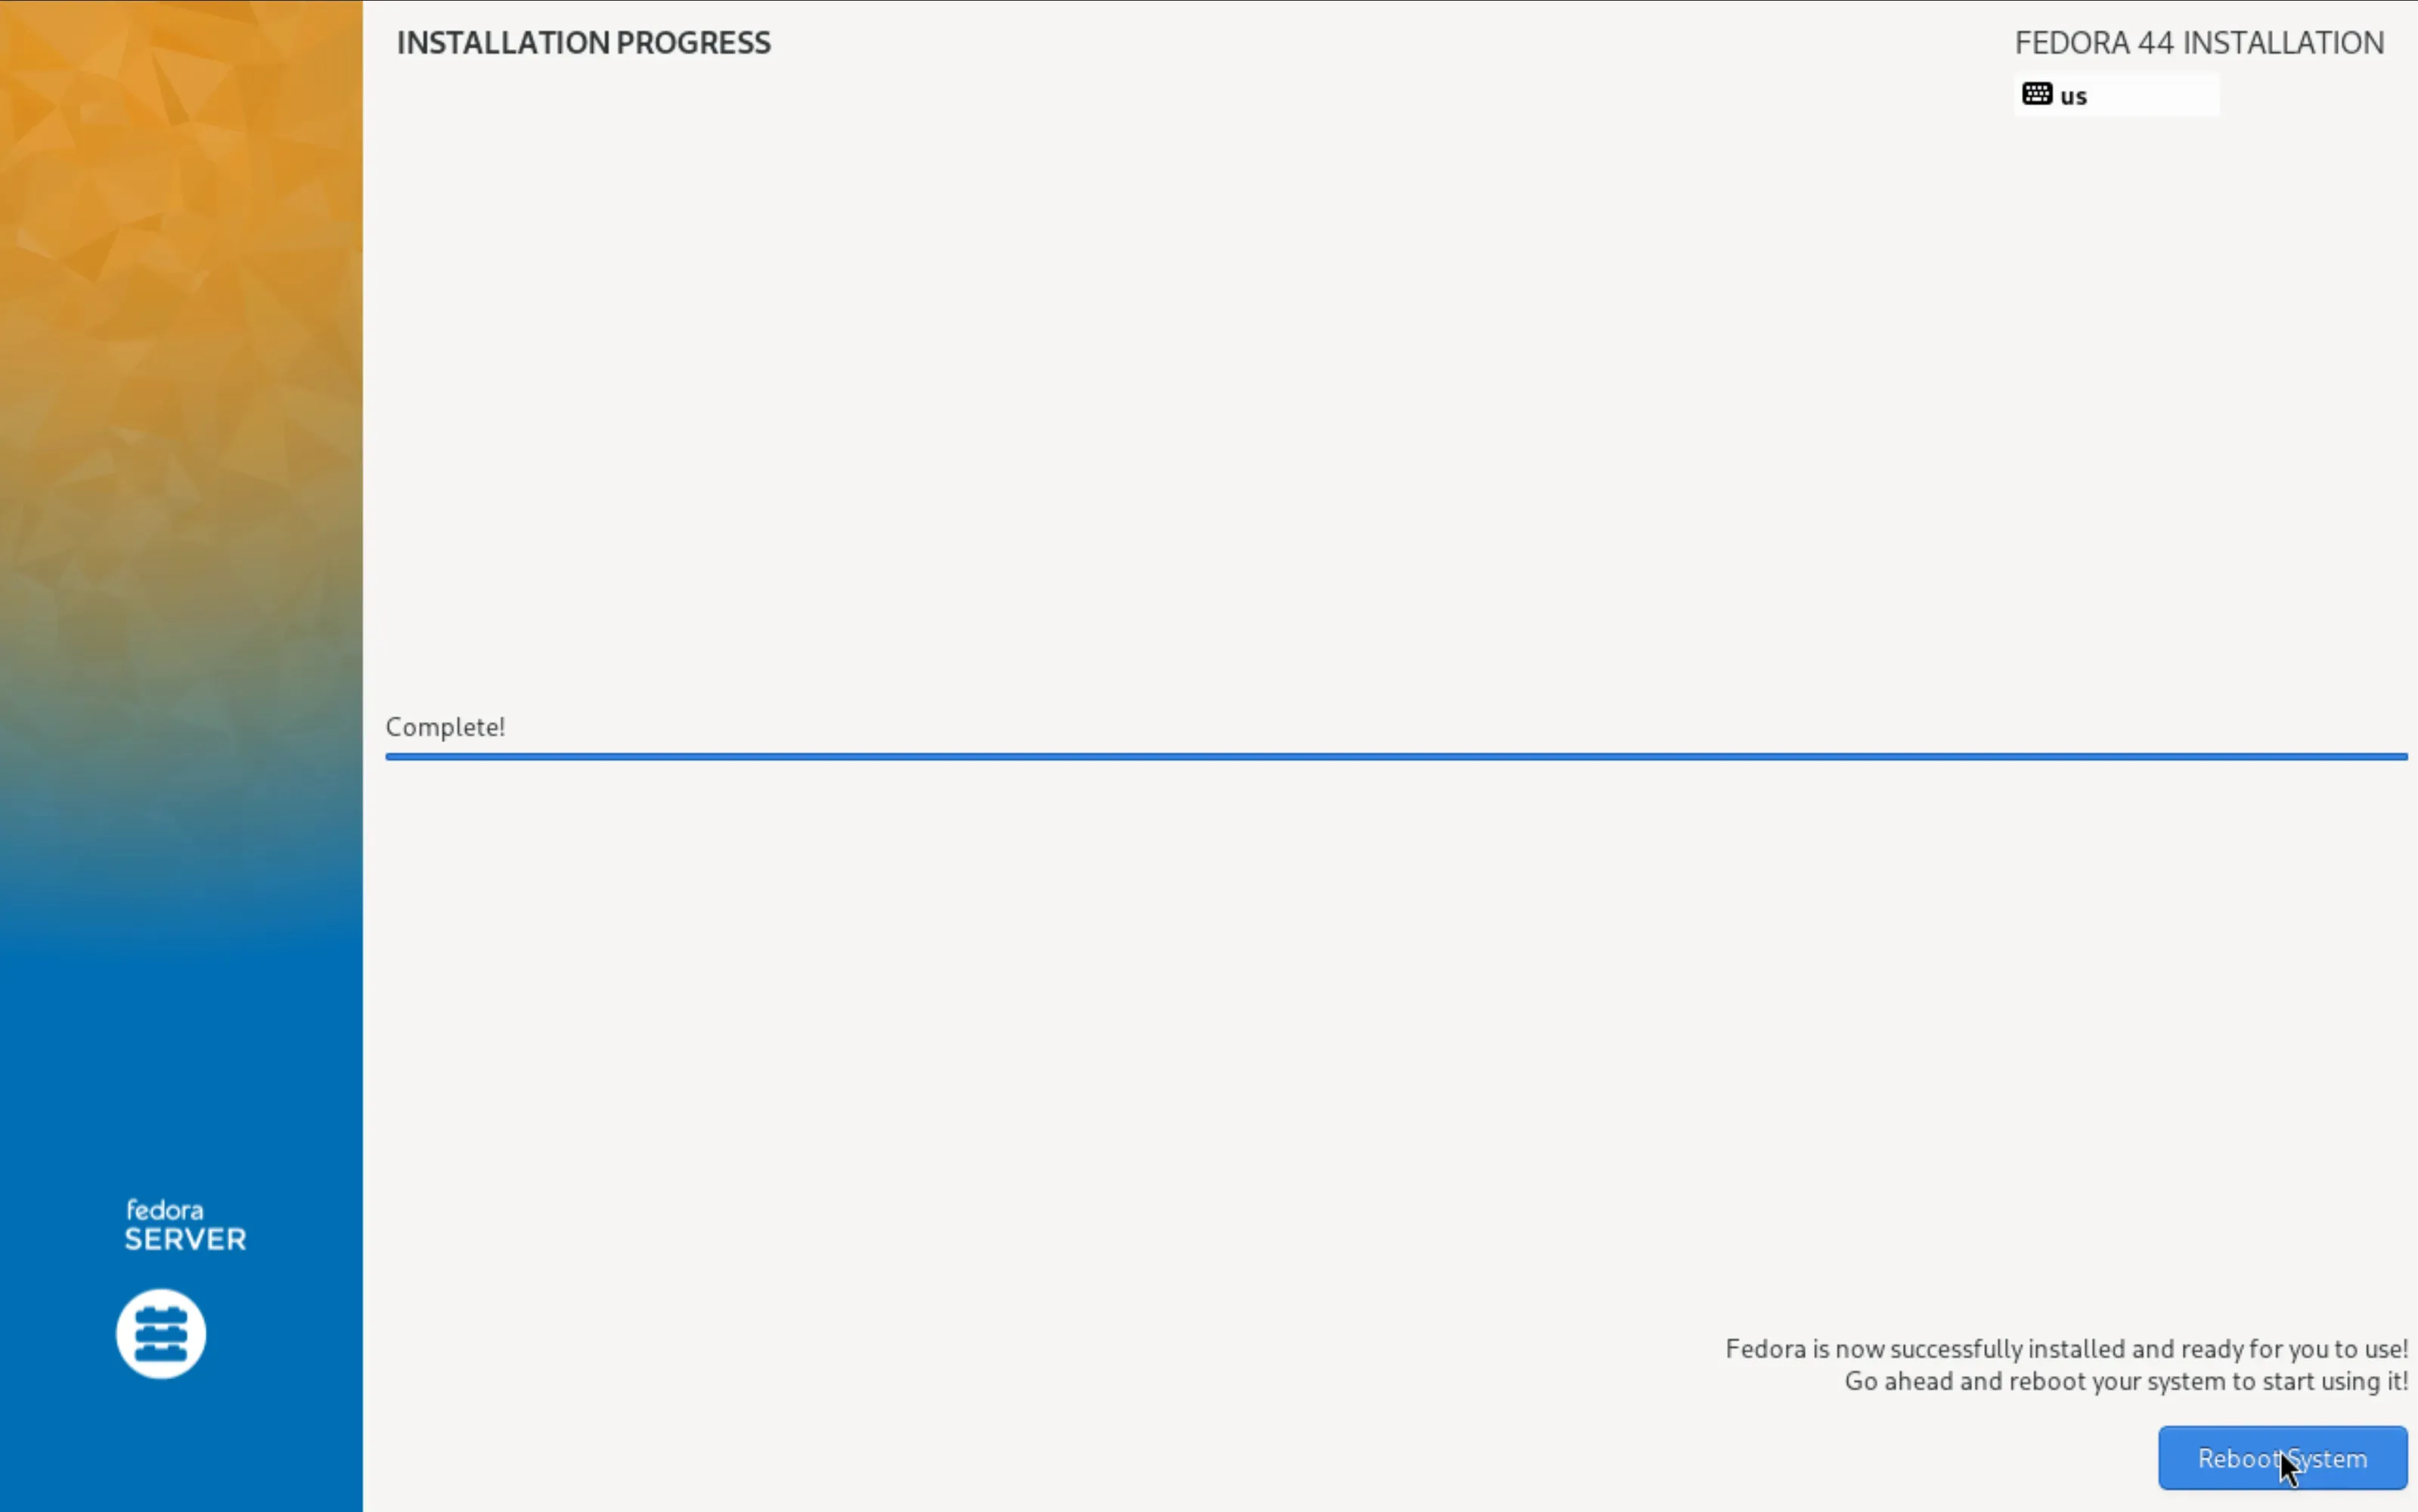
Anaconda offers Reboot System at the end. That restart takes you back to the install menu, because the ISO still sits ahead of the disk in the boot order. The menu has no entry for booting the local drive, not even under Troubleshooting. There is no way around ejecting:
- Click Reboot System in Anaconda. You land in the install menu, which is expected.
- In the panel, click Eject on the highlighted row of the Mount ISO section.
- In the console, click Send CtrlAltDel in the top right. The seed restarts and boots from the disk.
Do not eject during a running installation. It is carried out without a confirmation prompt and aborts the installation. A running system you restart from the inside later, with systemctl reboot.
Check access
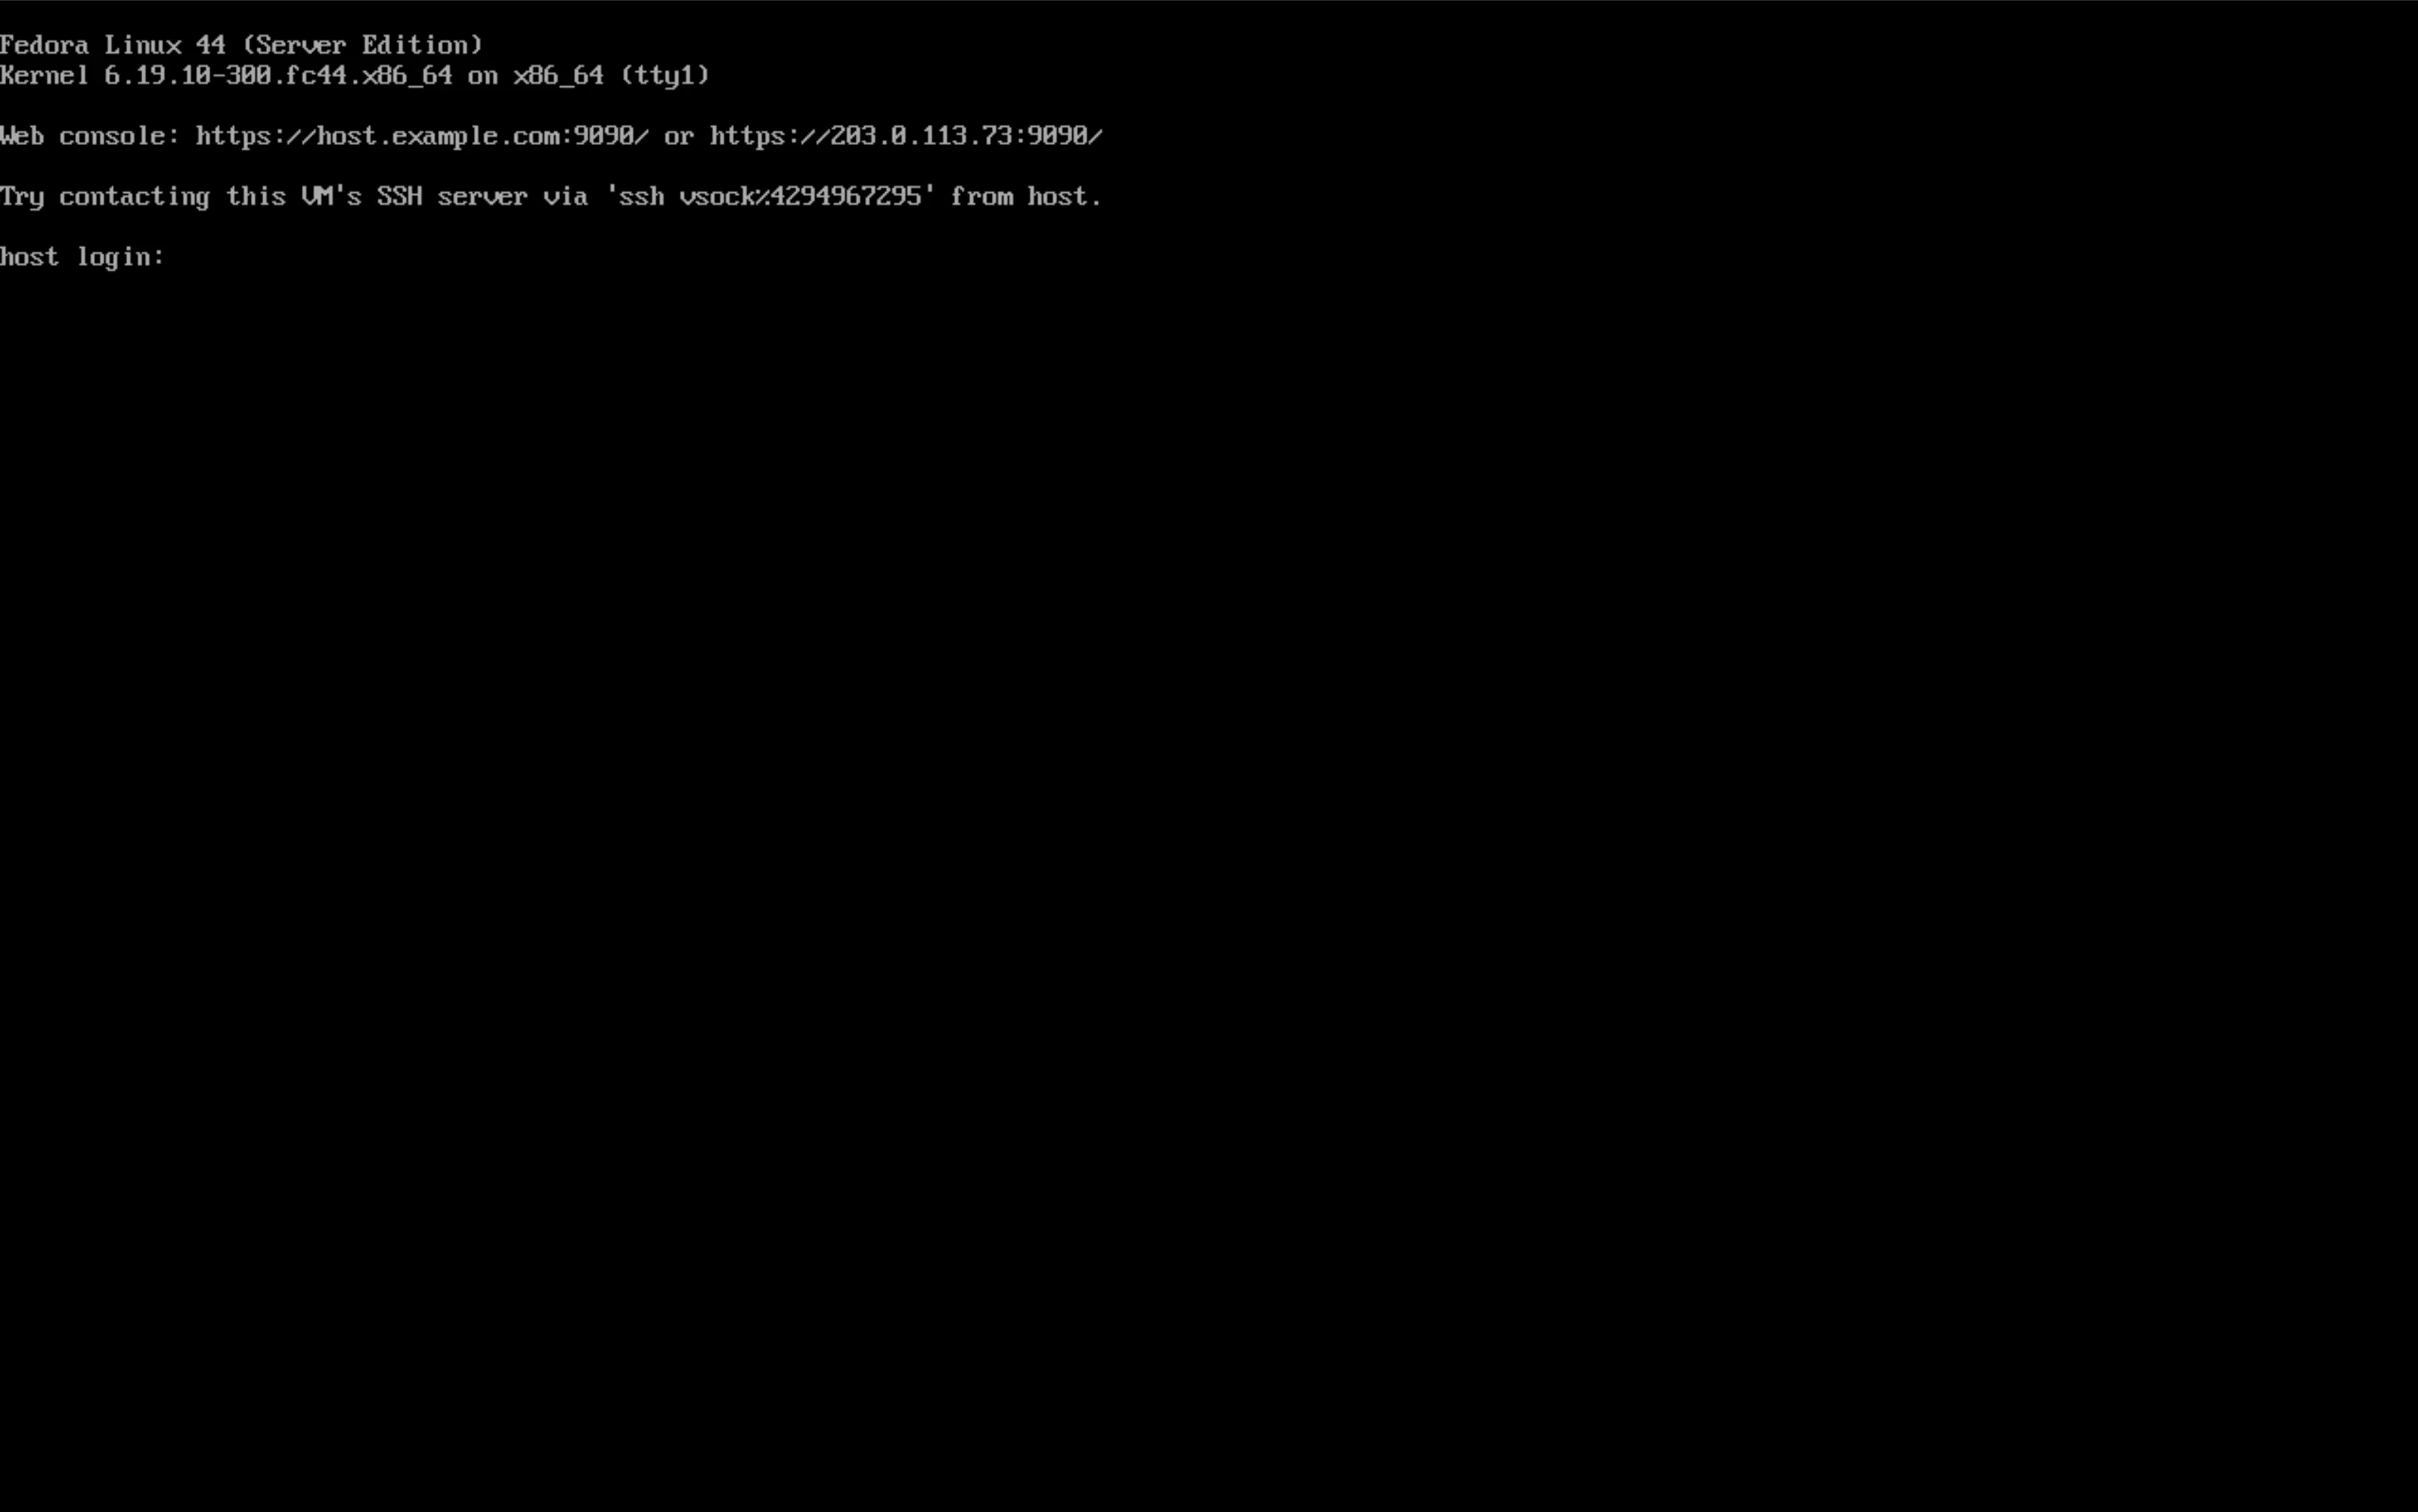
After the start, Fedora Server greets you with a text login; a graphical desktop is not part of the Server Edition. Log in on the console and check:
ip -br addr
ping -c3 1.1.1.1
getent hosts fedoraproject.org
And then from your own machine:
ssh <USER>@<IPv4-ADDRESS>
The web interface is Cockpit and it is already running: https://<IPv4-ADDRESS>:9090/, with the user from the installation. You acknowledge the self-signed certificate once in the browser.
Remember the firewall on our side: without an assigned firewall the seed is open to the internet. Under Network › Firewalls you create one that allows SSH and Cockpit only from your own address, and assign it to the seed.
Done
Your seed now runs your own installation. Things to keep in mind:
- Additional IPv4 addresses are routed to your seed immediately, but not configured inside the system, not even by a restart. The guide Configure additional IPv4 addresses on a seed describes how to add them permanently.
- DNS records (A and PTR) are still maintained automatically by the cloud, based on your seed's hostname. Setting the hostname inside the system is up to you.
- Backups and snapshots keep working unchanged. On a self-installed system they are your only safety net, because reinstalling through the cloud overwrites everything.
- Back to one of our images any time via Manage › Empty seed and reinstall. That lifts restricted mode, but wipes the disk.