This guide shows how to install Coolify on your own server and deploy your first application. Coolify is a free, self-hosted PaaS platform (comparable to Heroku or Vercel) that handles deployments, SSL certificates and reverse proxy configuration automatically. You install Coolify via a one-liner script, optionally connect additional servers via SSH and deploy applications through a web dashboard or git push. By the end of this guide, you will deploy n8n on a second server through the Coolify interface.
Why Should You Use Coolify?
Coolify is a free, open-source, self-hosted Platform as a Service (PaaS) solution that allows you to easily deploy applications, databases, and services on your own server without having to manually set up the infrastructure or manage deployment processes. It is a cost-free alternative to cloud-based PaaS solutions like Heroku and Vercel, giving you full control over your infrastructure.
By installing Coolify on your server you can deploy containerized applications through a single web dashboard without worrying about configuring Docker, reverse proxies, databases, or CI/CD pipelines manually. Each deployment runs in its own Docker container, and Coolify automatically manages SSL/TLS certificates for your apps.
What Is Coolify in Detail?
To further understand the opportunities provided by using a self-hosted deployment service, we will take a closer look at what is offered when using Coolify.
Coolify makes it very easy to deploy new resources on your servers. These resources can include applications, services, and databases. Applications can be any kind of service or web application that can be deployed as a Docker container. This includes for example frameworks such as Django or Next.js, as well as static sites. They can be deployed in several different ways:
- by using build packs (Nixpacks, Static, Dockerfile, or Docker Compose) or by using pre-built Docker images
- by deploying applications through Git repositories. This allows automatic deployment of code that is pushed to the repository and generally enables continuous integration workflows. It also allows pull requests to be tested in isolated environments before they are merged into the production environment
Services are deployed using custom Docker Compose files and are not connected to Git repositories. Within Coolify, more than 280+ one-click services are available, allowing users to deploy them instantly without having to manually perform configuration and setup. Coolify supports a few different database types and any additional ones using Docker.
It natively supports the Docker Engine. Docker Swarm is currently only available as an experimental feature. Kubernetes is not yet supported, but its integration has been announced for the future.
There are also several additional features provided, including:
- automatic Docker cleanup
- disk usage checks
- scheduled database backups
- the ability to connect S3 storage and schedule automated backups
- Cloudflare Tunnels integration settings
Coolify uses Traefik as its default and recommended proxy. Traefik automatically manages routing and simplifies SSL/TLS certificate management, including built-in support for Let's Encrypt. Otherwise Caddy is available as an experimental alternative, and a fully custom proxy can be configured manually as well. All proxy configurations can be changed at any time in the dashboard.
Using One or More Servers?
There are a few different ways to structure your Coolify server setup. You can deploy all of your resources on the same server where Coolify is installed (single-node setup), but it is generally not recommended, as high server usage could prevent Coolify from functioning properly.

Alternatively, you can run only Coolify on one server and connect additional remote servers via SSH that host your applications. A hybrid setup is also possible, where some resources are deployed on the same server as Coolify while additional remote servers are connected to host other resources.
Additional remote servers can always be added later through the Coolify dashboard. Using remote servers is generally recommended for production environments.
The Main Server where Coolify is installed provides the following:
- a UI dashboard from which you can control deployments, manage resources, and administer all connected servers
- SSH connections to additional servers in order to perform health checks and monitoring tasks
When multiple additional servers are connected to Coolify, they function as follows:
- Each server has its own proxy that handles incoming requests
- Traffic to applications deployed on those servers does not pass through the main Coolify server first, but instead goes directly to the respective server.

For production environments we recommend activating backups for all servers and generally using a multi-remote-server setup.
While Coolify simplifies deployment and infrastructure management, it does not manage the security of your servers.
Dokploy: An Alternative to Coolify
Dokploy is a newer, self-hosted and free Platform as a Service (PaaS) solution that is directly comparable to Coolify.
Many aspects of Coolify and Dokploy are very similar. Both provide a web-based dashboard from which you can manage deployments and infrastructure. However, there are also some notable differences. For example, Dokploy is designed as a Docker Swarm-first platform and automatically enables cluster mode.
Dokploy also attracts many users with its modern and intuitive dashboard UI, whereas some users consider Coolify’s interface to be somewhat clunky. Additionally, Dokploy supports more build methods: Coolify supports Static Buildpack, Nixpacks, Dockerfile, and Docker Compose, while Dokploy additionally offers Railpack, Heroku Buildpacks, and Paketo Buildpacks. It also includes a built-in monitoring dashboard that allows you to track CPU, memory, and disk usage across your servers.
One of the biggest downsides of Dokploy is that it is still relatively new, which means its community is smaller. As a result, there are fewer community resources available, and its library of one-click application templates is currently smaller as well.
Example Integration of Coolify on Your Own Seed
Get Your Seed
First, you need to create a Seed that meets the requirements for running Coolify.
Coolify supports all Linux operating systems currently provided by dataforest Cloud (Debian, Ubuntu LTS, AlmaLinux, and Rocky Linux).
The minimum Seed specifications required to run Coolify are:
- 2 CPU cores
- 2 GB RAM
- 30 GB storage
If you plan to run applications on the same Seed, you will most likely require a larger configuration. However, you can scale up your Seed later if necessary. Alternatively, you can run applications on separate servers and connect them to your Coolify server via SSH.
Your Seed must also allow SSH access so Coolify can connect to it. When creating the Seed, select the authentication method “SSH key”, then choose an existing key from your team or create a new one.
Finally, optionally rename your Seed and complete the purchase.
Seed Setup
Connect to your Seed via SSH:
ssh root@your-seed-ip
It is important to note that Coolify requires root access to your server.
It is also recommended to adjust your SSH configuration for improved security. Specifically, change the PermitRootLogin setting to prohibit-password.
You can edit the SSH configuration file with:
nano /etc/ssh/sshd_config
There you can set these options:
PubkeyAuthentication yes
PermitRootLogin prohibit-password
Then restart the SSH service, depending on your OS:
systemctl restart ssh
Additionally, it is highly recommended to configure a firewall on your server. For more information, refer to the Coolify documentation.
Coolify Installation
Coolify can be installed using the quick installation script shown below.
If you are using AlmaLinux, you must install Docker manually before running the installation script.
The quick installation script performs the following tasks automatically:
- Installs essential system tools
- Installs and configures Docker
- Creates the required directories
- Configures SSH keys
- Installs and starts Coolify
Run the following command on your Seed (if you’re not logged in as root User, run the script with ‘sudo’):
curl -fsSL https://cdn.coollabs.io/coolify/install.sh | bash
If the automatic setup fails, you can follow the official instructions for manual installation.
Coolify Initial Setup
After the installation completes, the Coolify URL will be displayed in the terminal.
http://your-seed-ip:8000
Open this URL in your browser and create your first admin account. It is important to do this immediately to prevent someone else from accessing the registration page and gaining control of your server.
During the setup process, you can choose between localhost and a remote server. Select the option that best fits your use case.
Once you reach the Coolify dashboard, it is recommended to set up a custom domain to enable automatic HTTPS.
- Navigate to Settings → Configuration → General.
- Update the Instance URL to your Seed’s domain, for example
https://my-seed.mycloudvps.de(you can find the hostname in the Overview tab of your Seed). - Save the configuration.
Coolify will automatically configure SSL/TLS certificates. After saving, you can access your instance securely using HTTPS. Once you accessed the dashboard from your custom domain, you can also safely close down the ports needed for access through your ip-address, see here.
Your Coolify instance is now ready to use. You can start deploying applications and other resources on your VM.
Keeping Your Coolify Instance Up to Date
You can manage the Update configurations by navigating to Settings → Configuration → Updates and configuring you own update check frequency and auto update frequency. If you want, you can also disable automatic updates entirely.
Deploying Your First Resource: n8n
In this example we will deploy n8n (see Workflow Automation Using n8n) using Coolifys one-click-resources on a second dataforest Cloud Seed.
If you want to deploy it on the same Seed Coolify is running on, you need to first get your own domain for the main server and then create a subdomain for the n8n instance, but the rest should work similarly. Just select the main server when creating the n8n resource.
Firstly, add the Server in your Coolify dashboard:
- Add the SSH key you used when creating the Seed to Coolify in the dashboard ‘Keys & Tokens’ tab.
- Then navigate to ‘Servers’ and add another Server. You can change the name and use either the IP Address of your Seed or the hostname of your Seed as Domain. Then select the just added key as Private Key and click on ‘Continue’.
- Now click the Button ‘Validate Server & Install Docker Engine’, which should be visible in your new Servers General Settings. This will automatically install all necessary things like Docker and Proxy. Each server added to Coolify has their own Reverse Proxy, which you can edit in your Servers settings.
Now follow these steps to deploy n8n:
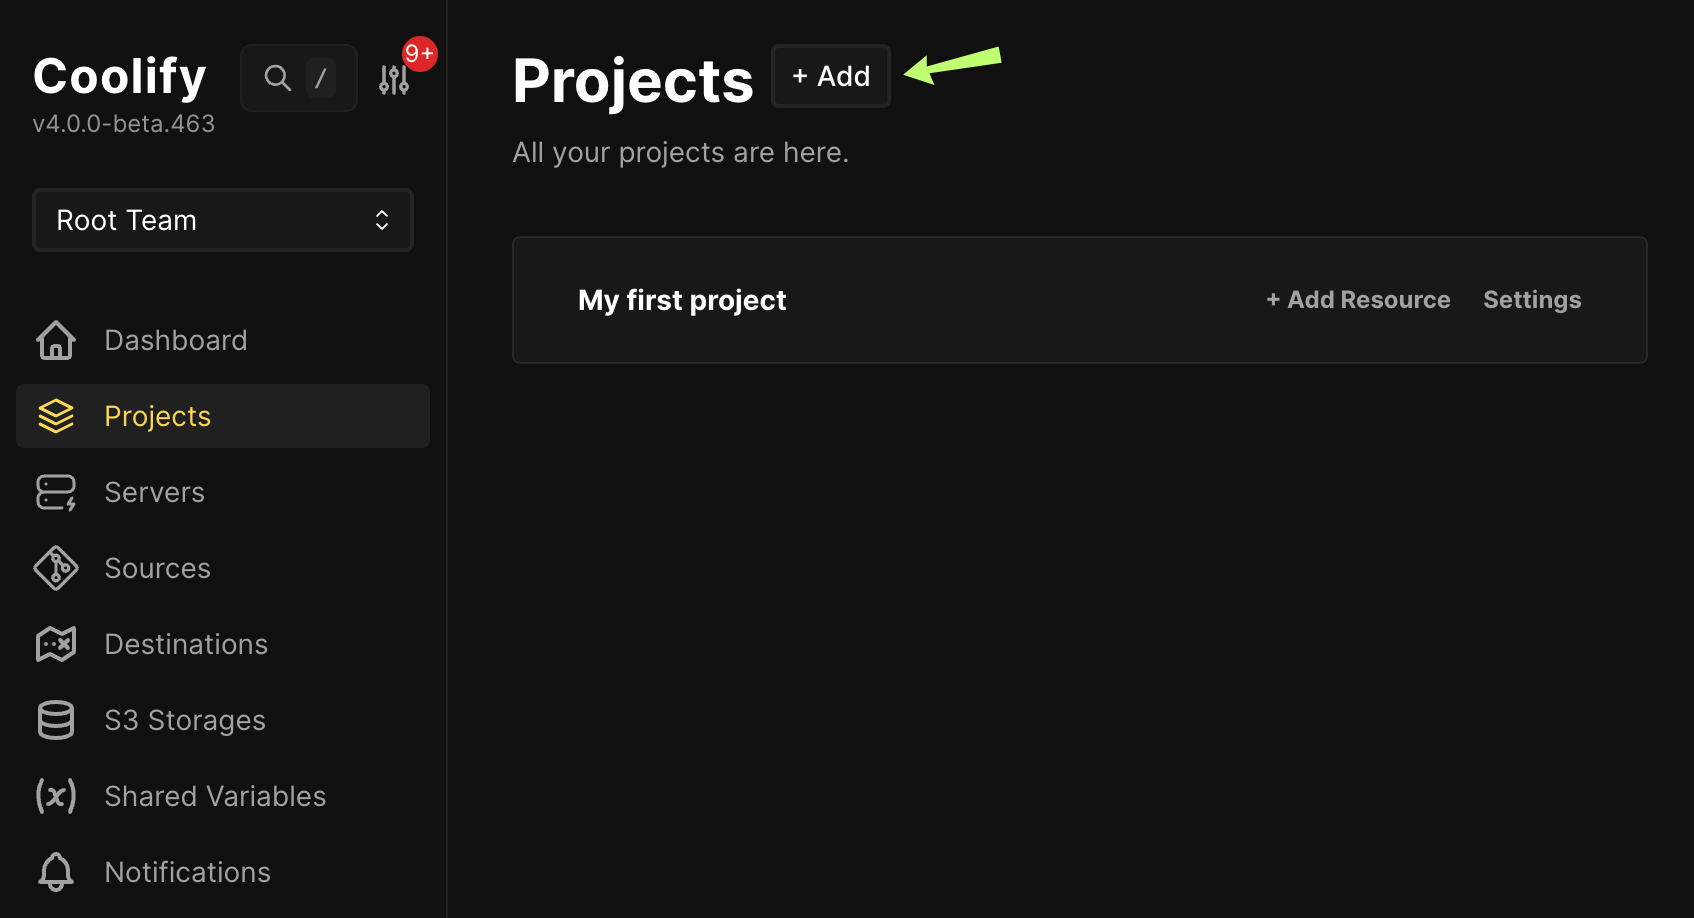
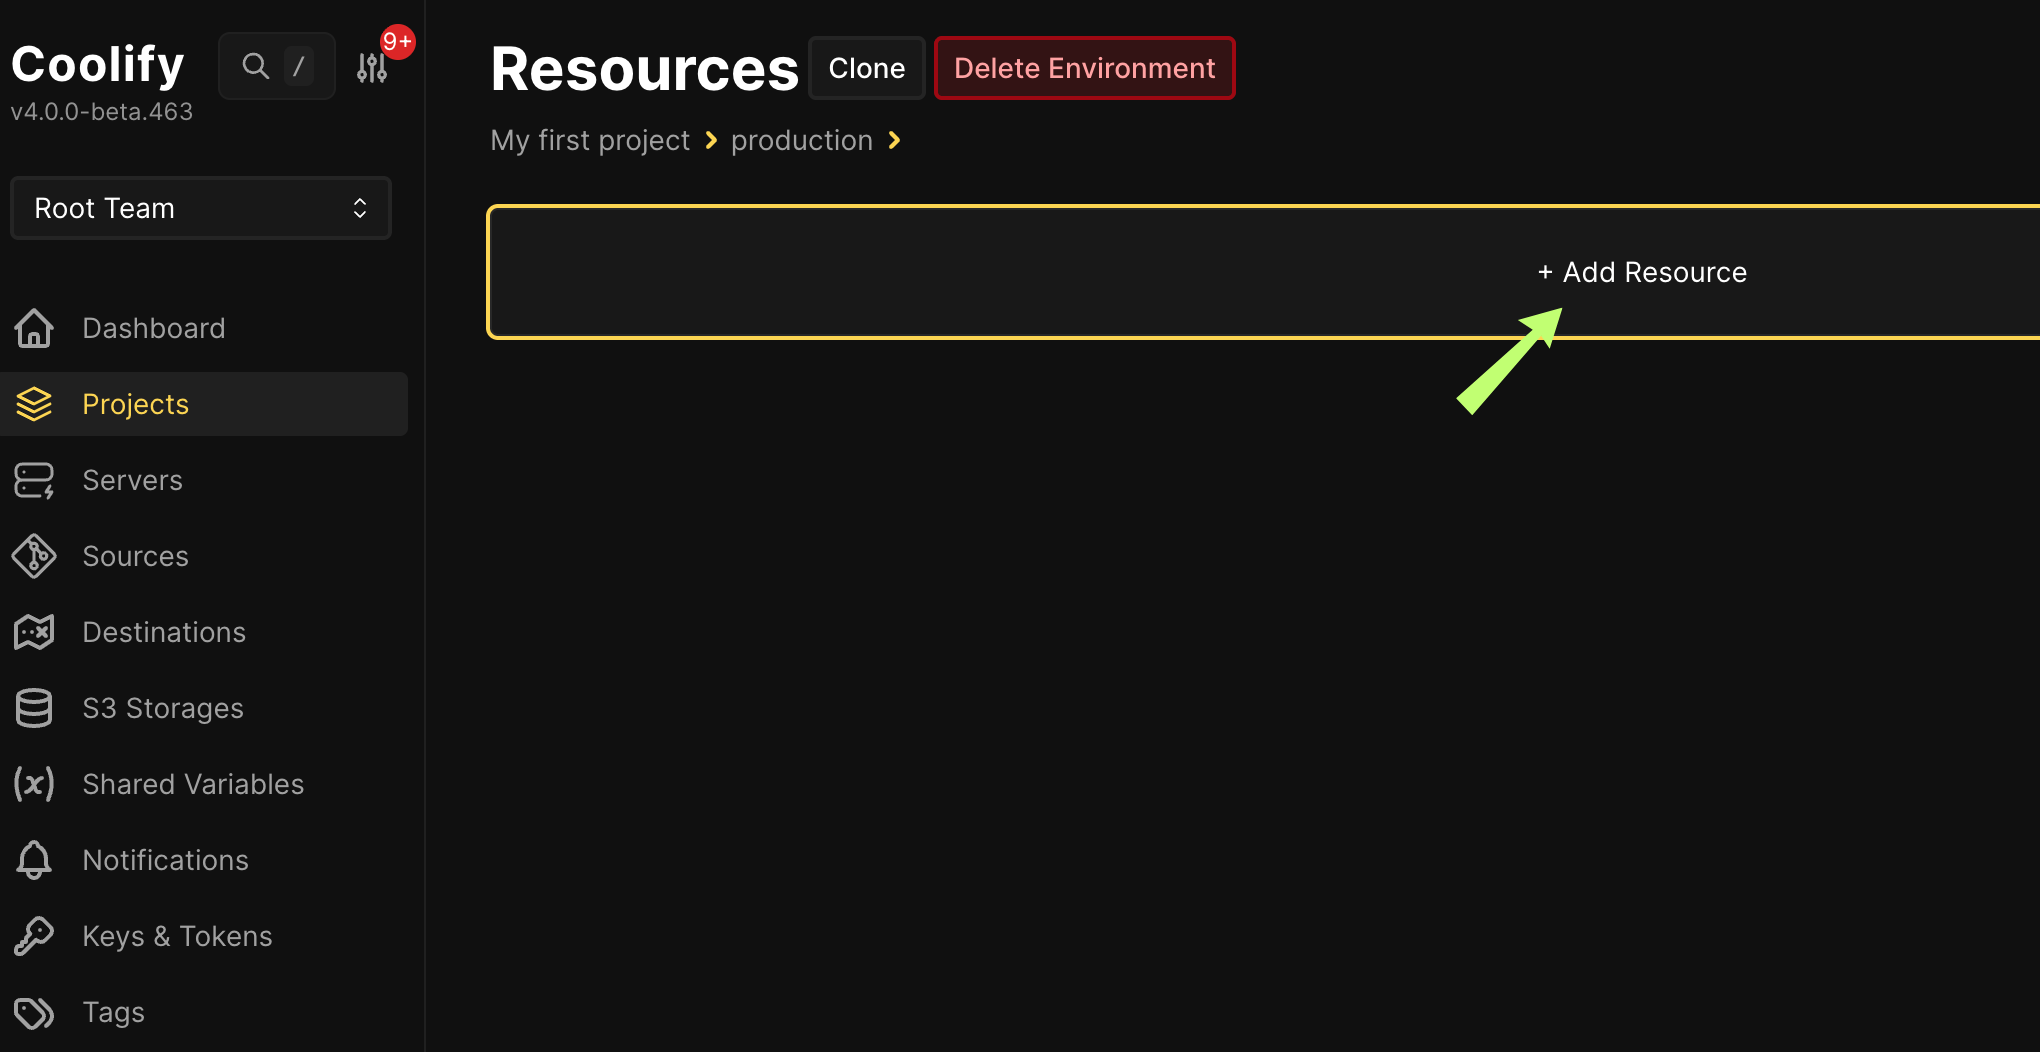
- Create a New Project and click on Add Resource.
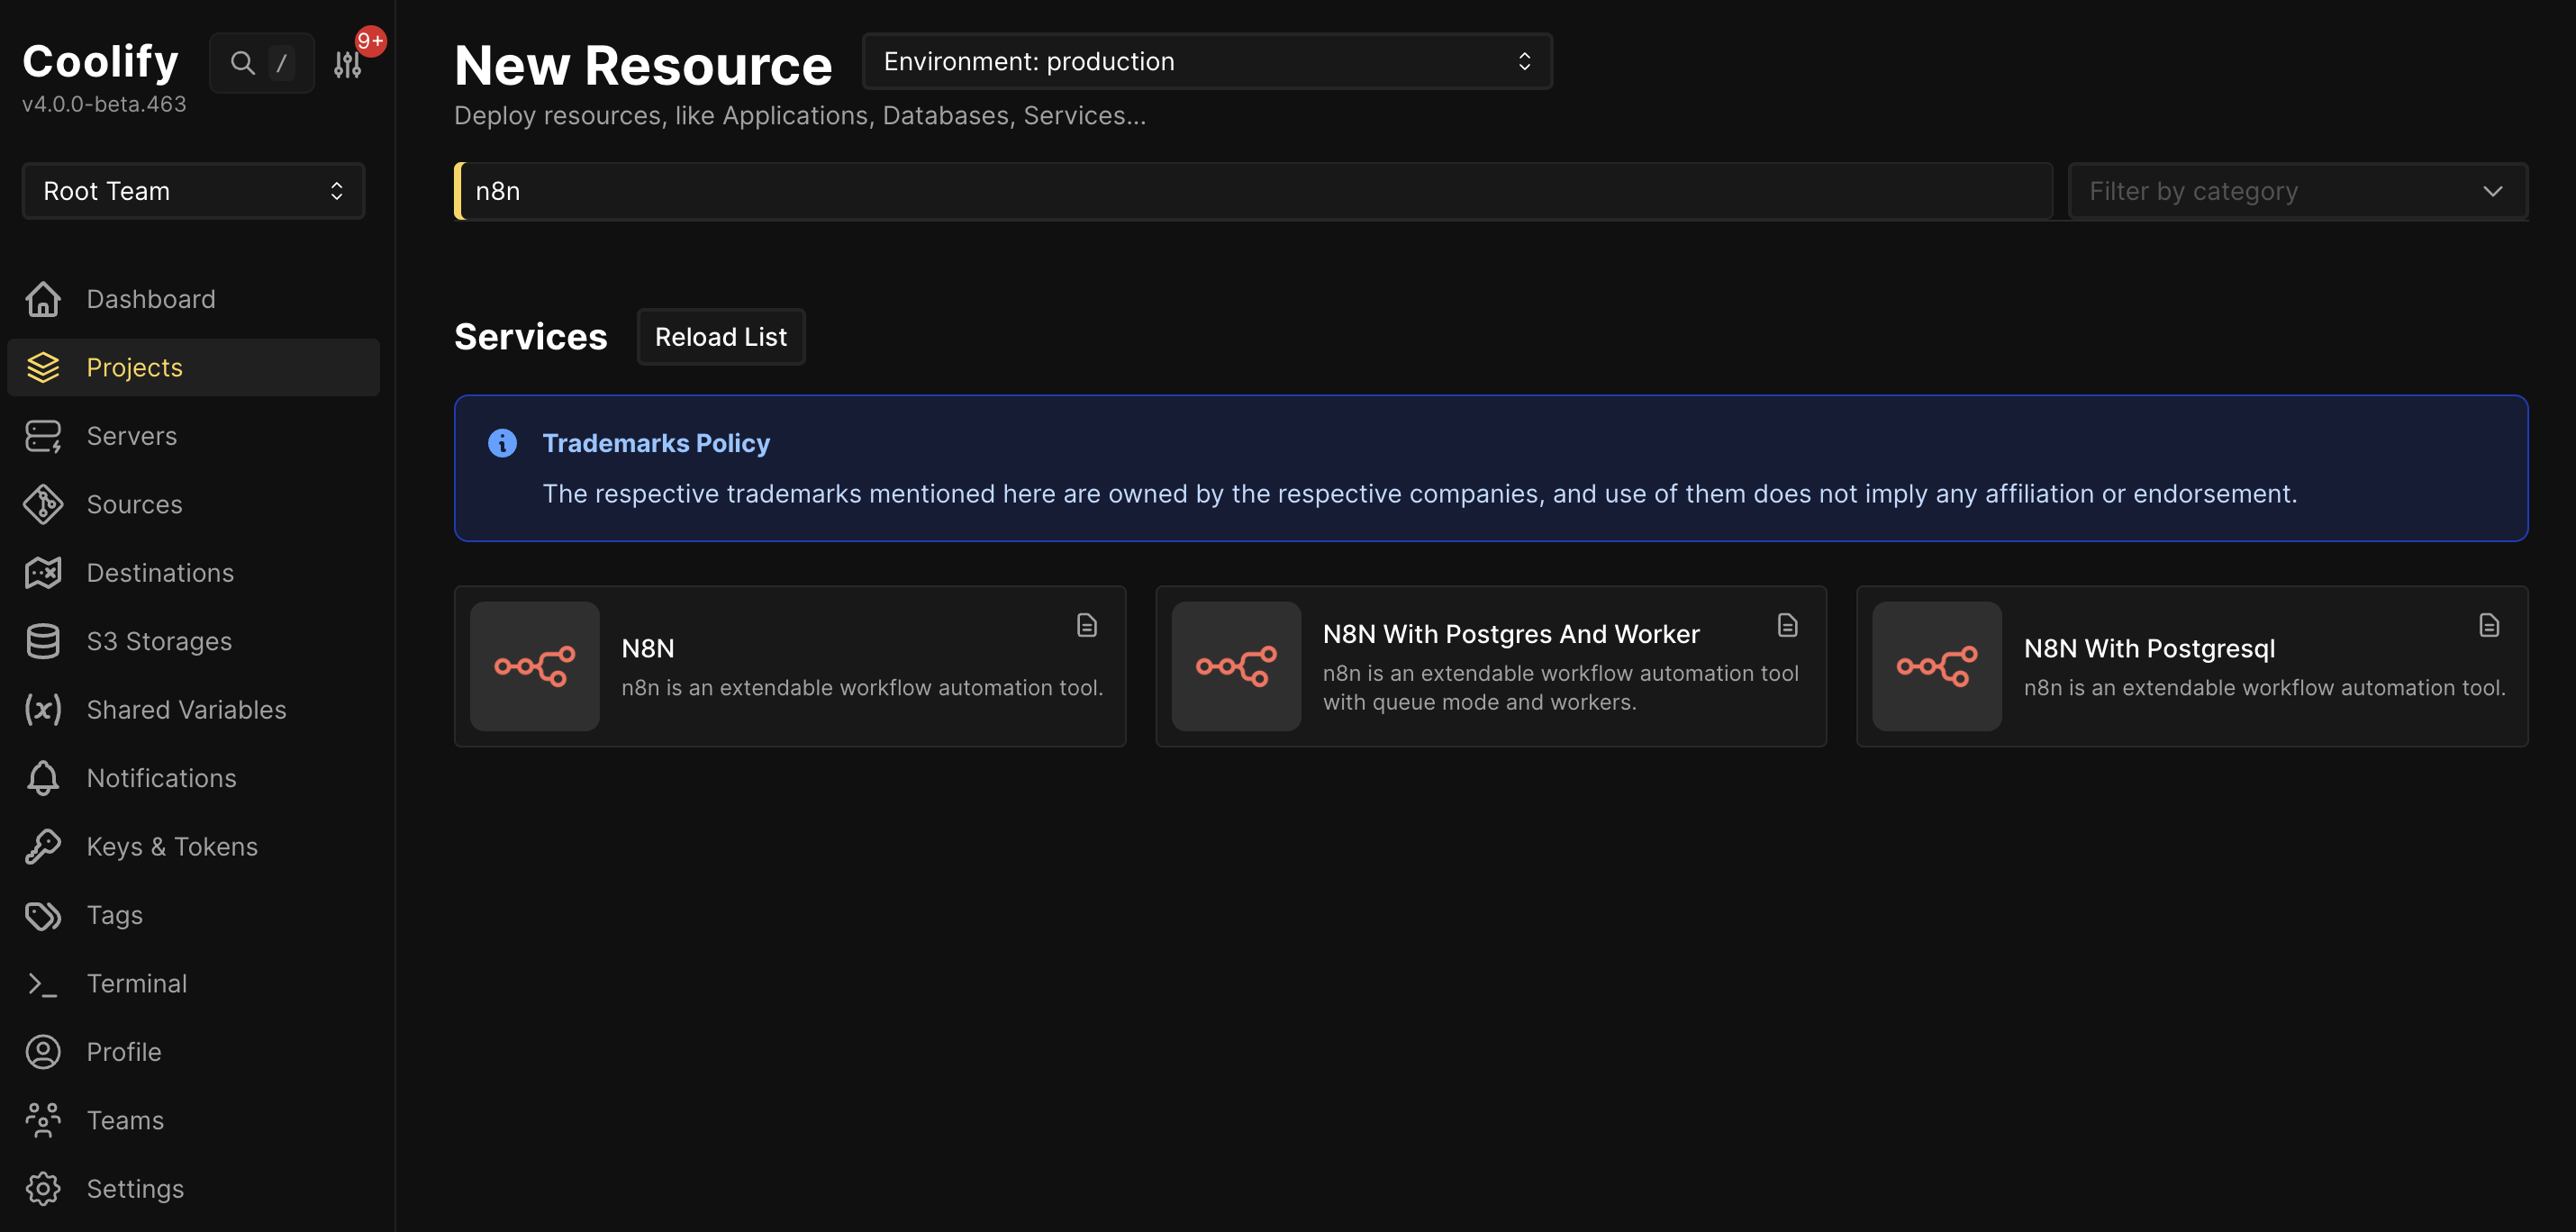
- Then you can search through their one-click-services and choose the n8n service. You can choose between three different Deployment Variants. Pick whichever best fits your Use Case.
- Now select the New Server you just added
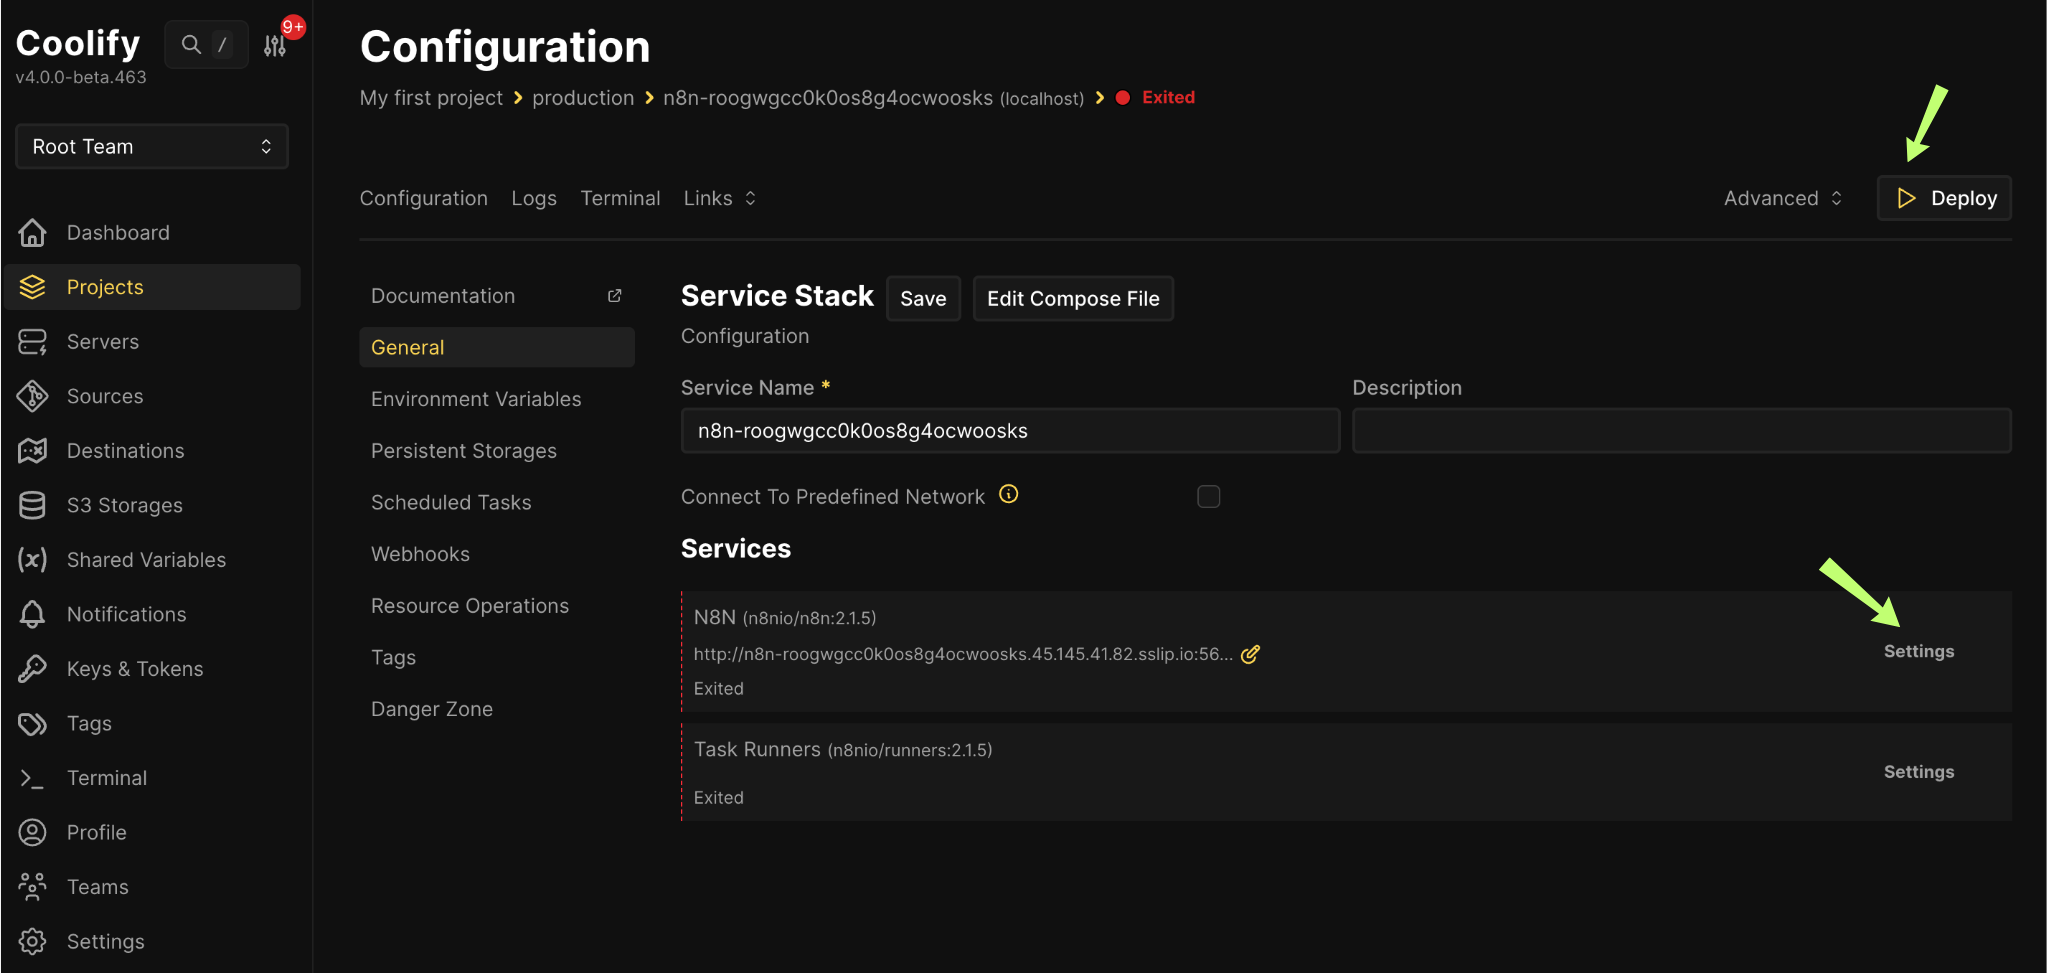
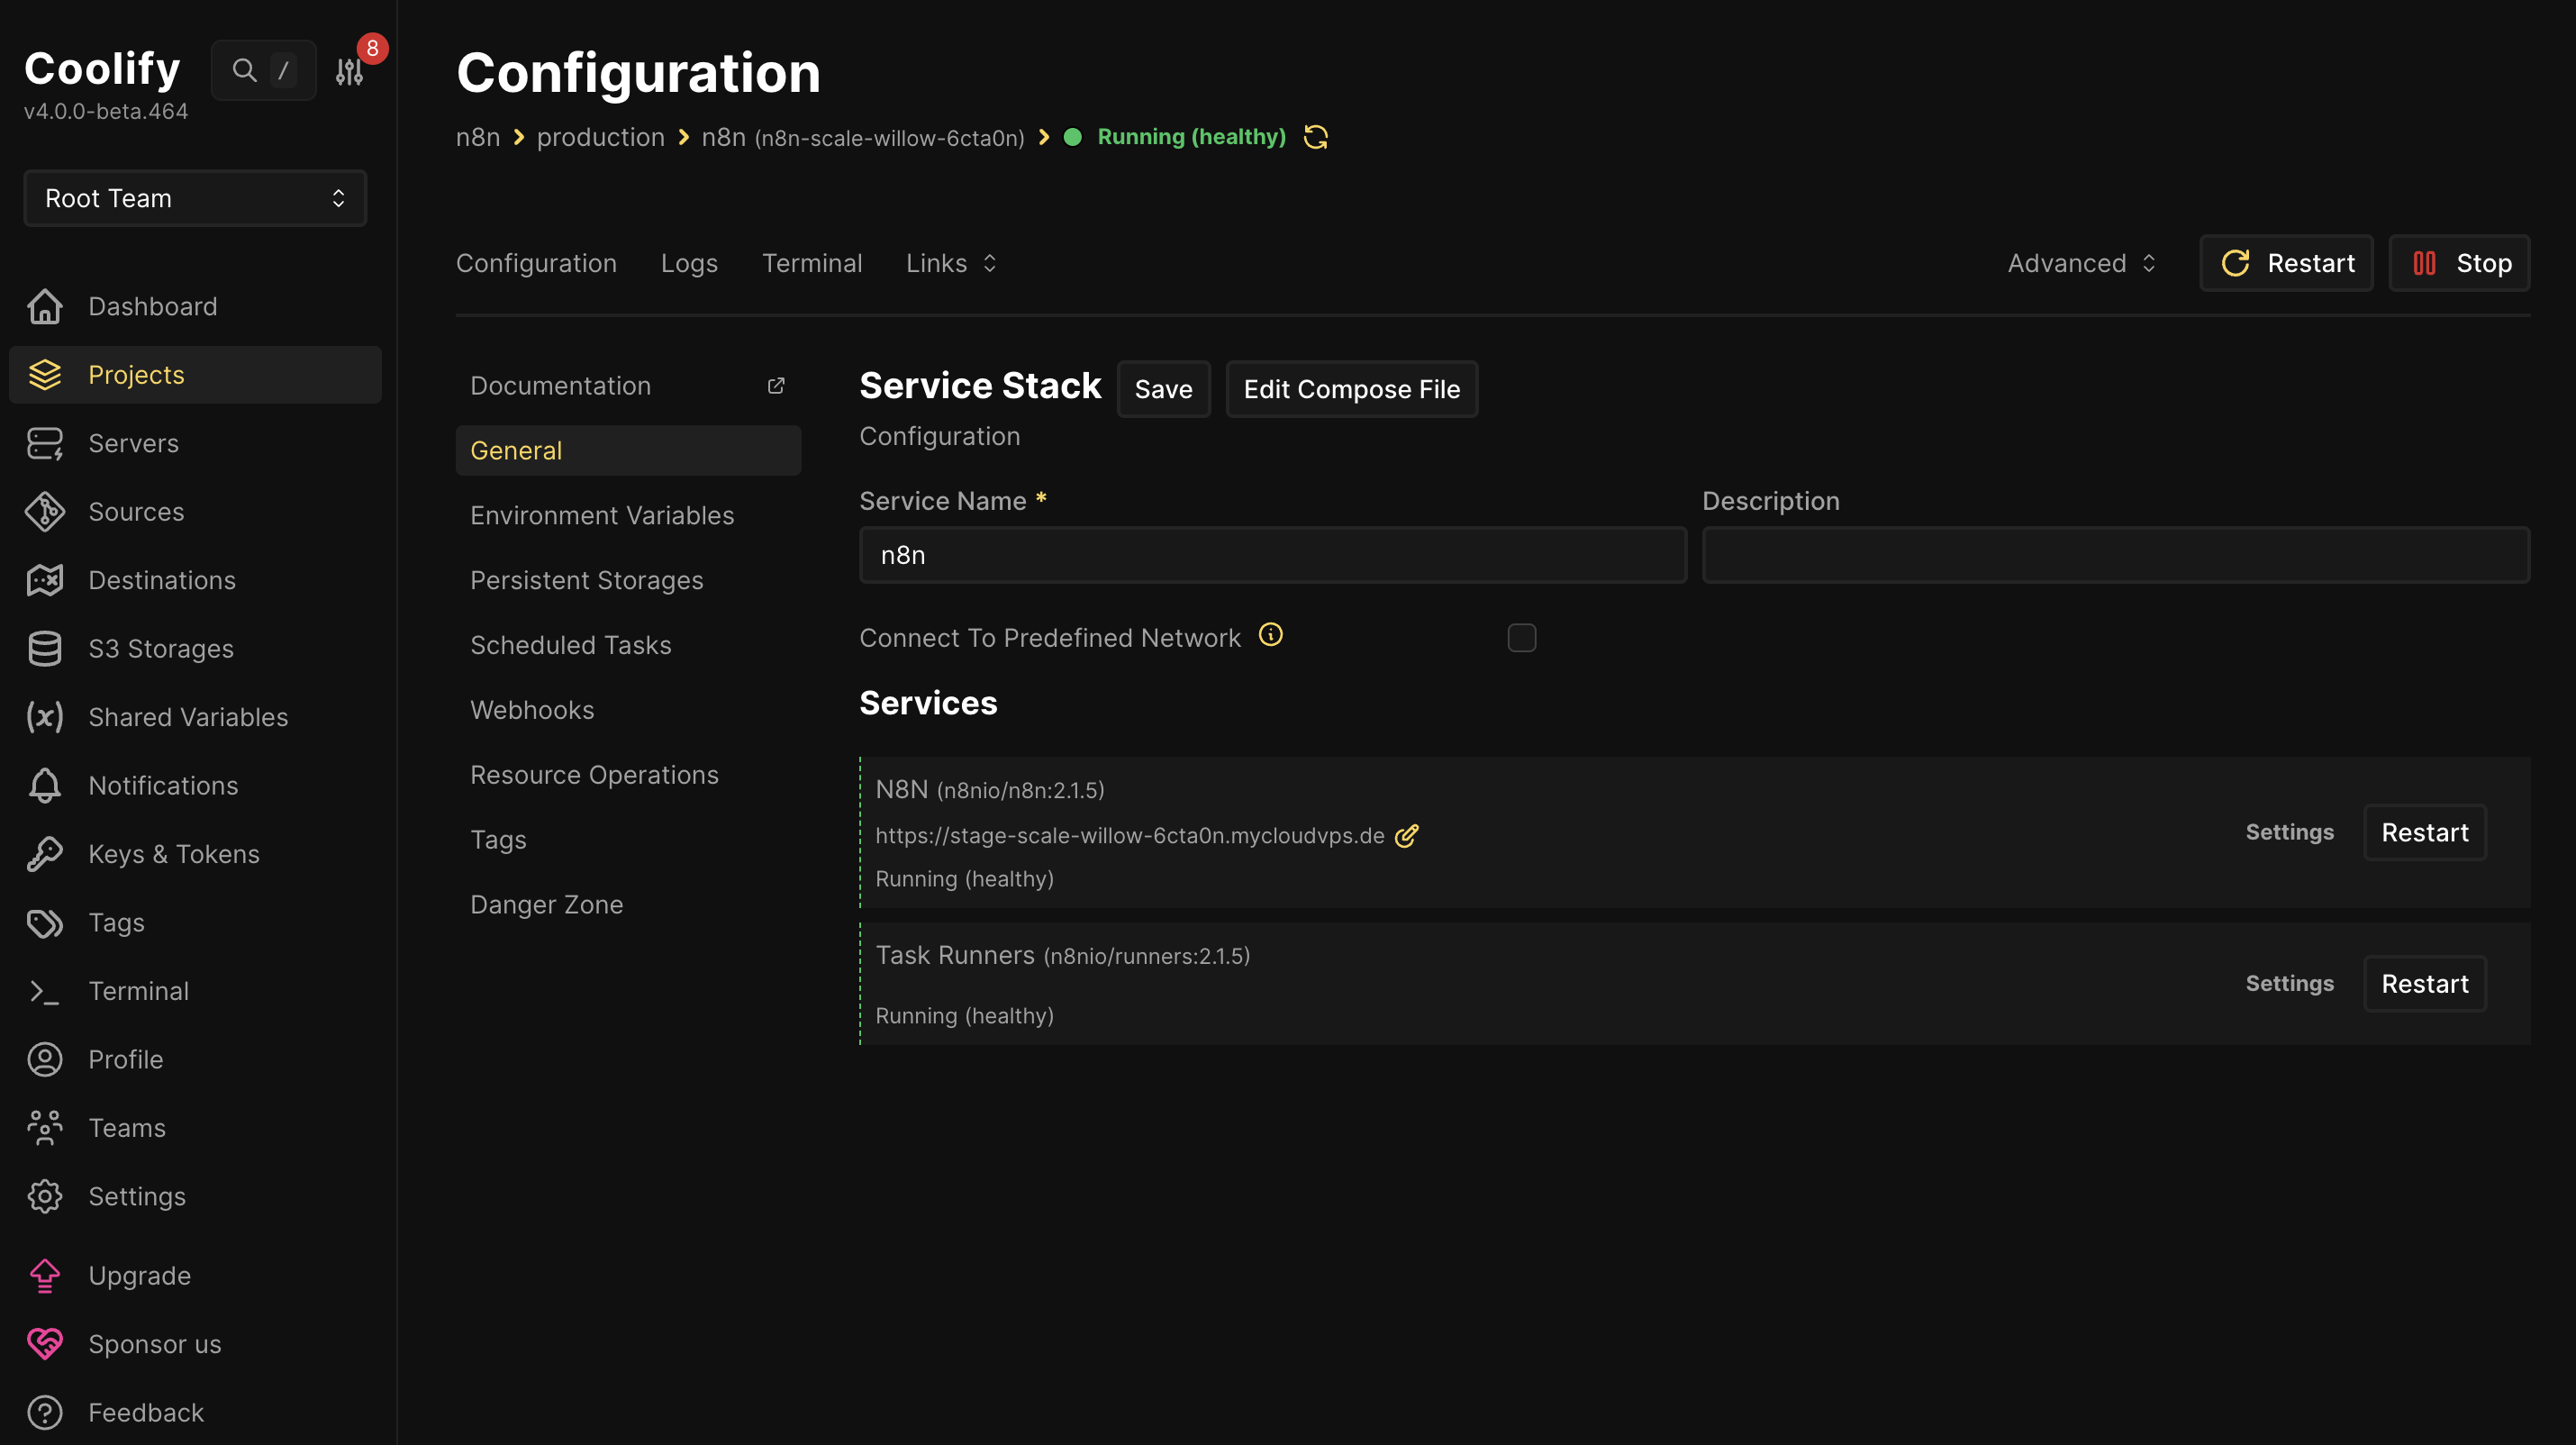
- Then you can edit the ‘Service name’ and right below it, under Services → N8N → Settings, edit the domain name to your hostname, e.g.
https://my-seed.mycloudvps.deand save - Then deploy your resource
Now you’re all set to create your account and start exploring n8n workflows in the UI (see workflow automation using n8n)!
Conclusion
Coolify and Dokploy are both powerful self-hosted PaaS solutions that simplify application deployment and infrastructure management. Coolify offers an easy-to-use platform with Docker-based deployments, automatic SSL, and a growing library of one-click services, while Dokploy provides a modern interface, built-in monitoring, and more flexible build options. By setting up Coolify on your own Seed, you gain full control over your server environment, making it a cost-effective alternative to cloud PaaS for both personal projects and production workloads.