This guide shows how to install n8n on your own server via Docker Compose and build two practical workflows with the dataforest API: one for automatic VM upgrades with snapshot creation and one for periodic cost reports via email. n8n is a self-hosted workflow automation platform with a visual editor, 400+ integrations and no per-execution costs. Installation takes under 20 minutes.
What is Workflow Automation?
Modern software environments can be complicated. Most businesses use a growing mix of tools: project management apps, messaging platforms, databases, and more. Each tool works well on its own, but they don’t always connect smoothly. Information often ends up scattered across systems, and someone has to manually copy data, check it, or write custom scripts to keep everything in sync.
Workflow automation fixes this by letting your tools work together automatically. Simply put: when something happens in one system, a set of actions is triggered across others. Once it’s set up, it runs on its own, which saves time, reduces errors, and lets you focus on the work that really matters.
A practical example: imagine your application has a support ticket form. Normally, when a user submits a ticket, a staff member has to read it, decide how to respond, and manually reply. And sometimes also creating a task or ticket for the appropriate team. With an automated workflow, n8n simplifies this process: AI automatically handles simple support requests by sending an immediate response, while more complex or ambiguous issues are forwarded to a human staff member for review. This ensures every ticket is addressed quickly, accurately, and consistently, without putting extra strain on the team.

Whether rule-based or AI-assisted, workflow automation is built for repetitive tasks, which is exactly what n8n is designed to solve.
When To Use Workflow Automation?
Workflow automation is particularly useful when processes are clear and linear, and when you need to connect multiple APIs to combine their outputs efficiently. In such scenarios, visual workflows can save significant development time and simplify integration across systems.
However, there are cases where building your own software may be a better and more manageable solution. Workflow automation may not be ideal when:
- You have complex business logic with many special cases, as visual workflows can quickly become hard to maintain.
- Your application requires high performance or handles large volumes of data.
- You need robust versioning, testing, and code reviews, which are easier to enforce in traditional software development.
- Advanced error handling and detailed logging are critical.
- You or your team are already experienced in software development, as in such cases a well-structured script or service can be clearer and easier to maintain than a complex visual workflow.
Why n8n?
There are a lot of workflow automation tools out there. Zapier and Make are popular, but most of them are cloud-only. That means your data passes through their servers, and costs can quickly add up as your usage grows. n8n takes a different approach. It is source-available and can be fully self-hosted, making it a strong choice for anyone who values privacy, cost control, or having full control over their own infrastructure.
At its core, n8n is a visual workflow editor and a low-code platform. Every app, service, or logical step is represented as a node, and you connect them by drawing lines between them. No coding is required. This drag-and-drop system makes building even complex automation pipelines intuitive, even for people who don’t have a programming background.
n8n comes with hundreds of built-in integrations for popular services. For services that aren’t included, you can use a generic HTTP Request node to connect to any API, giving you virtually unlimited reach. There are also AI agent nodes that let you integrate large language models and add intelligent, reasoning-based steps to your workflows.
Running n8n on your own infrastructure has a few clear benefits. Your data stays on your servers, which is especially important if your workflows handle sensitive business or user information. You avoid per-task or per-operation pricing since the main cost is your server. And because you manage the instance yourself, you have full control over updates, configuration, and access.
n8n is particularly useful when your workflows involve branching logic with if-else conditions, when privacy matters, or when you need to connect with services that don’t have official integrations on other platforms. If you want flexibility and control, n8n is hard to beat.
Setting Up n8n on a Seed
Enough theory, the following sections cover setting up n8n on a Seed and building two example workflows using the dataforest API: one that automatically checks for VM upgrades, and one that regularly sends a cost report for all running Seeds.
You have a few options for deploying n8n. One approach is to use an automatic deployment solution like Coolify or Dokploy, which handles management tasks for you. This can be especially helpful if you plan to deploy other applications alongside n8n. For a detailed tutorial on installing n8n via Coolify, see this guide.
Alternatively, you can run n8n on your own virtual machine using Docker Compose. The following quick guide will walk you through the setup process.
Initial Setup
Before you start, make sure your Seed meets the system requirements for running n8n. You can choose from the supported operating systems: Debian, Ubuntu (LTS), RockyLinux, or AlmaLinux. Make sure to set it up using an SSH key for secure access.
Also, confirm that you have the following ready before proceeding:
- Docker Engine and Docker Compose installed
- SSH access to your VM
- a subdomain for your Seed (you can also use the already created hostname of your Seed)
We will follow this guide to run n8n on our Seed using Docker Compose.
Connect to your Seed via SSH:
ssh root@your-seed-ip
Create a project directory and navigate inside:
mkdir n8n-compose && cd n8n-compose
Inside that, create an .env file:
nano .env
And paste the following file contents into it . Change DOMAIN_NAME , SUBDOMAIN , GENERIC_TIMEZONE and SSL_EMAIL to your data. If you use the hostname of your Seed, like https://my-seed.mycloudvps.de, instead of your own domain, the domain would be mycloudvps.de and the subdomain my-seed.
# DOMAIN_NAME and SUBDOMAIN together determine where n8n will be reachable from
# The top level domain to serve from
DOMAIN_NAME=example.com

# The subdomain to serve from
SUBDOMAIN=n8n

# The above example serve n8n at: https://n8n.example.com

# Optional timezone to set which gets used by Cron and other scheduling nodes
# New York is the default value if not set
GENERIC_TIMEZONE=Europe/Berlin

# The email address to use for the TLS/SSL certificate creation
SSL_EMAIL=user@example.com
If you want to use PostgreSQL instead of the default SQLite to save credentials, past executions and workflows, you can add additional env variables.
Now navigate back into your project directory and create a directory local-files that is responsible for sharing files between your n8n instance and host system:
mkdir local-files
Then create a docker compose file compose.yaml:
nano compose.yaml
It configures one container for n8n and one for the reverse proxy traefik. Paste this into it:
services:
  traefik:
    image: "traefik"
    restart: always
    command:
      - "--api.insecure=true"
      - "--providers.docker=true"
      - "--providers.docker.exposedbydefault=false"
      - "--entrypoints.web.address=:80"
      - "--entrypoints.web.http.redirections.entryPoint.to=websecure"
      - "--entrypoints.web.http.redirections.entrypoint.scheme=https"
      - "--entrypoints.websecure.address=:443"
      - "--certificatesresolvers.mytlschallenge.acme.tlschallenge=true"
      - "--certificatesresolvers.mytlschallenge.acme.email=${SSL_EMAIL}"
      - "--certificatesresolvers.mytlschallenge.acme.storage=/letsencrypt/acme.json"
    ports:
      - "80:80"
      - "443:443"
    volumes:
      - traefik_data:/letsencrypt
      - /var/run/docker.sock:/var/run/docker.sock:ro

  n8n:
    image: docker.n8n.io/n8nio/n8n
    restart: always
    ports:
      - "127.0.0.1:5678:5678"
    labels:
      - traefik.enable=true
      - traefik.http.routers.n8n.rule=Host(`${SUBDOMAIN}.${DOMAIN_NAME}`)
      - traefik.http.routers.n8n.tls=true
      - traefik.http.routers.n8n.entrypoints=web,websecure
      - traefik.http.routers.n8n.tls.certresolver=mytlschallenge
      - traefik.http.middlewares.n8n.headers.SSLRedirect=true
      - traefik.http.middlewares.n8n.headers.STSSeconds=315360000
      - traefik.http.middlewares.n8n.headers.browserXSSFilter=true
      - traefik.http.middlewares.n8n.headers.contentTypeNosniff=true
      - traefik.http.middlewares.n8n.headers.forceSTSHeader=true
      - traefik.http.middlewares.n8n.headers.SSLHost=${DOMAIN_NAME}
      - traefik.http.middlewares.n8n.headers.STSIncludeSubdomains=true
      - traefik.http.middlewares.n8n.headers.STSPreload=true
      - traefik.http.routers.n8n.middlewares=n8n@docker
    environment:
      - N8N_ENFORCE_SETTINGS_FILE_PERMISSIONS=true
      - N8N_HOST=${SUBDOMAIN}.${DOMAIN_NAME}
      - N8N_PORT=5678
      - N8N_PROTOCOL=https
      - N8N_RUNNERS_ENABLED=true
      - NODE_ENV=production
      - WEBHOOK_URL=https://${SUBDOMAIN}.${DOMAIN_NAME}/
      - GENERIC_TIMEZONE=${GENERIC_TIMEZONE}
      - TZ=${GENERIC_TIMEZONE}
    volumes:
      - n8n_data:/home/node/.n8n
      - ./local-files:/files

volumes:
  n8n_data:
  traefik_data:
Now start n8n:
docker compose up -d
And you can stop them again with:
docker compose stop
Your firewall should allow incoming traffic on ports 22 (SSH), 80 (HTTP) and 443 (HTTPS).
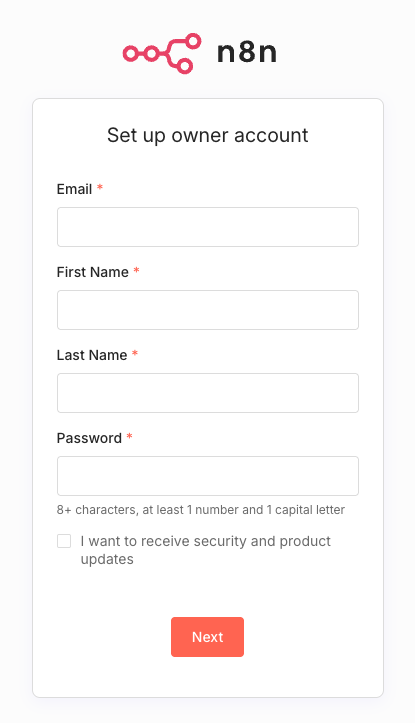
You can now open n8n in a browser with https://your-subdomain.your-domain , for example https://my-seed.mycloudvps.de if you used the hostname of your Seed, and register your first admin account!
Creating Your n8n Account
- Enter your email, first and last name, and choose a secure password.
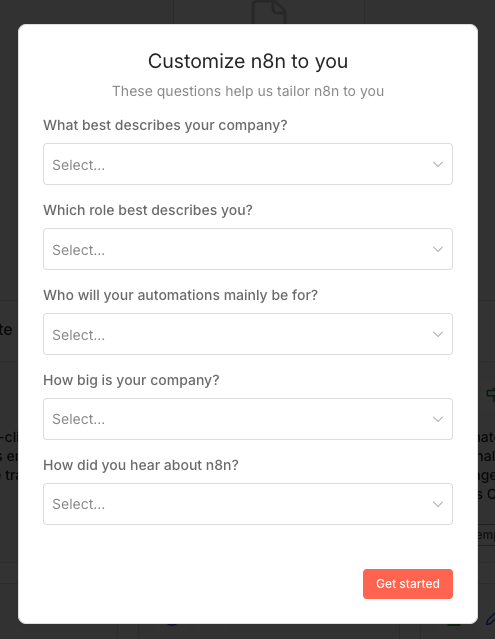
- Select any desired customizations for your account.
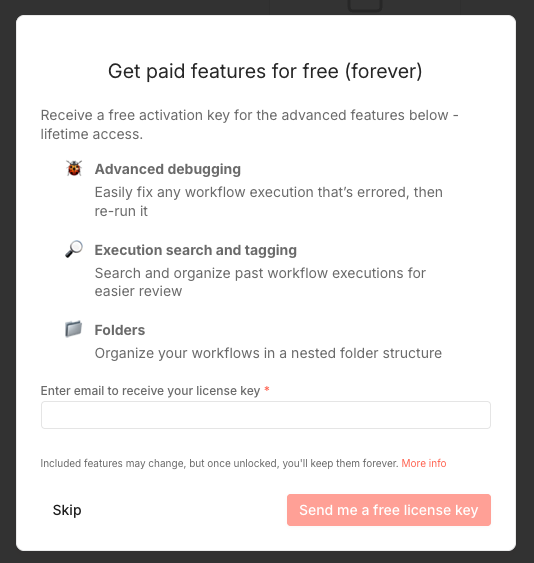
- When you open the dashboard for the first time, a popup will appear. Enter your email address to unlock the free paid features. You will receive an activation key via email along with instructions on how to add it in your Settings.
Now you can create your first workflow!
Building Your First Workflow
First off, we need to understand what a workflow entails and what components it has.
A workflow is a defined set of sequences, that are triggered by certain events.
There are a few different type of nodes you can create, including:
- A Trigger Node: It activates the workflow. It is triggered by an event and starts the sequence of events you defined that should follow
- Regular Node / Integration Node: Can be built-in integrations of apps and services, to perform actions through an API. Can also be HTTP Requests, which lets you connect to any API that is not on the prebuild list
- Logic Nodes: They control how the data flows, e.g through if-else conditions or filters
- AI Agent Nodes: Connect to a LLM, adds memory, lets you attach tools(based on your input and its reasoning)
In the following workflows we use the n8n version 2.1.5. Also we always use a Personal Access Token to connect to the dataforest API, which you can create in your dashboard and then add as a Bearer Auth Credential in your n8n dashboard.
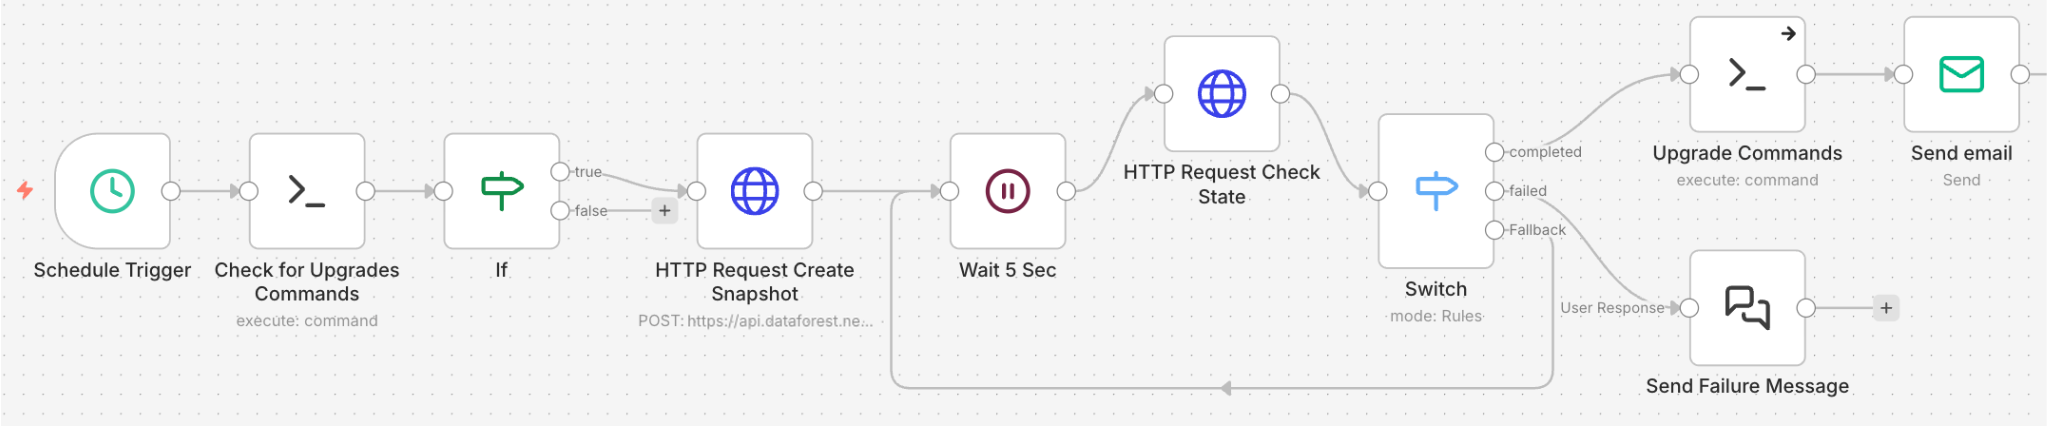
Example Workflow 1: Automatically Check for VM Upgrades
This workflow periodically checks whether your VM has available updates. If updates are found, it creates a snapshot as a safety measure and then proceeds with the system upgrade.
- Trigger Node: Runs on a schedule (for example, once per day) to automatically start the workflow.
- Check VM for Upgrades: Uses an SSH node to connect to the VM and check if updates are available.
- Conditional Check: If no updates are available, the workflow stops. If updates are found, the workflow continues.
- Create Snapshot: Sends a
POSTrequest to create a snapshot before upgrading:httpPOST https://api.dataforest.net/api/v1/public/seeds/{seedID}/actions Authorization: Bearer <your-personal-access-token> Content-Type: application/json { "type": "seed.snapshot", "name": "pre-upgrade-snapshot" } - Wait and Monitor Snapshot (Loop): Continuously polls the action status using the
actionIDfrom the previous response. If the snapshot fails, a notification is sent and the workflow stops.httpGET https://api.dataforest.net/api/v1/public/seeds/{seedID}/actions/{actionID} Authorization: Bearer <your-personal-access-token> - Upgrade VM: Executes the system upgrade on the VM via an SSH node.
- Notification: Sends an email once the upgrade is complete, optionally including the exit status and output of the upgrade process. This node requires SMTP credentials, for example, a Gmail account with an App Password works well. The exact configuration depends on your email provider.
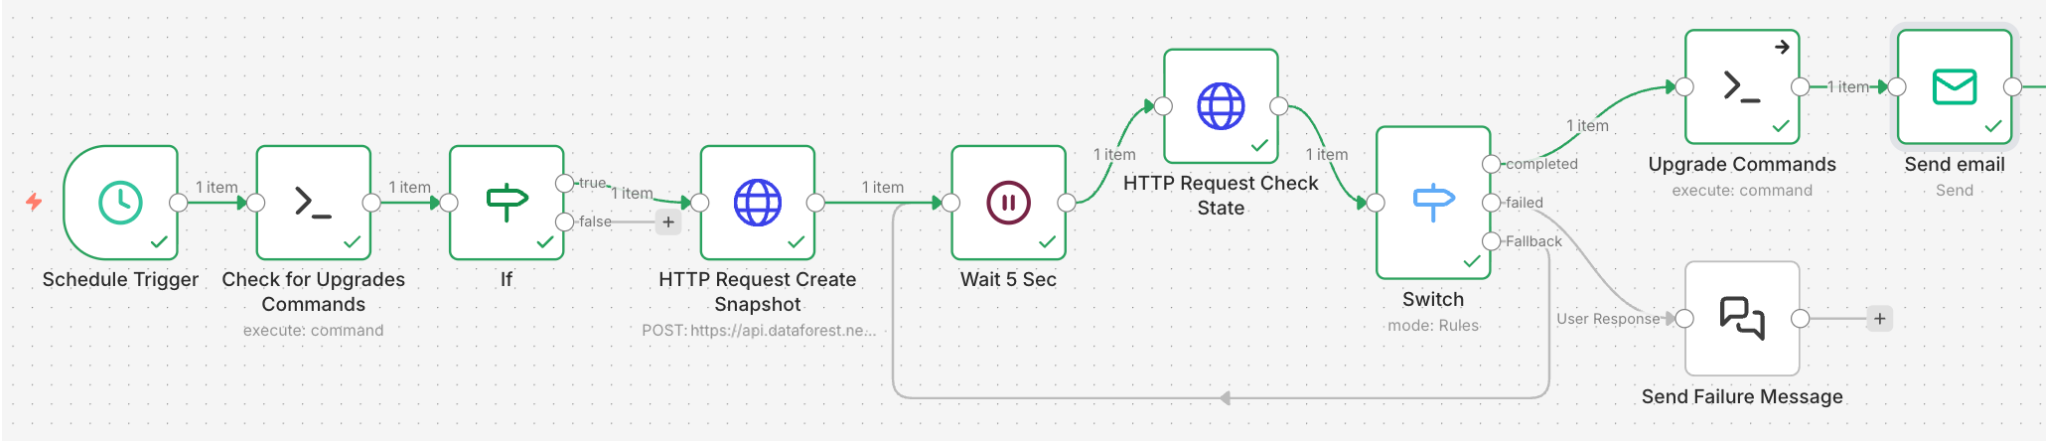
You can optionally add a "human in the loop" step before creating the snapshot. This allows you to manually confirm whether the upgrade should proceed at that time. The workflow can pause and wait for approval via email, messaging, or another notification method.
Another useful enhancement is adding a loop to check whether snapshot creation is currently allowed and act accordingly. This can be done by sending a GET request to /seeds/{seedID}/actions and verifying that snapshot creation is available. Since there is a limit on the number of snapshots per VM, you might need to delete an existing snapshot before creating a new one. Without this check, the snapshot creation request may fail.
You may also want to include a failure notification in case the snapshot creation request does not succeed.
Finally, after completing the upgrade, you can add an additional check to determine whether a system reboot is required.
Example Workflow 2: Automatic Cost Reports
This workflow automatically sends cost reports for all your currently running Seeds.
- Trigger Node: Runs on a schedule to automatically start the workflow.
- Get all your Seeds: Uses an HTTP Request Node to fetch all Seeds:http
GET https://api.dataforest.net/api/v1/public/seeds Authorization: Bearer <your-personal-access-token> - Split data: The API request in step 2 returns meta data and an array of all Seeds. To process each Seed individually, the Split Node is used to break the list into separate items. In the "Fields To Split Out" option, set the value to
seeds. - Process each Seed: An HTTP Request Node fetches the details for each individual Seed. Drag the
idfield from the previous step into the URL to have n8n process each entry automatically. No additional loops necessary.httpGET https://api.dataforest.net/api/v1/public/seeds/{seedID} Authorization: Bearer <your-personal-access-token> - Format output data for email: This Code Node runs JavaScript to format a summary email for all Seeds at once. You could use a format like this:
const items = $input.all();

return [
  {
    json: {
      report: items.map(item => {
        return `• ${item.json.name}
        - MTD Today: ${item.json.gross_mtd_costs} €
        - Month Forecast: ${item.json.gross_estimated_costs} €`;
      }).join('\n\n')
    }
  }
];
- Send Cost Report: Uses the Send Email Node to deliver the formatted cost report to your email address. This node requires SMTP credentials, for example, a Gmail account with an App Password works well. The exact configuration depends on your email provider.

This workflow helps you stay on top of spending by automatically generating and sending clear cost summaries for each of your Seeds.
Conclusion
n8n makes workflow automation accessible, flexible, and fully self-hostable. From routine system checks and cost reporting to complex, AI-assisted decision-making, workflows can save time, reduce errors, and keep your processes consistent. Especially by integrating AI Agent nodes, you can add reasoning, memory, and natural language understanding to your workflows, enabling intelligent automation that adapts to context and handles tasks previously reserved for humans. Running n8n on your own Seed gives you full control over your automation pipelines while keeping your credentials and data private, making it a practical and cost-effective alternative to hosted automation services.