Why a dedicated game server panel?
A single Minecraft or Valheim server is easy enough to run with Docker Compose. But once you add a second game, more instances, or co-players who each want their own console, their own backups and an SFTP login, doing it all by hand gets messy fast.
A game server panel handles exactly that. It gives you a web UI for creating and starting game servers. Every server gets its own console and SFTP login, and backups or version upgrades are a single click away.
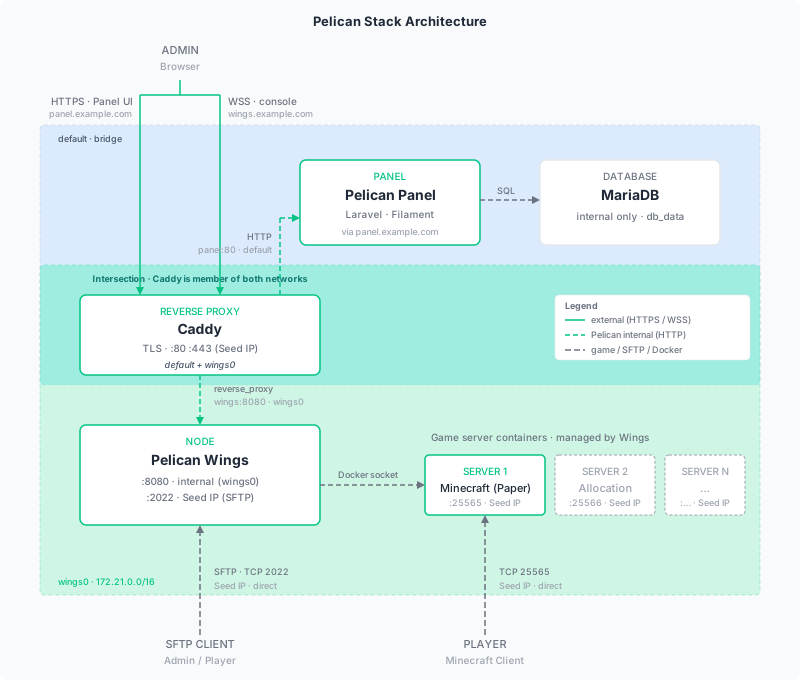
Pelican is a modern open-source panel that grew out of the Pterodactyl community and launched as an independent project in 2024. It has two components: the Panel (web UI and database) and Wings (the daemon that actually runs the game servers in Docker containers). In this guide, both run on the same dataforest Seed.
As of May 2026, Pelican is in beta (Panel v1.0.0-beta34, Wings v1.0.0-beta25). The project is actively maintained and used in production, but the official docs still label the Docker-based installation path as "work in progress". The steps below work with the current images, but they may shift as new releases come out.
If a single game server for a small group is enough and you do not need a panel, the Minecraft direct-setup guide is the simpler choice.
Key concepts
Five terms come up constantly in Pelican:
- Panel: the Laravel-based web UI. This is where you manage users, nodes and servers. Data lives in a SQL database.
- Wings: the daemon that actually runs the game servers. Wings sits on every host that serves game servers, talks to the Docker engine, and starts, stops and supervises the individual game server containers. In this tutorial, Wings runs on the same Seed as the Panel.
- Node: from the Panel's perspective, a Wings installation. In this guide we have exactly one node, your local Seed. Distributed setups across multiple Seeds have correspondingly more nodes.
- Allocation: a reserved IP-plus-port combination assigned to a game server. Every game server needs at least one.
- Egg: a template that defines what software gets installed and how it starts (Minecraft, Rust, Valheim, ARK …). Pelican maintains an official egg collection, and you can build your own.
Prerequisites
- A Seed on the dataforest cloud. We recommend 4 CPU and 8 GB RAM, because Panel, Wings, MariaDB and one or two game servers all share the host. Java game servers like Minecraft also benefit from 2-4 GB of swap so the host does not OOM-kill them when the JVM heap briefly spikes. Check with
swapon --showand add a swapfile if empty. - SSH access to the Seed.
- A domain with two A records (IPv4) pointing to the Seed, for example
panel.example.comandwings.example.com. We need both because Caddy issues a separate Let's Encrypt certificate per subdomain and Wings runs as an independent service on its own domain. Set the DNS records before you start the stack, otherwise certificate issuance will fail. IPv6 (AAAArecords) is out of scope here; both the allocations and the Caddy stack are wired up for IPv4 only.
Install Docker
SSH into the Seed and install Docker using the official script. It detects the operating system automatically and sets up Docker including Docker Compose:
curl -fsSL https://get.docker.com | sh
If the message Could not get lock /var/lib/dpkg/lock-frontend appears, an automatic system update is still running in the background. Wait a minute and try again.
Create the project directory and Wings directories
Wings reaches into a few host directories through the Docker socket and forwards them into the game server containers. These directories need to exist before Wings starts. Create the project directory and the Wings paths:
mkdir -p /opt/pelican && cd /opt/pelican
mkdir -p /etc/pelican /var/lib/pelican /var/log/pelican /tmp/pelican
What each path is for:
/opt/pelican: project directory, holdsdocker-compose.yml,.envandCaddyfile./etc/pelican: Wings configuration, will holdconfig.ymlgenerated by the Panel later./var/lib/pelican: game server volumes and their backups, one subdirectory per server./var/log/pelican: Wings logs (separate from the Docker logs)./tmp/pelican: temporary files used while installing new game servers.
All other files in this guide live under /opt/pelican.
Collect secrets in a .env file
Passwords have no business sitting in docker-compose.yml. We keep them in a separate .env file, in two steps: first the values that belong to your setup (domains, email), then two generated random passwords for the database.
1. Enter domains and email. Create the file and fill in:
nano /opt/pelican/.env
With the following content (replace the domains and email with your own values):
PANEL_DOMAIN=panel.example.com
WINGS_DOMAIN=wings.example.com
ACME_EMAIL=admin@example.com
Let's Encrypt uses the email for expiry notifications, so please use a real one.
2. Append random passwords. Instead of making up passwords yourself, we let openssl rand produce two 32-byte random values (256 bits of entropy) and append them to .env:
cat >> /opt/pelican/.env <<EOF

DB_ROOT_PASSWORD=$(openssl rand -base64 32)
DB_PASSWORD=$(openssl rand -base64 32)
EOF
chmod 600 /opt/pelican/.env
The $(openssl rand -base64 32) calls are evaluated by the shell when the file is written, so two random base64 strings land in .env (no openssl calls survive in the file). You never need to enter these passwords manually: Docker Compose passes them through automatically. Pelican will later ask for the DB_PASSWORD in its setup wizard, just look it up in .env then (grep DB_PASSWORD /opt/pelican/.env).
Create docker-compose.yml
The whole stack (Caddy, Panel, MariaDB and Wings) lives in a single Compose file. Create /opt/pelican/docker-compose.yml:
nano /opt/pelican/docker-compose.yml
With the following contents (copy as-is):
services:
  caddy:
    image: caddy:2-alpine
    restart: always
    ports:
      - "80:80"
      - "443:443"
    environment:
      PANEL_DOMAIN: "${PANEL_DOMAIN}"
      WINGS_DOMAIN: "${WINGS_DOMAIN}"
      ACME_EMAIL: "${ACME_EMAIL}"
    volumes:
      - ./Caddyfile:/etc/caddy/Caddyfile:ro
      - caddy_data:/data
      - caddy_config:/config
    networks:
      - default
      - wings0
    depends_on:
      - panel

  panel:
    image: ghcr.io/pelican/panel:latest
    restart: always
    environment:
      XDG_DATA_HOME: /pelican-data
      APP_URL: "https://${PANEL_DOMAIN}"
      BEHIND_PROXY: "true"
      TRUSTED_PROXIES: "172.16.0.0/12,192.168.0.0/16,10.0.0.0/8"
    volumes:
      - pelican_data:/pelican-data
      - pelican_logs:/var/www/html/storage/logs
    depends_on:
      - db

  db:
    image: mariadb:11
    restart: always
    environment:
      MARIADB_ROOT_PASSWORD: "${DB_ROOT_PASSWORD}"
      MARIADB_DATABASE: panel
      MARIADB_USER: pelican
      MARIADB_PASSWORD: "${DB_PASSWORD}"
    volumes:
      - db_data:/var/lib/mysql

  wings:
    image: ghcr.io/pelican/wings:latest
    restart: always
    tty: true
    environment:
      TZ: "UTC"
      WINGS_UID: 988
      WINGS_GID: 988
      WINGS_USERNAME: pelican
    ports:
      - "2022:2022"
    volumes:
      - "/var/run/docker.sock:/var/run/docker.sock"
      - "/var/lib/docker/containers/:/var/lib/docker/containers/"
      - "/etc/pelican/:/etc/pelican/"
      - "/var/lib/pelican/:/var/lib/pelican/"
      - "/var/log/pelican/:/var/log/pelican/"
      - "/tmp/pelican/:/tmp/pelican/"
      - "/etc/ssl/certs:/etc/ssl/certs:ro"
    networks:
      - wings0

volumes:
  caddy_data:
  caddy_config:
  pelican_data:
  pelican_logs:
  db_data:

networks:
  wings0:
    name: wings0
    driver: bridge
    ipam:
      config:
        - subnet: "172.21.0.0/16"
    driver_opts:
      com.docker.network.bridge.name: wings0
A few notes on the configuration:
- Caddy sits on two networks (
defaultandwings0), because as a reverse proxy it has to reach both the Panel (on the default network) and Wings (on thewings0network). PANEL_DOMAIN,WINGS_DOMAINandACME_EMAILare passed into the Caddy container's environment. Docker Compose only uses the.envfile for variable interpolation in the Compose file itself (${VAR}syntax). The Caddyfile needs the values at runtime inside the container, otherwise{$PANEL_DOMAIN}ends up empty and Caddy fails withunrecognized global option: reverse_proxy.BEHIND_PROXY: "true"is the critical flag. The Pelican Panel image ships with an internal Caddy. Without this flag, anhttps://APP_URLmakes that internal Caddy turn on auto-HTTPS and try to fetch its own Let's Encrypt certificate, which does not work behind a second reverse proxy. WithBEHIND_PROXY=truethe entrypoint setsauto_https offinternally and binds the server to port 80 (plain HTTP). Our external Caddy then handles TLS termination.TRUSTED_PROXIESlists the private IP ranges of the Docker bridges whoseX-Forwardedheaders the Panel should trust. Without it, file uploads in the Panel fail with 413 errors because Laravel cannot recognize the external HTTPS connection as such. The Pelican image formats the value internally as a Caddytrusted_proxies staticdirective.- The only Wings port exposed to the host is SFTP on 2022. The daemon API on port 8080 stays internal to
wings0. Caddy handles HTTPS for it underwings.example.com. - How does the Panel talk to Wings? Pelican configures Connect Port
443per node and calls the daemon API ashttps://wings.example.com. The request leaves the Panel container, hits the Seed's public IP, comes back in through Caddy and gets forwarded towings:8080over thewings0network. This "hairpin" path works without extra config on a normal Seed. Restrictive egress firewalls (e.g. a forced outbound HTTPS proxy) would need to permit it. pelican_datakeeps the Panel configuration (including theAPP_KEY) alive across container restarts.- Game container ports (like 25565 for Minecraft) do not show up in the Compose file later. Wings opens them dynamically when you create a game server, through the mounted Docker socket.
Create the Caddyfile
Caddy gets one block per subdomain. It picks up the Let's Encrypt certificates automatically and renews them without further input. Create /opt/pelican/Caddyfile:
nano /opt/pelican/Caddyfile
With the following contents:
{
    email {$ACME_EMAIL}
}

{$PANEL_DOMAIN} {
    reverse_proxy panel:80
}

{$WINGS_DOMAIN} {
    reverse_proxy wings:8080
}
The global block sets the email address used for Let's Encrypt registrations. Each subdomain then gets its own simple reverse_proxy block. WebSockets for the live console and the file manager work through Caddy without extra configuration.
Start the Panel stack
We bring up the stack in two stages: Caddy, Panel and the database first, then Wings later. Wings needs a configuration file that gets generated in the Panel in the next step, so there is no point starting it now.
docker compose up -d caddy panel db
On first start, Docker pulls the images (around 600 MB for these three services) and Caddy requests the TLS certificates. Follow along:
docker compose logs -f caddy panel
Once Caddy reports certificate obtained successfully for both domains and the Panel is up, exit the log view with Ctrl+C.
If Caddy fails to obtain a certificate, the most common cause by far is DNS: a record has not propagated yet, or it points to the wrong IP. Check with dig +short panel.example.com.
Initialize the Panel
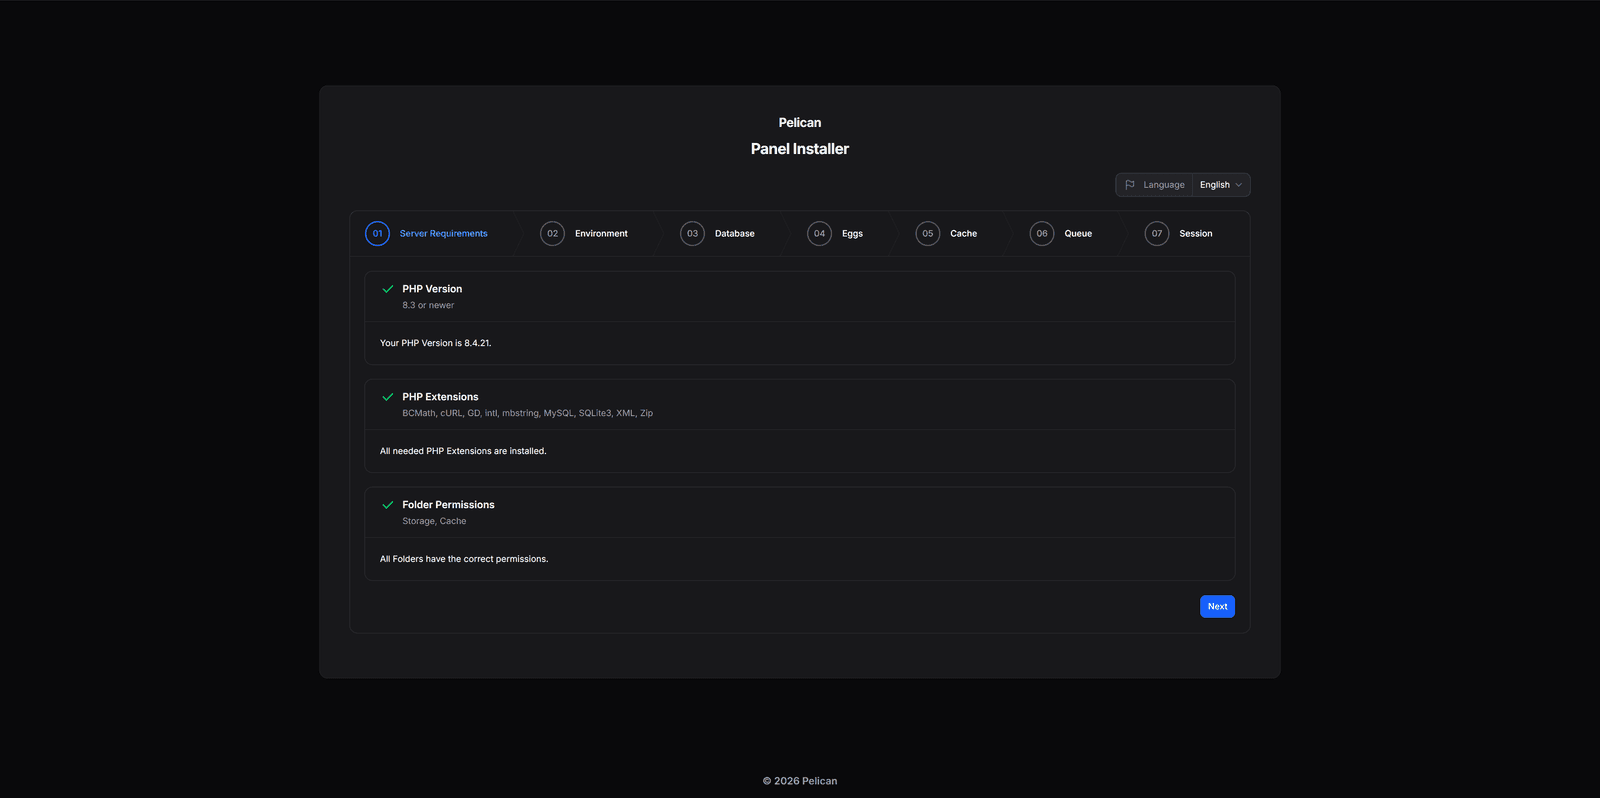
Open https://panel.example.com/installer in a browser. The /installer path is important: without it you land directly on the login page, because the Panel does not redirect to the installer from the root URL. The installer walks you through several steps:
- Environment check: Pelican verifies that all dependencies are available.
- App configuration and admin user (on the same page):
- App Name:
Pelican(or your own name) - App URL: your panel domain including protocol, e.g.
https://panel.example.com - Admin User: email, username and password for the first administrator
- App Name:
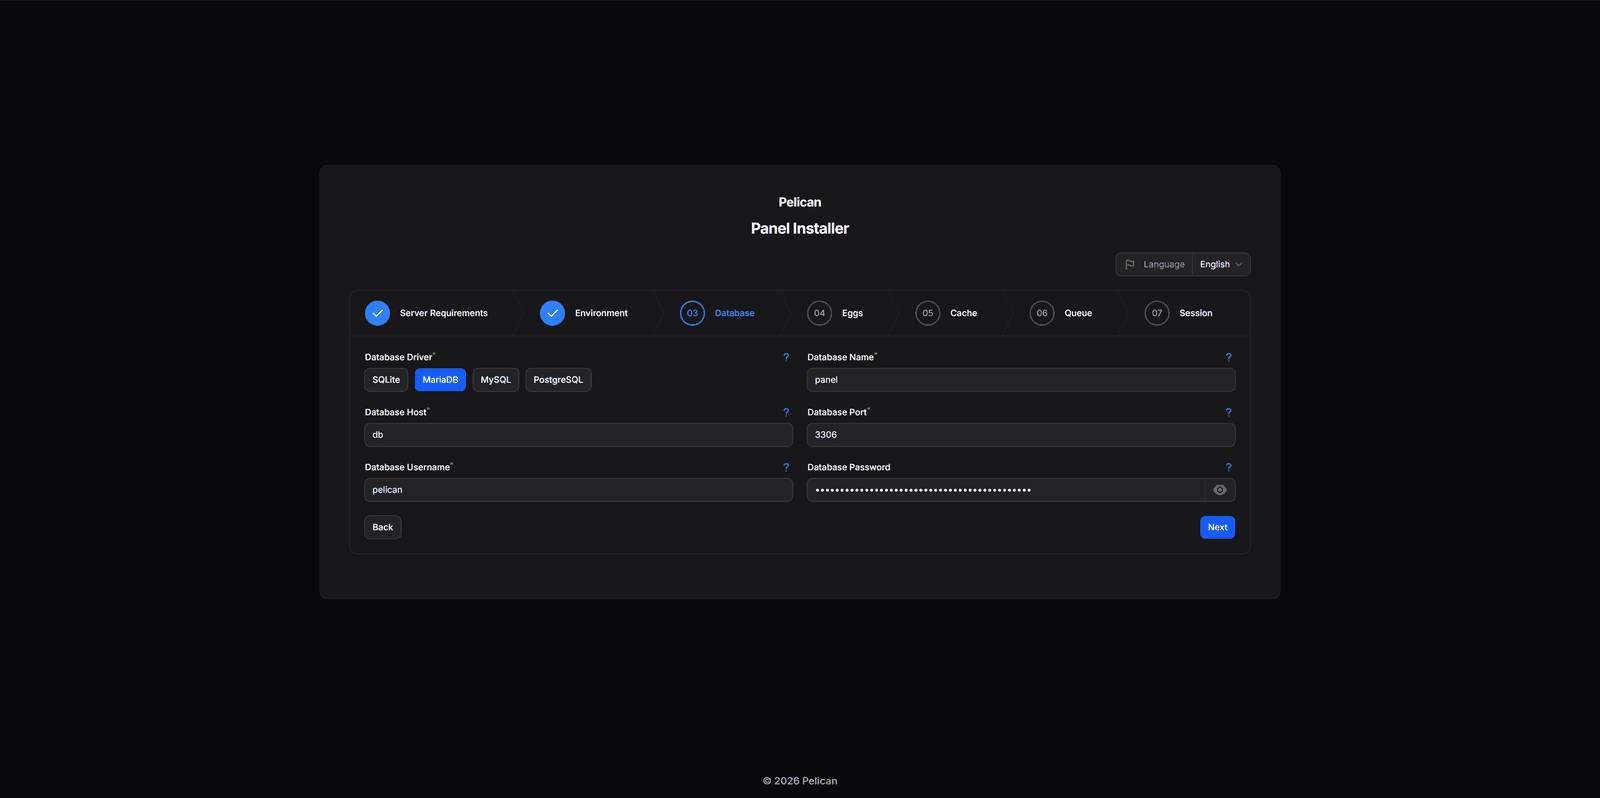
- Database: pick
MariaDBas the driver and enter:- Host:
db - Port:
3306 - Database:
panel - User:
pelican - Password: the value of
DB_PASSWORDfrom your.env. Look it up withgrep DB_PASSWORD /opt/pelican/.env.
- Host:
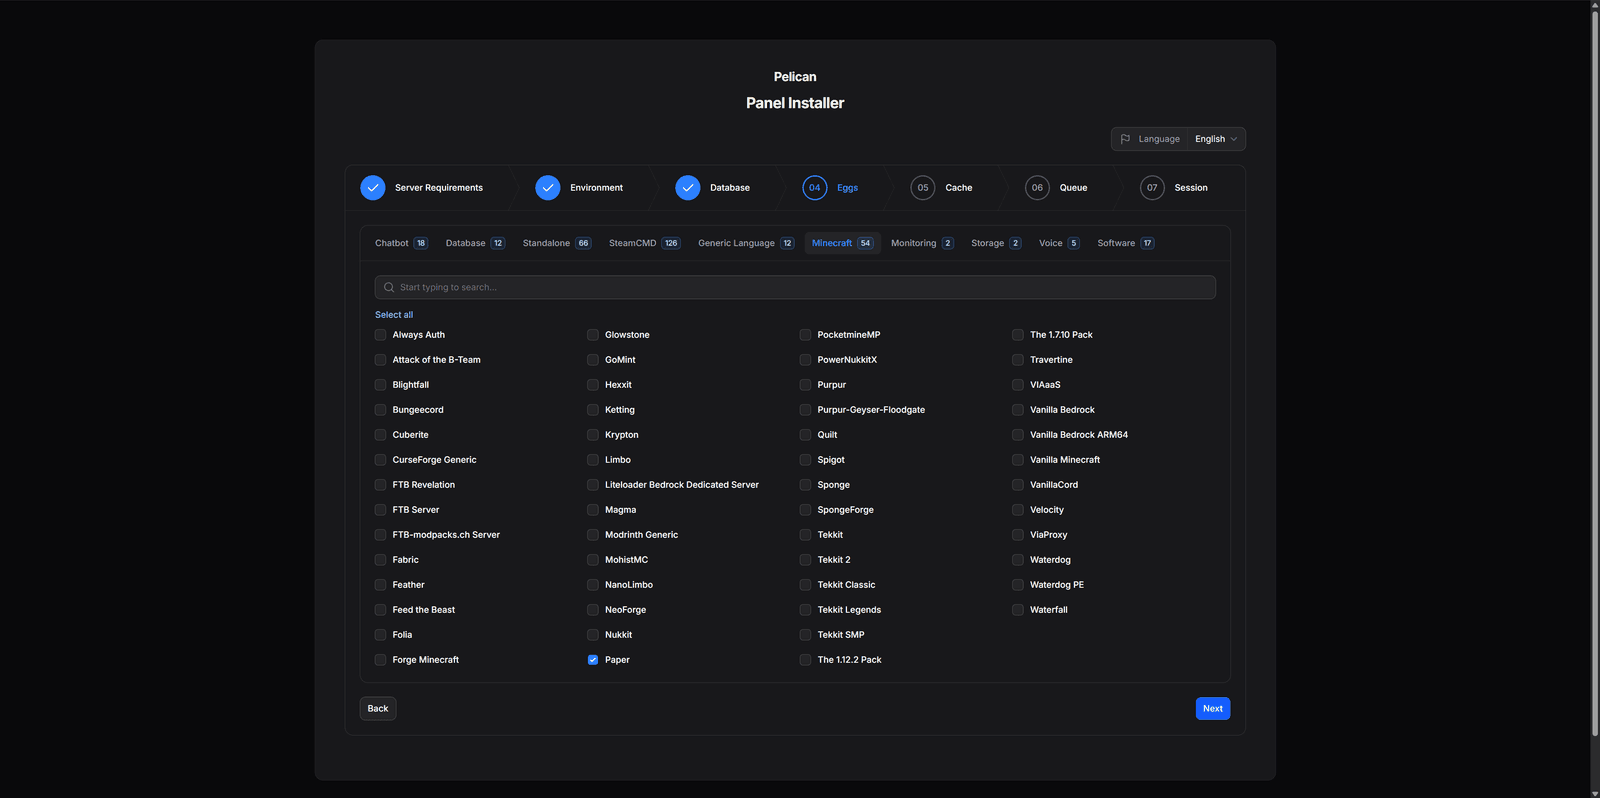
- Pick eggs: at this step Pelican offers a list of stock eggs to import directly (Minecraft, Rust, Valheim, ARK …). You can pick as many as you want here. For this tutorial we go with the Minecraft category and pick Paper as an example, because we set up a Minecraft server later on. Additional eggs can also be added after setup at any time.
- Cache: leave the default (
Filesystem). - Queue: leave the default (
Database). - Session: leave the default (
Filesystem).
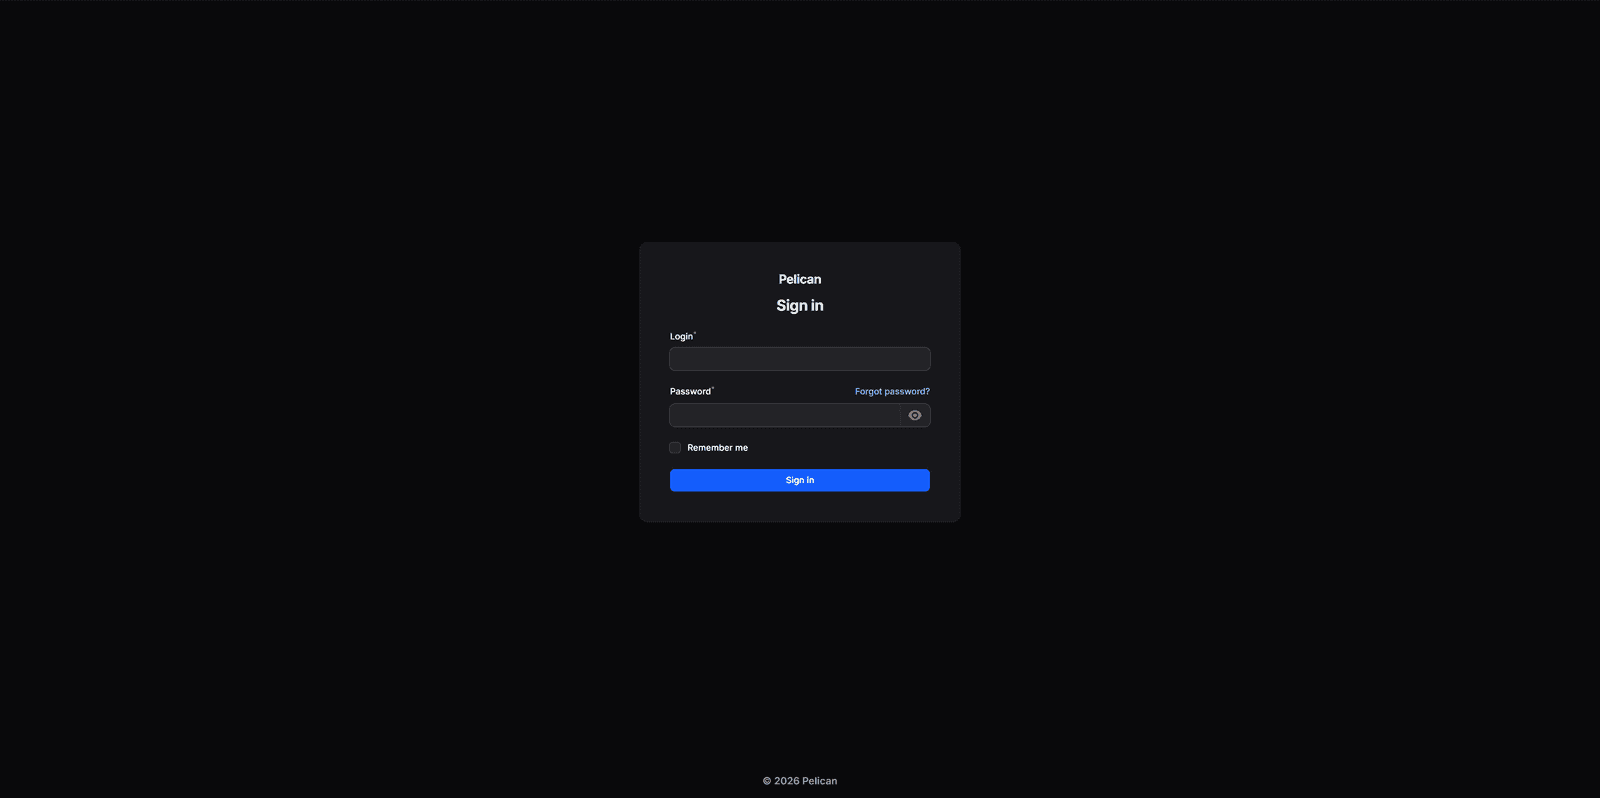
After the final step you land on the login page. Sign in with the admin credentials.
Save the APP_KEY
Before going any further, save the APP_KEY. Laravel uses this key to encrypt sensitive data such as sessions, stored tokens and a few database fields. If the key is lost, that data is unreadable after a restore even if the DB backup is intact. Grab the value now and store it somewhere safe (password manager, encrypted note):
docker compose exec panel grep APP_KEY /pelican-data/.env
You will not need the key day to day, but it becomes critical when restoring onto a new Seed.
Restart the Panel
Restart the panel container once:
docker compose restart panel
Why: Laravel caches configuration and routes in compiled PHP files. The installer updates .env and the database settings correctly, but the already-running PHP processes (including the queue worker and scheduler) do not re-read them on the fly. Without a restart, later background jobs (egg imports, backup tasks) can still run against the old defaults and fail. One restart after the installer finishes avoids that.
Add a Wings node in the Panel
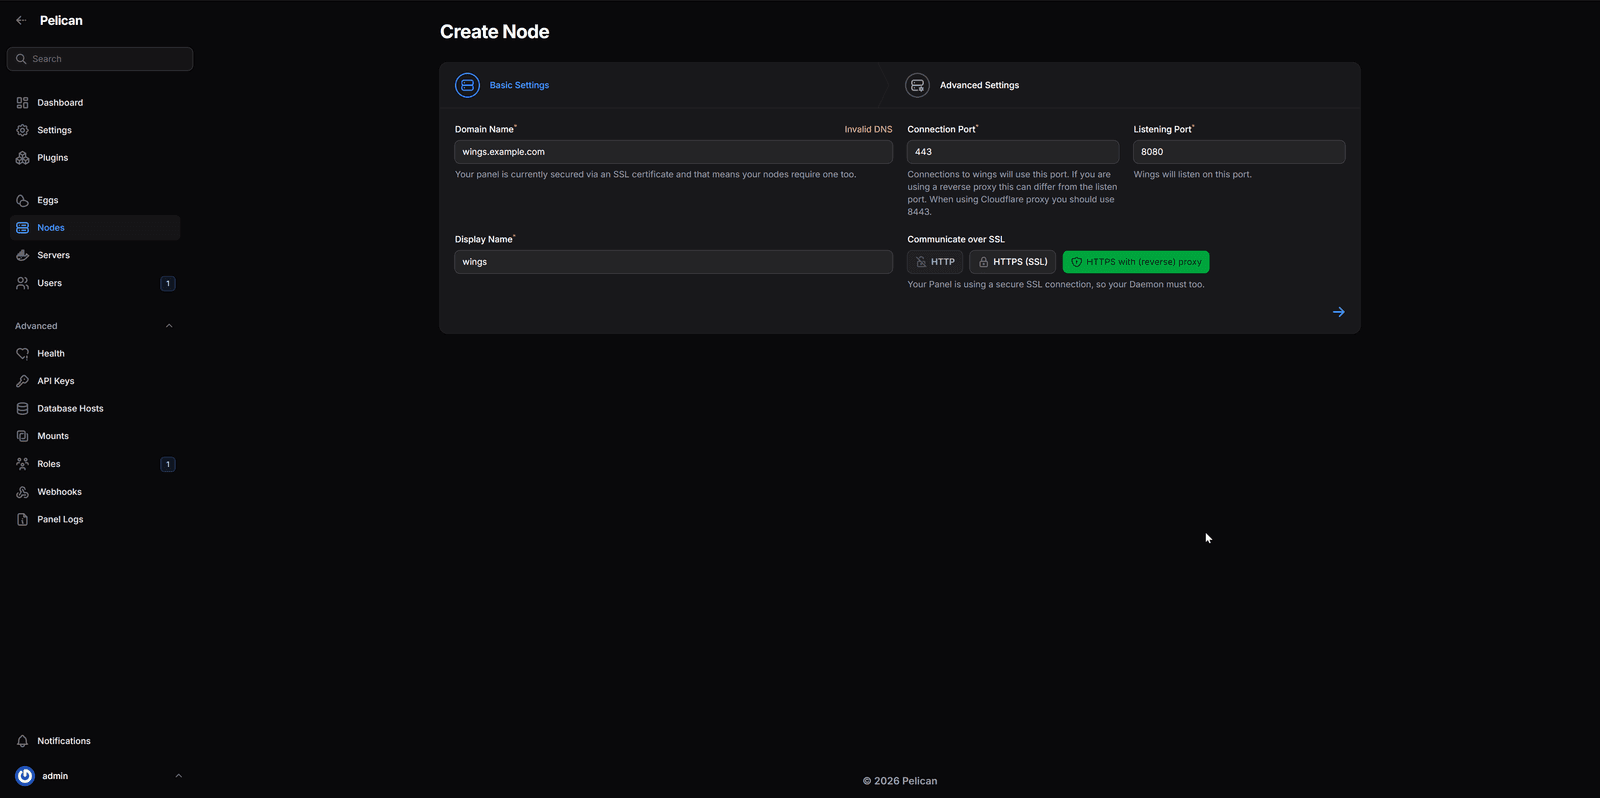
In the Panel, open Admin → Nodes → Click on the big + and fill in:
- Domain Name:
wings.example.com - Display Name:
local-seed(or any other label) - Communicate over SSL:
HTTPS with (reverse) proxy(third option in the dropdown). Pelican then sets Listen Port8080(internal port Wings binds to), Connect Port443(the one the Panel calls via Caddy), schemehttps, and the behind-proxy flag automatically.
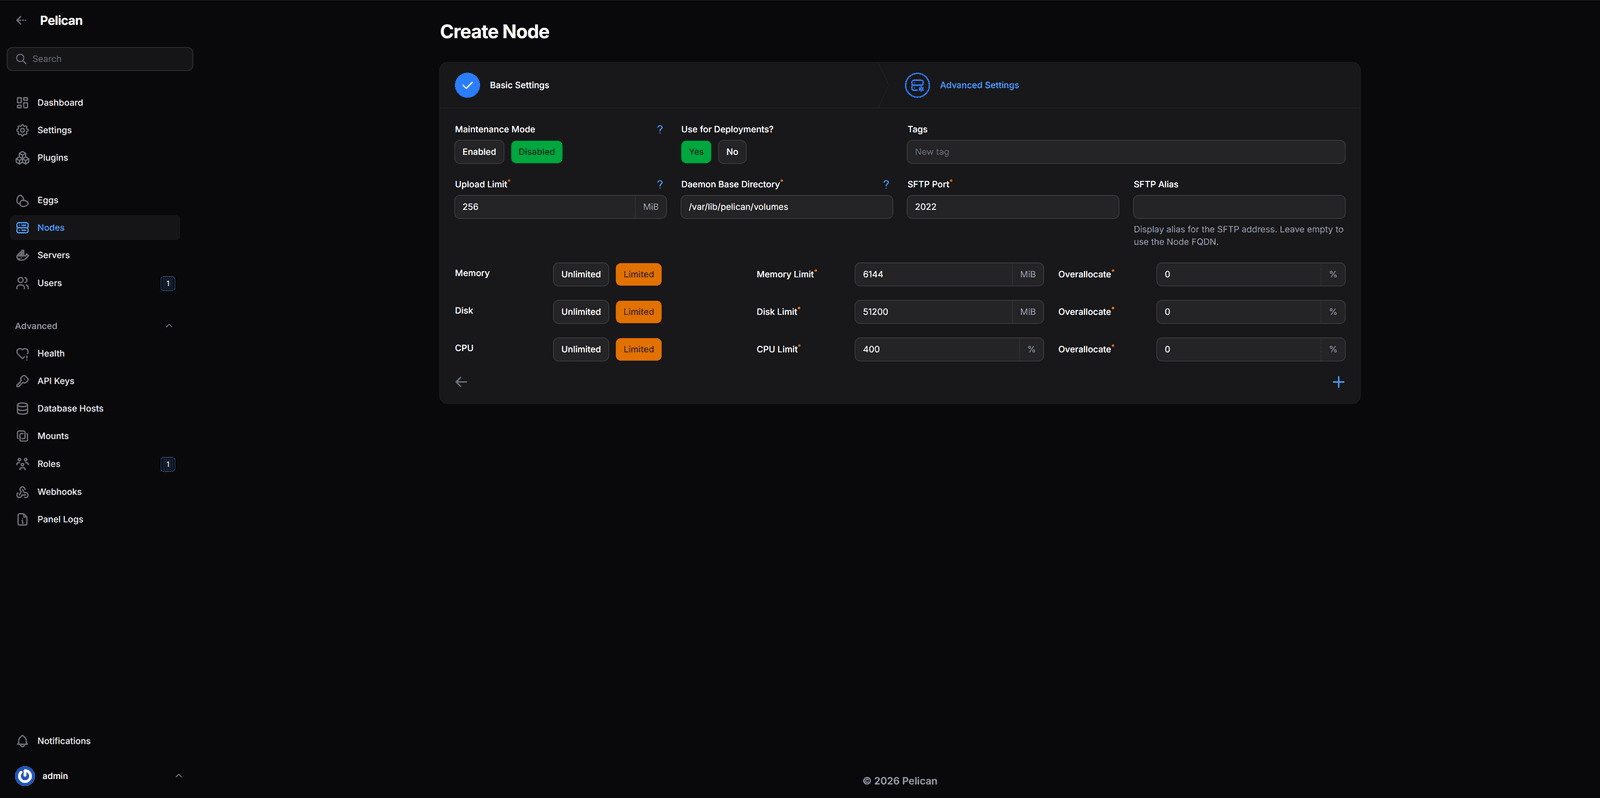
Next, fill in the resource limits that cap how much this node can hand out to game servers in total:
- Memory:
Limited· RAM Limit6144MiB · Overallocation0% - Disk:
Limited· Disk Space Limit51200MiB (≈ 50 GB, adjust to your Seed) · Overallocation0% - CPU:
Limited· CPU Limit400% (= 4 cores × 100 %) · Overallocation0%
The values target the recommended 4-CPU / 8-GB Seed: 6 GB of RAM for game servers leaves around 2 GB for Panel, Wings, MariaDB and the host system. With Overallocation 0 %, Pelican only hands out what is physically present. Higher values only make sense for commercial hosters running oversubscription; for a private setup, 0 % is the right choice.
Save. Pelican creates the node. Right after that, switch to the Configuration File tab. The generated Wings YAML config sits there. Anything not mentioned here we leave at its default.
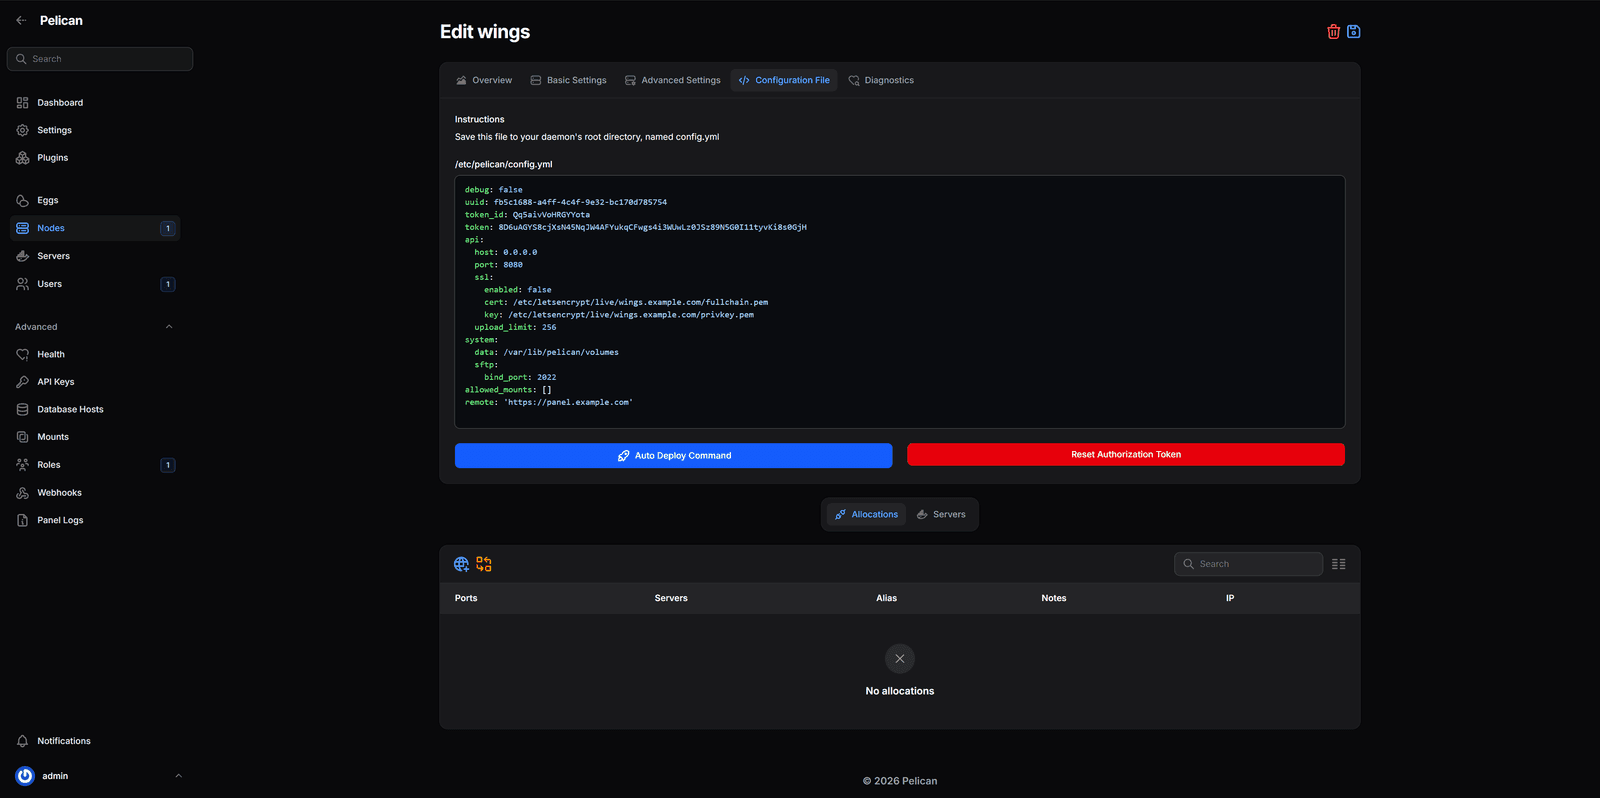
Copy that YAML onto the Seed:
nano /etc/pelican/config.yml
Paste the contents from the Panel and save. The generated file already has api.ssl.enabled: false set, which is what we want because Wings speaks plain HTTP internally and Caddy handles TLS.
Start Wings
With the config in place, Wings can now start:
docker compose up -d wings
Follow the startup:
docker compose logs -f wings
Wings registers with the Panel and starts sending heartbeats. Under Admin → Nodes, a green dot should appear next to the node after a few seconds. If it stays red, the troubleshooting section below covers the usual causes.
Add an allocation
For a game server to get a port, you need at least one allocation. Open the node in the Panel and switch to the Allocations tab:
- IP Address: the public IPv4 of your Seed. Wings runs in a container and does not know the host IPs out of the box, so the dropdown only shows container-internal addresses like
172.21.0.3. Click the keyboard icon to the right of the dropdown, enter the Seed IP there and submit. Docker on the host can bind to that IP because it actually lives on a host interface. - Ports:
25565for Minecraft, or a port range like25565-25570if you plan to host multiple servers
Click Submit. The allocation shows up in the list.
Create a Minecraft Paper server
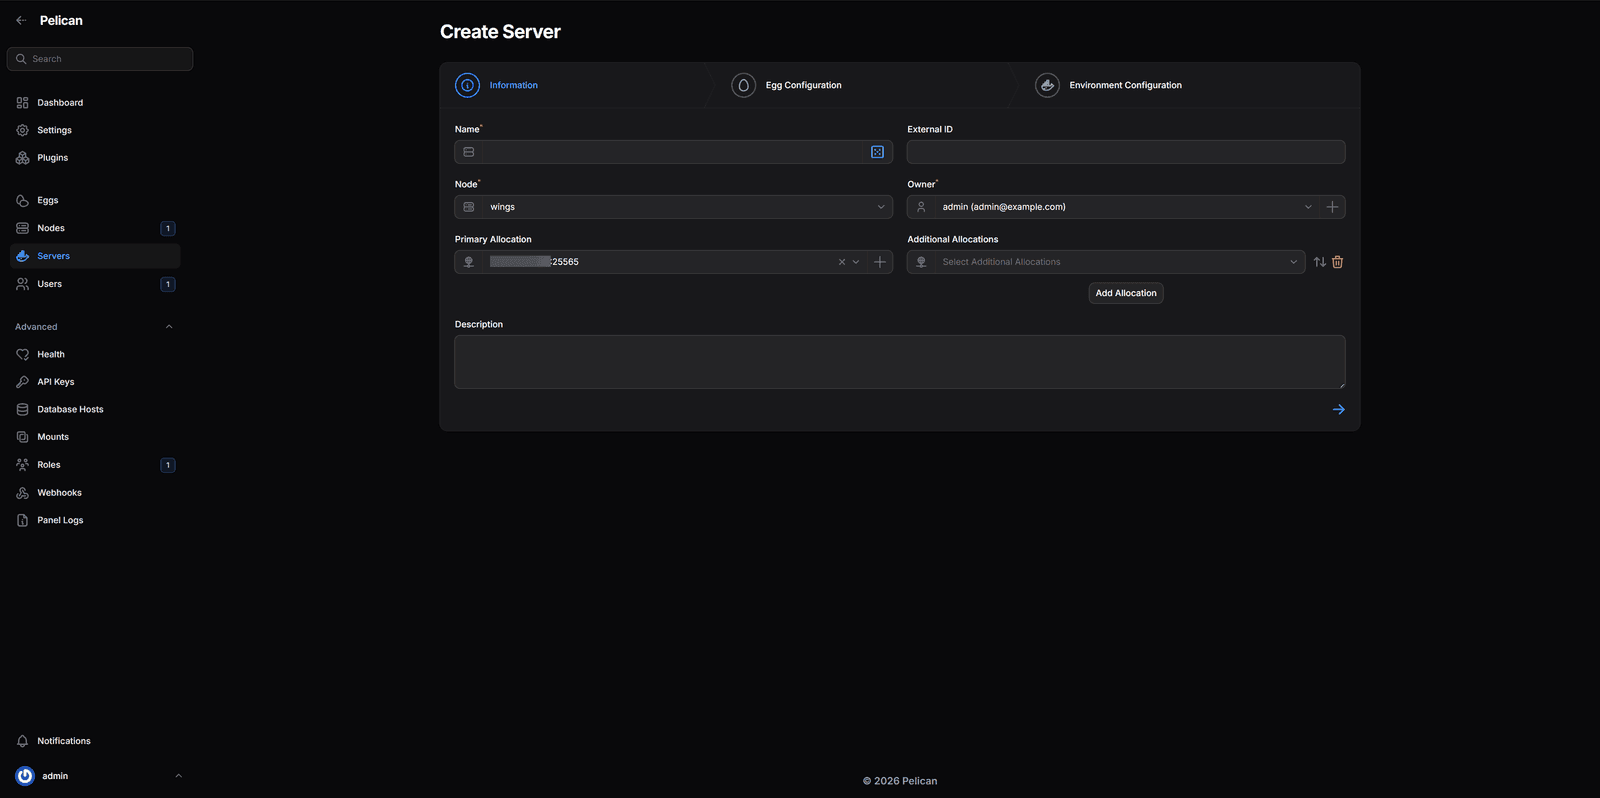
Now the actual fun: a real game server. Go to Admin → Servers → Create Server.
- Server Name:
My Minecraft Server - Server Owner: your admin account
- Node:
local-seed - Allocation: the 25565 allocation you just created
- Egg:
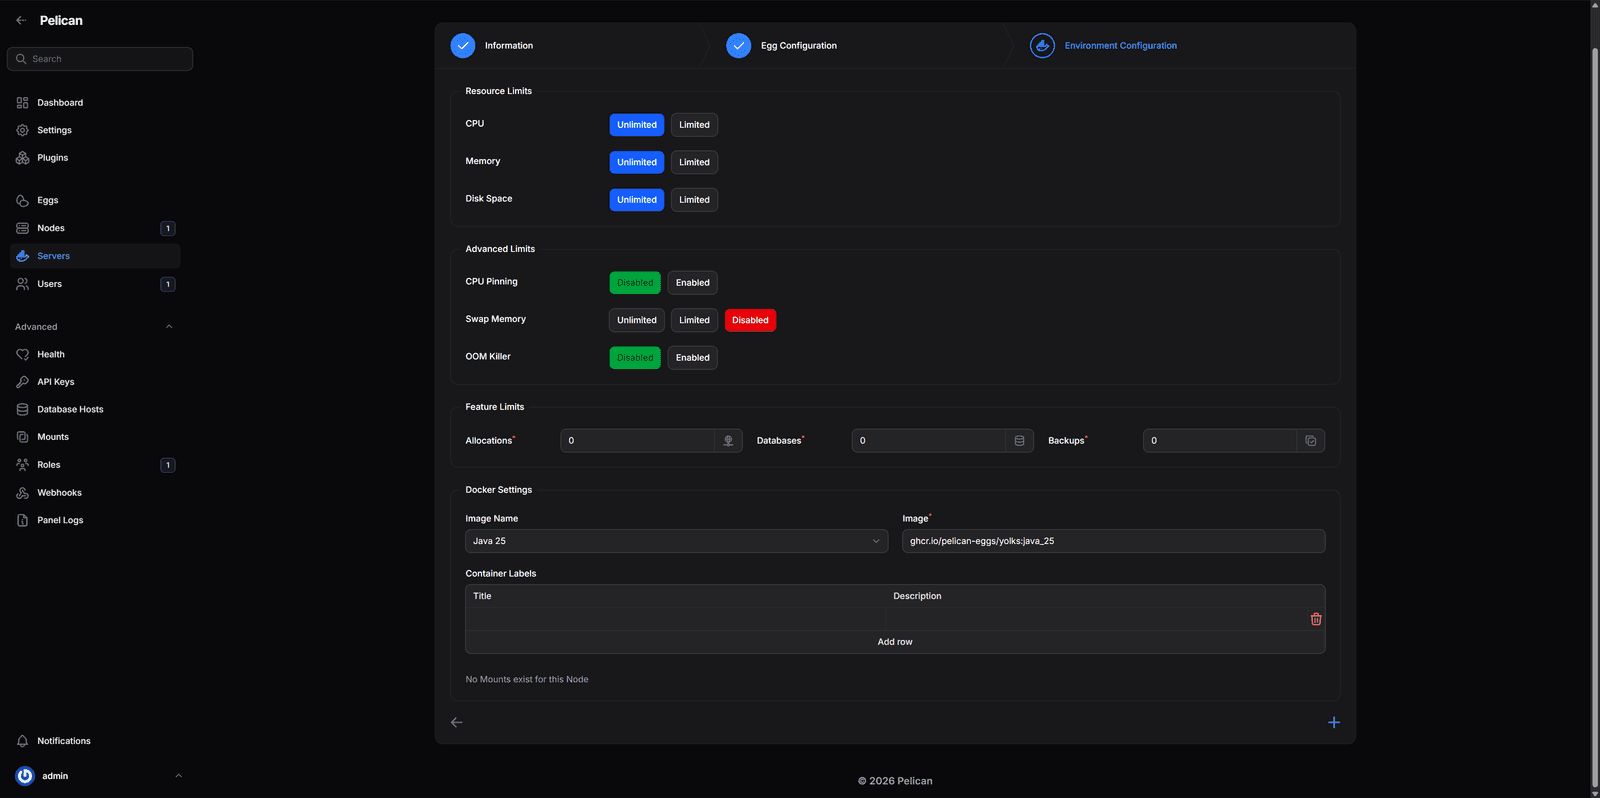
Paper(in the Minecraft Java category) - Resource limits:
- Memory: 2048 MiB
- Disk: 5000 MiB
- CPU Limit: 200 (two cores)
- Variables (the fields the Paper egg ships with; all three can stay on their defaults):
Minecraft Version:latestServer Jar File:server.jarBuild Number:latest
Click Create Server. Wings now pulls the matching Docker image, downloads the Paper JAR, generates the world and starts the server. You can watch the progress in the Panel console or via:
docker compose logs -f wings
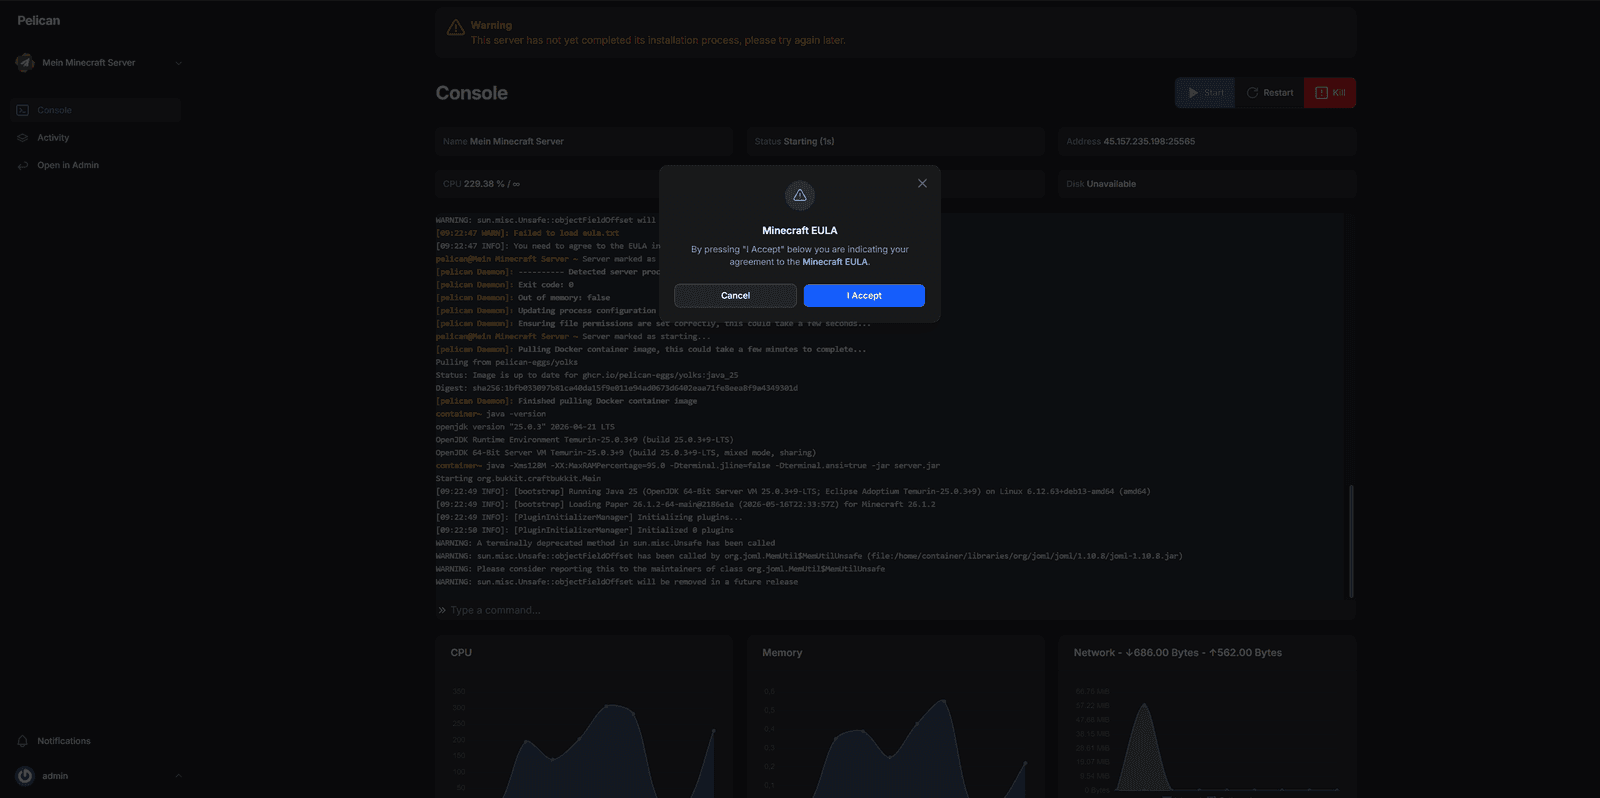
On first start, Paper stops and asks you to accept the Minecraft EULA. Right after creating the server, open the console icon in the top-right of the server view and wait for the EULA prompt to appear. Confirm it there. After that the server runs through to the Running state.
Open Minecraft Java Edition and connect to the Seed IP on port 25565. Unlike the admin browser, the player connection does not go through Caddy. It hits the game server container directly, so the domain is irrelevant for it. Only the IP and port matter.
Set up backups
Server backups in the Panel
Pelican comes with a built-in backup feature. In the Panel, open the server, switch to the Backups tab and click Create Backup. The backup lands as a ZIP under /var/lib/pelican/volumes/<server-id>/.backups/ on the host. You can also schedule backups under the Schedules tab.
Database backup
Game worlds and server files live on the filesystem, not in the database. The database does hold users, nodes, server configurations and audit logs. A daily database dump covers that metadata:
mkdir -p /opt/backups
docker compose exec -T db sh -c 'mariadb-dump -u root -p"$MARIADB_ROOT_PASSWORD" panel' > /opt/backups/panel-$(date +%Y%m%d).sql
The sh -c '...' form runs the dump inside the db container, where MARIADB_ROOT_PASSWORD is already set as an environment variable by the Compose file. That avoids exporting the password into your shell or grepping it out of .env.
As a cron job (crontab -e):
0 4 * * * cd /opt/pelican && docker compose exec -T db sh -c 'mariadb-dump -u root -p"$MARIADB_ROOT_PASSWORD" panel' > /opt/backups/panel-$(date +\%Y\%m\%d).sql
30 4 * * * find /opt/backups -name "panel-*.sql" -mtime +7 -delete
The first command creates a dump backup every day at 04:00 AM, the second deletes anything older than seven days.
Offsite backups via the dataforest cloud
The dataforest cloud offers automatic daily offsite backups as an optional add-on. They cover the whole Seed including game worlds and the database. Backups are off by default and need to be enabled in the cloud console.
Updates
Before updating Pelican, take a Seed snapshot in the dataforest cloud console. Snapshots are an optional add-on and capture the full Seed state including the database, game worlds and the APP_KEY. If an update breaks something, you are one click away from rolling back. This is especially important during the beta phase: Pelican regularly changes database schemas or config fields in this period.
Once the snapshot finishes, pull the new images and bring the stack back up:
cd /opt/pelican
docker compose pull
docker compose up -d
When the Panel container restarts, database migrations run automatically. Before upgrading, take a look at the Pelican release notes so you know what has changed.
Troubleshooting
Wings shows "Heartbeat failed" in the Panel:
Check the node fields: Domain Name (wings.example.com), Communicate over SSL (HTTPS with (reverse) proxy) and Connect Port (443). Then look at docker compose logs wings. Typical errors are a stale token in config.yml (re-copy the configuration from the Panel) or a TLS mismatch (api.ssl.enabled in config.yml has to be false because Caddy terminates TLS).
TLS error in the Panel right after creating the node (e.g. cURL error 35: TLS connect error … tlsv1 alert internal error):
Race condition just after first boot: Caddy is still fetching its Let's Encrypt certificate for wings.example.com (one to two minutes), and the Wings container itself needs a moment before it answers. The Panel polls immediately. Wait two to three minutes and reload the node page; the error clears itself once both the cert and Wings are ready. If it persists past five minutes, check docker compose logs caddy (ACME errors?) and docker compose logs wings (daemon up?).
Caddy fails to obtain a certificate:
Run docker compose logs caddy. ACME errors are right there in plain text. The most common cause: one of the DNS A records does not point to the Seed or has not propagated yet. Check with dig +short panel.example.com and dig +short wings.example.com. Caddy tries both the HTTP-01 challenge (port 80) and TLS-ALPN-01 (port 443) by default. At least one of the two has to be reachable from the internet, otherwise Let's Encrypt will not issue a certificate.
Console in the Panel does not connect (WebSocket error):
Usually a proxy or trusted-proxy issue. Make sure TRUSTED_PROXIES is set on the Panel service in the Compose file (private Docker CIDRs like 172.16.0.0/12,192.168.0.0/16,10.0.0.0/8) and that Caddy proxies wings.example.com to wings:8080 correctly.
Upload error in the Panel ("413 Payload Too Large"):
Usually a trusted-proxy symptom. If the trusted-proxy value is already correct, raise the limit at Caddy explicitly (Caddy's default is 10 MB; the Panel image can layer its own PHP upload caps on top). In /opt/pelican/Caddyfile, inside the Panel block:
{$PANEL_DOMAIN} {
    request_body {
        max_size 100MB
    }
    reverse_proxy panel:80
}
Then docker compose restart caddy.
Game server does not start or is not reachable:
The allocation IP has to be your Seed's public IPv4 (entered manually via the keyboard icon in the IP dropdown). An internal container bridge IP like 172.21.0.3 from the preselected dropdown does not work for external players, because it is only reachable inside the wings0 network.
"Permission denied" on the Docker socket:
The Wings container needs access to /var/run/docker.sock. Make sure the mount in the Compose file is correct and that the socket exists on the host (ls -l /var/run/docker.sock). On hosts with SELinux/AppArmor you may need additional labels. On a fresh dataforest Seed with Debian 13 that is not an issue.
Port 80 or 443 already in use:
Any other container that publishes 80 or 443 needs to stop before Caddy can start. Use ss -tlnp | grep -E ':80|:443' to find the conflicting process.
Firewall blocking ports:
If a firewall is running on the Seed (ufw, nftables, a cloud-level firewall sitting in front of the Seed, etc.), every port the stack exposes to the outside has to be open:
80/tcpand443/tcpfor Caddy (HTTP and HTTPS to the panel, ACME challenge)2022/tcpfor SFTP (Pelican Wings provides SFTP access to the game server files)25565/tcpfor the Minecraft server (or whatever port lives in the allocation)
Important: every additional allocation you create in the Panel for more game servers needs its port opened too. If you allocated a range like 25565-25570, open the whole range. The symptom of a missing rule is that panel logins time out from the outside, or that players cannot reach the game server even though it runs fine internally. A fresh dataforest Seed on Debian 13 ships with no active firewall unless you ran ufw enable yourself, so you would only hit this if you set one up deliberately.
Summary
After completing this guide, your Seed runs:
- Pelican Panel at
https://panel.example.comwith its own MariaDB - Pelican Wings as a daemon, reachable at
https://wings.example.com - Caddy as the TLS terminator for both subdomains
- A Minecraft Paper game server reachable via the Seed IP on port 25565
You can now create additional game servers directly in the Panel. For other games, pull in the matching egg via Admin → Eggs → Import Egg from the pelican-eggs GitHub organization. Eggs are grouped by category, each in its own repo: minecraft (Paper, Vanilla, Spigot, Forge, Fabric, NeoForge …), games-steamcmd (CS2, Rust, ARK, Valheim …), games-standalone (Terraria, Factorio …), voice, database, and more. Every game server gets its own console, its own SFTP login and one-click backups.
For a single, lean Minecraft or Valheim server without a panel, the direct setups in the Minecraft with Docker and Valheim with Docker guides are simpler. Wings can also be spread across separate Seeds to split the load or to isolate game servers by category. Our follow-up guide Scale Pelican with Multiple Wings Nodes walks through that setup with a WireGuard hub-and-spoke and a central Caddy. An overview of all options lives on our Game Server solution page.